|
When it comes down to it there is nothing better than manual tools for your Lock pick Set, whether they be retail, homebrew, macgyver style. DIY'ers look here.
 by femurat » 25 Sep 2008 4:21 by femurat » 25 Sep 2008 4:21
I'm making my first set based on "Bare Neccesities" templates by Bazooka Medic. I'm using street cleaning bristles and wiper blades cause my lock is too small for hack saw blades. 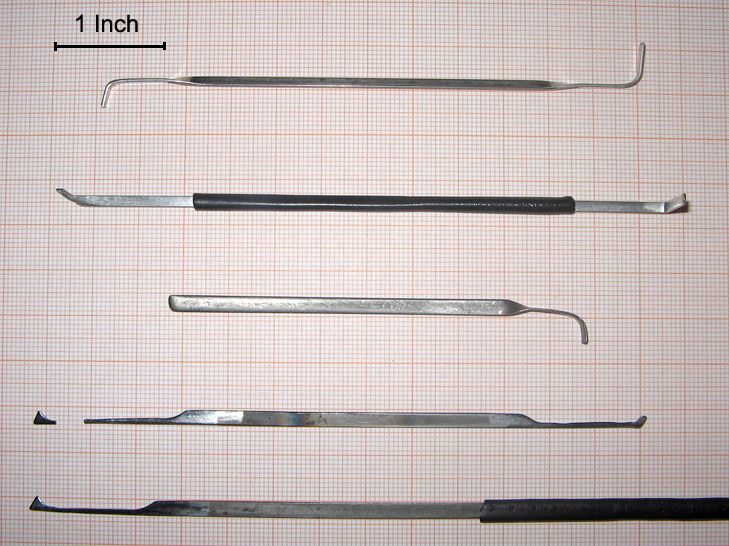 On the broken pick the left diamond was made heating the metal on my gas cooker, then it became easyer to file. At the end I tempered it in cold water. Unfortunately it broke at second use, so I had to review the creating process. The hook on the right was filed without heating the metal, and as you can see it's not broken yet. It's stronger than the other one, although the shape isn't perfect. The last pick is still under construction, I'm filing it without heating it so it wont broke so fast. Unfortunately the process is longer, but I think it's worth it. The handles are made of electric wires gum. They're not easy to slip on but is the fastest solution for me. Any suggestions? 
-

femurat
- Site Admin
-
- Posts: 3770
- Joined: 22 Sep 2008 9:06
- Location: Italy
by ToolyMcgee » 25 Sep 2008 5:05
femurat wrote:Any suggestions?
Your half diamonds are too big. You'll want them slightly smaller.
Your one half diamond broke because you got it too hot before quenching it in water. I can see the temperature was too high. Use motor oil next time and don't heat the metal until it glows. Maybe don't heat it at all.
An interesting first set.
-T'Mcgee
-
ToolyMcgee
-
- Posts: 640
- Joined: 27 May 2008 14:45
- Location: Indiana
by Arcturus » 25 Sep 2008 5:28
femurat wrote:On the broken pick the left diamond was made heating the metal on my gas cooker, then it became easyer to file. At the end I tempered it in cold water. Unfortunately it broke at second use, so I had to review the creating process.
Your pick broke because it was too brittle. You didn't go into a lot of detail about the steps you took, but I'm guessing that you probably have a misunderstanding of how the heat treatment process works. Heat treatment of steel picks is a complex subject, but without getting into the subtle technical details, you can think of it as a three step process - normalizing, hardening, and tempering.
When you heated the metal in your gas cooker and cooled it in air, you softened the steel. That's called "normalizing".
After you filed the pick to the shape you wanted, you probably reheated the pick in your gas cooker and dipped it in water, right? Well, dipping the hot metal into cold water (or oil as I prefer) is not "tempering". That's called "quenching". Quenching hardens the metal and leaves it in a stiff, brittle state that easily breaks under stress. If you try to use the pick at this point, it'll snap on you, as you found out.
What you need to do next is soften the metal to a resilient, spring-like state. That's called "tempering". Tempering is done by laying the hardened pick on a slab of steel heated to red-hot. Some folks just use a torch for this, which is fine when it works, but it's not as repeatable as using a hot slab. The slab will gently heat the pick and cause it to change colors. When the surface of the pick changes to a blue color the tempering is done. Remove it from the heat and either let it air cool or quench it. The blue color can be sanded away or polished off pretty easy if that's what you want.
When you heat treat your picks correctly, you'll end up with a durable, long-lasting tool. Hope this helps ya.
Arcturus
-
Arcturus
-
- Posts: 16
- Joined: 21 Sep 2008 8:08
by femurat » 25 Sep 2008 7:51
Thanks ToolyMcgee, I'll file the half diamond a little.
I think you're right cause i found a bit difficult to move the pick between the pins when I tried it.
Arcturus, I read many topics in this forum about heat treatment, but I was still confused. Your schema was very clarifying for me, thank you.
You're right guessing my process:
1) normalization of the metal
2) filing by hand
3) quenching in water (next time in motor oil)
4) cleaning with a sort of dremel.
Now I know that I confused the tempering technique, so I still have one step to follow.
I don't have special equipment and I'm not going to buy it for now. I'll ask a friend to borrow me his torch and I''l try to follow Your tip. Let's see how it works.
I think I can finish this first pick and practice for a few days with it before starting to build the snake pick.
Ceers 
-
femurat
- Site Admin
-
- Posts: 3770
- Joined: 22 Sep 2008 9:06
- Location: Italy
by femurat » 29 Sep 2008 7:28
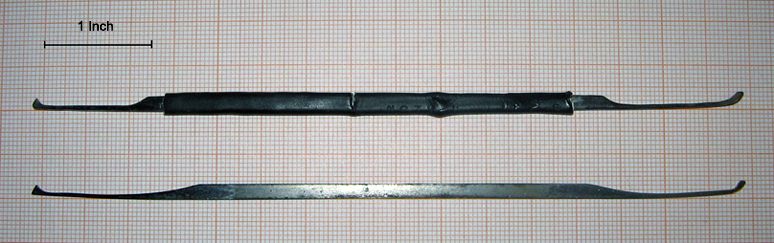 The first one is the same of previous photo, now finished with the hook. I filed a little the half diamond as ToolyMcgee suggested. I know, I have to reduce a little the hook too. The second one is a copy I made to practice. Next step is the handle, electric wire insulation, as usual. See you soon...
-
femurat
- Site Admin
-
- Posts: 3770
- Joined: 22 Sep 2008 9:06
- Location: Italy
by cppdungeon » 4 Oct 2008 23:30
get some sandpaper. thats my advice. I had unpolished picks for 2 years and just polished them and you can feel the lock much much better.
-
cppdungeon
-
- Posts: 314
- Joined: 6 Mar 2005 22:14
- Location: Southern California
-
by savs2k » 5 Oct 2008 2:52
have you tried making any ball picks? i still cant get it done right.
-
savs2k
-
- Posts: 134
- Joined: 7 Nov 2006 23:48
by femurat » 6 Oct 2008 4:02
cppdungeon wrote:get some sandpaper. ...
Sure, that's next step in my mind. I'm going to polish all my picks with an abrasive rubber wheel of my dremel-like tool. I want them shining!
Is there a reason to prefer sandpaper? I also have a paper of 600 wet-dry if needed...
-
femurat
- Site Admin
-
- Posts: 3770
- Joined: 22 Sep 2008 9:06
- Location: Italy
by femurat » 6 Oct 2008 4:04
savs2k wrote:have you tried making any ball picks? i still cant get it done right.
Now I'm working on my first rake, then may be I'll try an half ball.
-
femurat
- Site Admin
-
- Posts: 3770
- Joined: 22 Sep 2008 9:06
- Location: Italy
by LearningTheArt » 6 Oct 2008 14:56
Nice, but I don't think its really necessary to temper the picks themselves, I would save that for your tension wrench. Nice picks though, can't wait to see how your rake turns out for you.
-
LearningTheArt
-
- Posts: 46
- Joined: 24 Aug 2008 20:39
by femurat » 7 Oct 2008 3:15
This is my rake 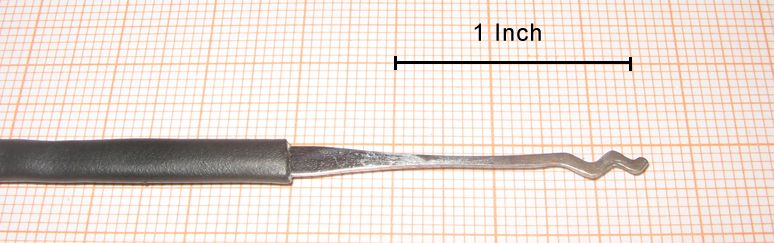 I tried it with my padlock: it's fantastic! I opened it in less than 5 minutes (last time it took 10 minutes).
-
femurat
- Site Admin
-
- Posts: 3770
- Joined: 22 Sep 2008 9:06
- Location: Italy
by cppdungeon » 7 Oct 2008 19:06
sandpaper will actually take rub off all the metal around scratches gently, so its smooth and shiny. I also imagine its easier to do it gently on small picks with paper as opposed to a high speed tool, and it eliminates the high-speed-flying-metal danger...If you try it, let me know how it turns out though, because i imagine it would be faster
-
cppdungeon
-
- Posts: 314
- Joined: 6 Mar 2005 22:14
- Location: Southern California
-
by ady1989 » 9 Oct 2008 13:30
Your half diamonds are too big and the shafts are WAY too skinny. No wonder it broke. Don't be afraid of leaving a lot of material on the shaft, those bristles are thin anyway. Good luck
-
ady1989
-
- Posts: 96
- Joined: 21 Oct 2005 1:41
by femurat » 10 Oct 2008 5:09
cppdungeon wrote:sandpaper will actually take rub off all the metal around scratches gently, so its smooth and shiny. I also imagine its easier to do it gently on small picks with paper as opposed to a high speed tool, and it eliminates the high-speed-flying-metal danger...If you try it, let me know how it turns out though, because i imagine it would be faster
I tried the abrasive rubber disc and I'm not completely satisfied. The gum is too gentle, so the flatten surfaces are shining but there are some edges left. I think that sandpaper is more effective on the edges, the gum disk is faster and softer but should be used just for final effect. This weekend I'll try a bit of sandpaper (600) just to smooth the edges, then I'll give a final touch with the rubber disk. Let's see how it works.
-
femurat
- Site Admin
-
- Posts: 3770
- Joined: 22 Sep 2008 9:06
- Location: Italy
by femurat » 10 Oct 2008 5:29
ady1989 wrote:Your half diamonds are too big and the shafts are WAY too skinny. No wonder it broke. Don't be afraid of leaving a lot of material on the shaft, those bristles are thin anyway. Good luck
Now that you mentioned it... I was too concentrated on getting a straight line and maybe I filed too much the shafts to correct them. Next time I'll be more focused on the whole shape of the pick. By the way, is there another template that you can suggest me? Or I can give another try with this? Thank You!
-
femurat
- Site Admin
-
- Posts: 3770
- Joined: 22 Sep 2008 9:06
- Location: Italy
Return to Lock Picks
Who is online
Users browsing this forum: No registered users and 20 guests
|


