|
Tool recommendations, information on your favorite automatic and/or mechanical lockpicking devices for those with less skills, or looking to make their own.
 by Mad Mick » 16 May 2005 19:11 by Mad Mick » 16 May 2005 19:11
Have you been taking graphic art classes or something?
 Sort of... What 3D modelling software do you use, Mick?
I've been using a program that a friend of mine has, 3D studio max, but I get the feeling I've been bugging him  It's pretty pricey too so I won't be buying it myself.  After doing a bit of searching for a cheap(er) alternative, I found this: http://www.blender3d.com/cms/Home.2.0.htmlAnyone used this? Looks pretty good from the picture and the best thing is.....it's free!!! Sooooo, I downloaded & installed it.....ran it....played around and scratched my head.  Guess I'll have to RTFM.  I can see the idea of a bump-key-like tool for a tubular lock, but what's the point? Most can be opened in a short time by the normal tool, and any bumper machine is likely to cost just as much?
True, but it would be cool to dream up another way of doing things and then make a tool to do it. We have a lathe at work, so it wouldn't be a problem to knock up a sleeve or two after hours, or even in the lunch hour. The most important factor would be the angle of the groove, and having a smooth surface for the pins to move easily. Perhaps a Dremel could be carefully used to make the groove, but the metal would have to be pretty hard-wearing, otherwise the guide pins could start 'pocketing' (correct term?) where the repeated backlashes occur...
I think this thing could work...assuming there is a backlash. If not, the groove could be made to go the other way and apply slight rotation as the centre punch is pushed and 'gives'.
Any ideas as to which way would be best?  If it ain't broke.....pull it down and see how it works anyway!
-
Mad Mick
-
- Posts: 2314
- Joined: 8 Jan 2004 19:19
- Location: UK
by vector40 » 16 May 2005 19:49
I've heard some good things about Blender, though I'm not sure it's really made for this sort of modeling. But don't quote me on that.
-
vector40
-
- Posts: 2335
- Joined: 7 Feb 2005 3:12
- Location: Santa Cruz, CA
by Mad Mick » 16 May 2005 20:04
Looks pretty good at first glance. I guess playing around with it will be the best practice, roll on Saturday!
If it ain't broke.....pull it down and see how it works anyway!
-
Mad Mick
-
- Posts: 2314
- Joined: 8 Jan 2004 19:19
- Location: UK
by n2oah » 21 May 2005 23:25
Mad Mick wrote:Does this help to explain things better: 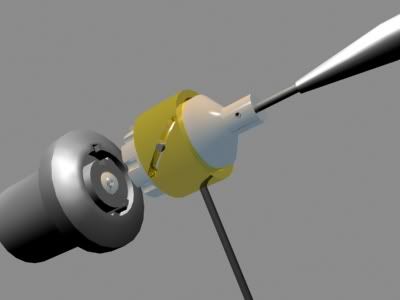
No, but you are obviously very skilled with CAD!
Perhaps you could generate other views of the snapgun to help me/us understand?
-
n2oah
-
- Posts: 3180
- Joined: 13 May 2005 22:03
- Location: Menomonie, WI, USA
-
by Surfer » 12 Jun 2005 17:47
Not to discourage you, but have you ever used a normal tubular pick before? Usually, it should take no more than 5-10 seconds to do it manually, so I don't see the advantage of having a tubular pick gun. Furthermore, it might actually be more difficult to use since tubular picks rely on tension and a tubular pick gun would probably use too much force as it pounds back and forth.
The only times I've had problems are with tubular locks that are old and rusted, but a tubular pick gun wouldn't solve that problem either. However, it would be interesting if you put together such a design, perhaps using the parts from an old southord pick that you got for cheap (you know, the old school ones that use rubber bands) and a common crest electric toothbrush.
Also, if you want to build a prototype, HPC does sell the replacement feelers individually, so you could buy those cheaply and put them into your prototype.
-
Surfer
-
- Posts: 14
- Joined: 3 May 2005 22:28
by Nasydave » 30 Jul 2005 15:57
TOWCH wrote:I like the punch idea. It reminds of a impact punchdown tool I've used while terminating CAT5 cable. How I would do it would be take a blank, cut to half a cut higher than all lowest cuts, and fix it to the punchdown tool. The problem with this setup is the force is transfered into the rest of the lock as much as the pins.
One idea I had re: a tubular snap gun: If you've ever seen these toy guns that shoot foam darts - the gun has a wooden shaft with a spring around it. The dart is a foam tube that slides down on the shaft, compressing the spring. There is a plastic "hook" that holds the dart until the trigger is pulled.
I would modify the tip of the shaft to include a very short section of tubing and a torsion pin to apply turning pressure to the lock. The tubing would be just long enough to be on the pins. Instead of a foam dart on the shaft, I would place a sliding weight. When you pull the trigger, the weight goes forward on the shaft, hitting the short section of tubing, which tranfers the impact to the pins.
-
Nasydave
-
- Posts: 159
- Joined: 7 Nov 2003 2:03
by sillyboy » 30 Jul 2005 16:13
one guy so far here has actually come up with the correct method.......
-
sillyboy
-
- Posts: 34
- Joined: 26 Jul 2005 15:46
- Location: Liverpool
by TOWCH » 30 Jul 2005 21:11
Who is that?
-
TOWCH
-
- Posts: 1587
- Joined: 20 Jul 2004 0:19
- Location: Oregon
by Chrispy » 15 Nov 2005 1:37
What do you need? Simply put the needle into the keyway and pull the trigger (whilst applying tension) until the lock opens. If you don't know how to use a pick gun, maybe you shouldn't really have it. No offense.
Different needles for different occasions. To change a needle, loosen the lug holding the needle in, pull it out and put in a new needle the tighten the lug. The dial at the back is the tension (how hard the needle snaps), adjust it to your needs.
HTH  
Some things may be pick proof, but everything can be bypassed....
-
Chrispy
-
- Posts: 3569
- Joined: 24 Mar 2005 15:49
- Location: GC, QLD
-
by kmit028 » 18 Nov 2005 2:31
Chrispy wrote:What do you need? Simply put the needle into the keyway and pull the trigger (whilst applying tension) until the lock opens. If you don't know how to use a pick gun, maybe you shouldn't really have it. No offense. Different needles for different occasions. To change a needle, loosen the lug holding the needle in, pull it out and put in a new needle the tighten the lug. The dial at the back is the tension (how hard the needle snaps), adjust it to your needs. HTH
Ok, this is what I dont understand; how do I use the tension wrench, where exactly do I put it (i.e. which part of the key-hole) and then how do i apply the tension? I would really appreciate if u could provide me a simple diagram of the tension wrench is to be used. If u or anyone can help, Ohh, that would be great, but thanks anyway for the first reply.
-
kmit028
-
- Posts: 2
- Joined: 15 Nov 2005 1:18
by digital_blue » 18 Nov 2005 2:50
Sorry kmit, but it's not a magic wand. It requires that you understand how it works, why it works, etc. You really should consider researching lockpicking a bit. have a read through the MIT Guide to Lockpicking. If your interest in this topic is that of someone who is interested in the hobby of lockpicking you'll find this to be a valuable read. If your only interest is in getting into places quickly, I'm afraid this is probably not the place for you.
db
-
digital_blue
- Admin Emeritus
-
- Posts: 9974
- Joined: 6 Jan 2005 15:16
- Location: Manitoba
-
by dxlocks » 18 Nov 2005 3:18
n2oah wrote:Mad Mick wrote:Does this help to explain things better:
No, but you are obviously very skilled with CAD! Perhaps you could generate other views of the snapgun to help me/us understand?
Am i correct in saying the white part of the pick is pulled back via the wire and snapped back at the lock? __________________________________________
-
dxlocks
-
- Posts: 44
- Joined: 13 Nov 2005 2:24
- Location: AUS!
by Mad Mick » 18 Nov 2005 20:19
dxlocks wrote:Am i correct in saying the white part of the pick is pulled back via the wire and snapped back at the lock?
The idea was that the white part is either a modified tubular key, or a purpose built part that has the deepest cuts for each pin. The bit on the top right is an automatic centre-punch and is secured to the 'pick' with a grub screw. There are two pins attached to the 'pick', which ride along the grooves in the yellow collar.
The method I thought may have worked, at that time, was that you get a small bounce-back from the punch tip as the internals 'snap', and that could be used to turn the pick via the grooves in the sleeve. However, looking at the picture again after having a long break from this brain-fart and re-thinking how the punch works, I realise that it wouldn't work this way. At the point of the punch 'snapping', the energy has not yet been transferred to the pins, so trying to turn the pick at this stage is useless.
With the grooves in the sleeve as they are now, continued forward pressure on the punch would attempt to turn the pick CCW after the 'snapping' operation, since no-one is able to precisely release pressure at the exact moment the punch 'snaps'. If the grooves were reversed, however, the forward pressure would attempt to turn the pick CW.
All of this is purely hypothetical, as the pick has never been built and is not likely to be anywhere in the near future. Another point to be considered is that in order to both unlock and relock, you would need two tools...an 'unlocker' with the grooves in the current image reversed, and a 'locker' with the grooves as they are.
When you think about how bumping works in regular pin-type locks, this idea is far too complicated to make and use. You could just cut a normal tubular key to the deepest cuts, file a small amount of material from the tip of the key, stick a tension wrench through the hole in the bow, then tap away.
I'd bet that it could be made to work, but I think it would only appeal to the James Bond wannabe's and would be listed alongside the jacknife picks. If it ain't broke.....pull it down and see how it works anyway!
-
Mad Mick
-
- Posts: 2314
- Joined: 8 Jan 2004 19:19
- Location: UK
Return to Lock Pick Guns, EPGs, Snappers
Who is online
Users browsing this forum: No registered users and 28 guests
|