Lock Picking 101 Forum
A community dedicated to the fun and ethical hobby of lock picking.
       

Lock Picking 101 Home
Login
Profile
Members
Forum Rules
Frequent Forum Questions
SEARCH
View New Posts
View Active Topics


Live Chat on Discord
LP101 Forum Chat
Keypicking Forum Chat
Reddit r/lockpicking Chat


Learn How to Pick Locks
FAQs & General Questions
Got Beginner Questions?
Pick-Fu [Intermediate Level]


Ask a Locksmith
This Old Lock
This Old Safe
What Lock Should I Buy?


Hardware
Locks
Lock Patents
Lock Picks
Lock Bumping
Lock Impressioning
Lock Pick Guns, Snappers
European Locks & Picks
The Machine Shop
The Open Source Lock
Handcuffs


Member Spotlight
Member Introductions
Member Lock Collections
Member Social Media


Off Topic
General Chatter
Other Puzzles


Locksmith Business Info
Training & Licensing
Running a Business
Keyways & Key Blanks
Key Machines
Master Keyed Systems
Closers and Crash Bars
Life Safety Compliance
Electronic Locks & Access
Locksmith Supplies
Locksmith Lounge


Buy Sell Trade
Buy - Sell - Trade
It came from Ebay!


Advanced Topics
Membership Information
Special Access Required:
High Security Locks
Vending Locks
Advanced Lock Pick Tools
Bypass Techniques
Safes & Safe Locks
Automotive Entry & Tools
Advanced Buy/Sell/Trade


Locksport Groups
Locksport Local
Chapter President's Office
Locksport Board Room
 

Lever padlock picking (commercial picks + basic wires)

European hardware -lever locks, profile cylinders specific for European locks. European lock picks and European locks.

Lever padlock picking (commercial picks + basic wires)

Postby Solomon » 26 Mar 2013 19:43

fgarci03 asked me about the picks I used to open a couple of lever padlocks in another thread, and my reply got a bit out of hand so at the risk of de-railing that thread I've decided to start this one instead. I was just gonna PM this but I figure someone else might also benefit from the info. :mrgreen:

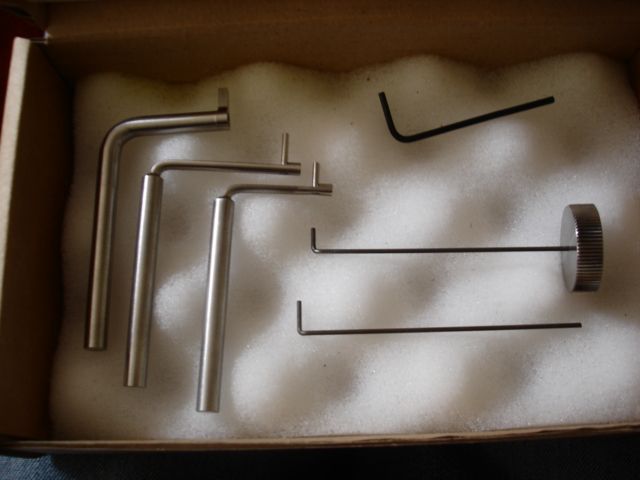
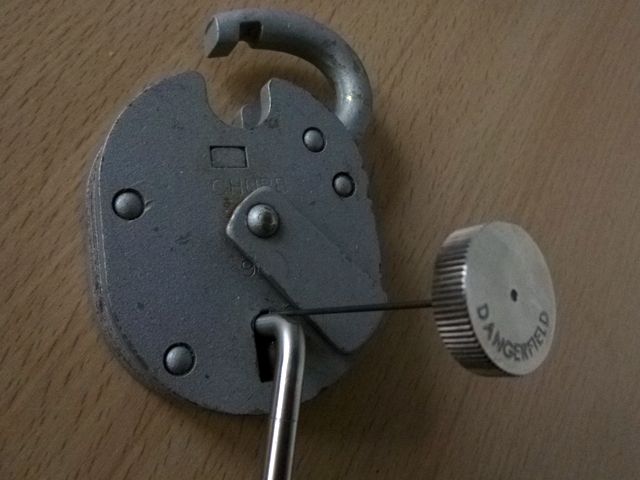
So, I have a set of commercial picks for these made by Dangerfield that I bought quite a few years ago and never got any real use out of them until recently. He had specifically asked me which locks they're suitable for, so this was my response and subsequent going-off-the-railery...

I can't give you a comprehensive list of what they will open, but they're suitable for pretty much any of the modern lever padlocks you're likely to run into in the UK. They definitely work on the chubb cruiser and battleship (possibly the chubb london as well), ERA big 6, ERA 975, squire 440 and 660 (and maybe the valiant HSV), some ACE, some yale, and I've seen one called the "bulldog" being opened with them too but I'm not sure if that's the name of the company that makes them or if it's just the model.

Some locks have keyways that are too small for the smallest wrench (eg. squire 220), or the post is too big for the big one to fit over (eg. some yales). But basically as long as one of the wrenches fits into the back of the keyway and grabs the bolt properly, you're sorted. If it doesn't go into the keyway, or it goes all the way in but it just spins past the bolt without hooking into it, they're not gonna do the job. One of the chubb cruiser padlocks I have was a very tight fit getting over the post and I did manage to tap it in with the handle of a pair of pliers, but that is the exception to the rule. I knew for a fact that the pipe-key style wrench is supposed to fit those padlocks, so I took the risk and luckily it turned out fine. Other than that though, if it doesn't wanna go, don't force it.

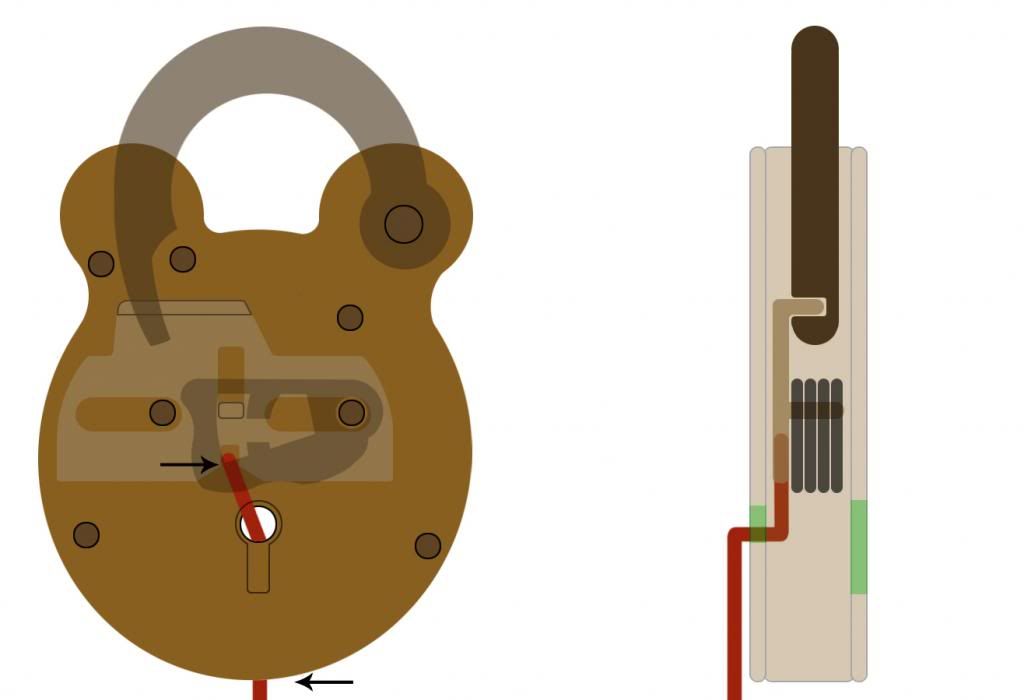
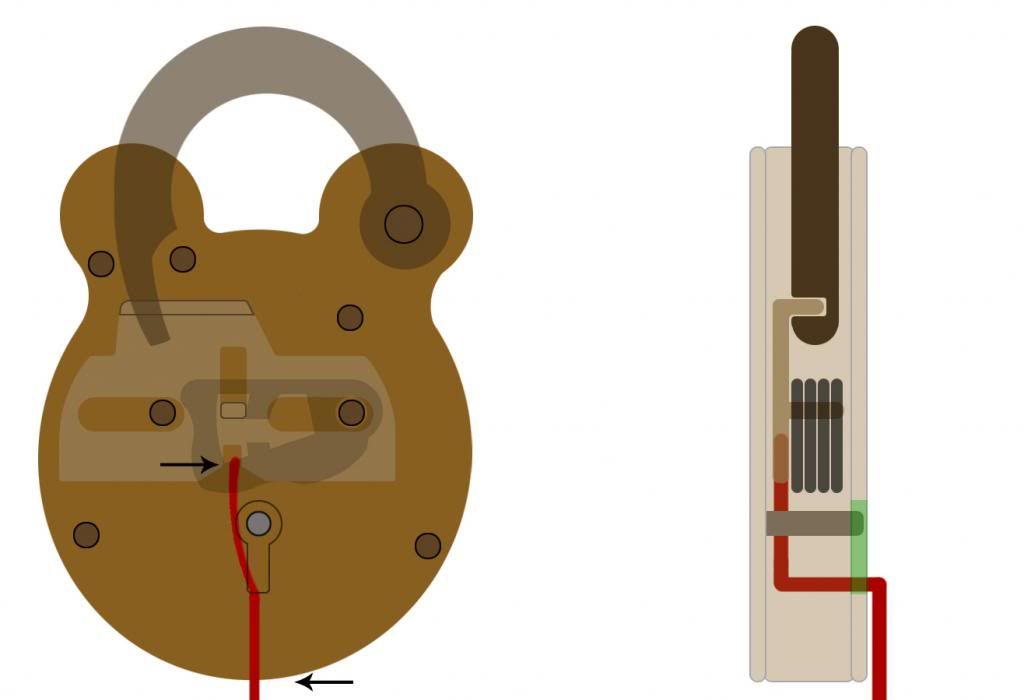
If none of the wrenches are suitable, it's not hard to make a couple of wires for that particular lock and add them to your kit anyway. You need one wire for the bolt and one for the levers, it takes a bit of trial and error but it isn't complicated when you have the lock in front of you (especially if it's already open). Some padlocks have a hole in the back so you can fit a wire through there and tension that way (which I find preferable), others you have no choice but to go through the front. The wires will be identical in shape, just different dimensions depending on which way you go about it.

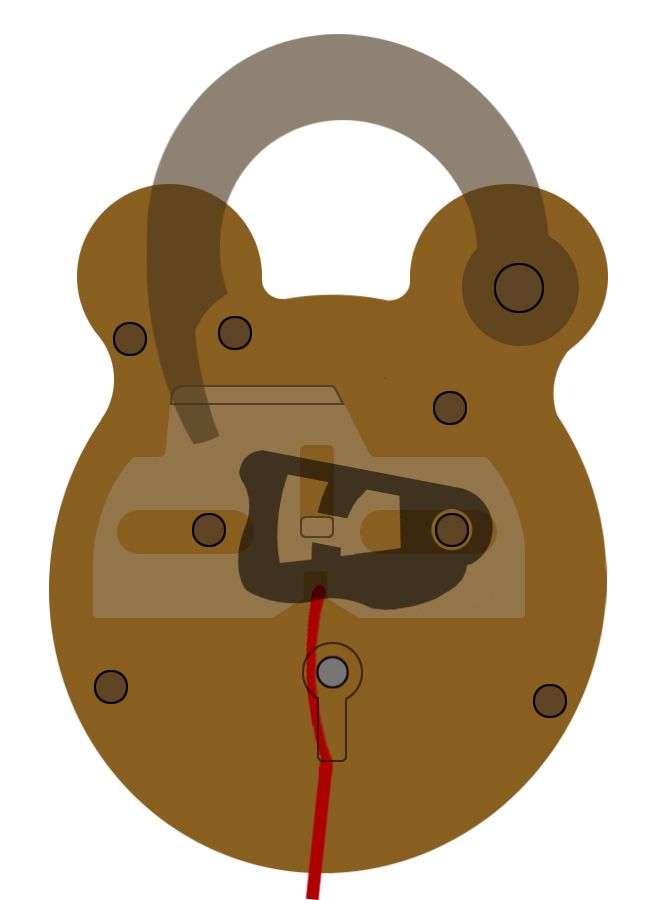
Locks with a post are harder to pick with wires because the space in the keyway is limited, but you still have a couple of options to work with. If you take a key blank (or spare key that came with your lock) and grind it down so it has an upstand left over just slightly less than the thickness of a single lever, you can use that to manipulate the levers individually. For this method you can tension the bolt through the gap between the shackle and the body using a flat piece of steel ground to a point... I've seen this done but it isn't my favoured method. To be honest, the only lock I ever experimented with this method on was a squire 440 and I didn't have the time to start grinding hacksaw blades down at the time... I filed down some sweeper bristle to try it out first and instead of resting against the bolt, it slipped around the side and provided no tension whatsoever. I'm pretty sure this method only works on larger padlocks because the bolts in those tend to have much less slop, so keep that in mind before you decide to try it on something small.

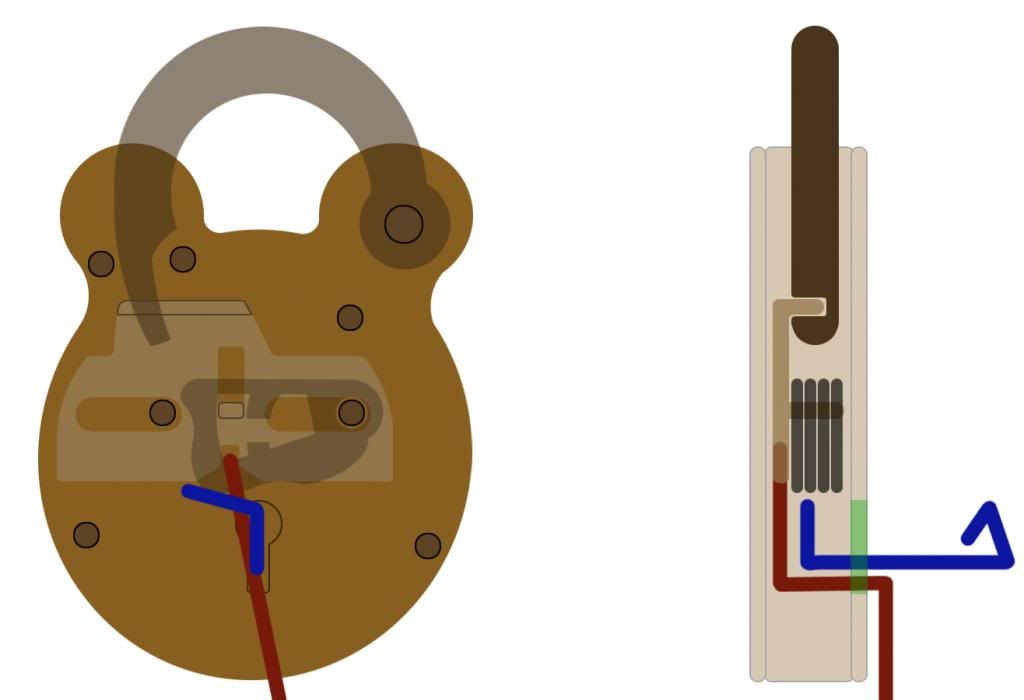
An alternative tension method in this scenario would be a simple wire... you can actually tension the bolt in larger padlocks with a slightly curved upstand, although the wire won't be able to throw the bolt far enough to completely release the shackle. It will pick fully and slide across a little, but you need to fidget with it a bit to get it fully across after it's open, but it's not too bad. You can use a short wire or a seperate modified key for this purpose.

An easier method is to use that same key to actually tension the bolt with, and file a flat across it to let a wire over the top and lift the levers that way. You're better off leaving a bit more thickness on the upstand for this method though, so it takes less strain under tension. You need a fair bit of tension compared to pin tumbler locks, most of the time it's not as much as you might expect but it's still a good idea to keep it as thick as possible to be on the safe side.

Hopefully this isn't just a blur of "what on earth is he talking about?"... it wasn't really intended for a full-blown instructional and I realise this would all make a lot more sense with pictures or at least diagrams. Apologies for that. This thread just sort of happened and all my lever padlock kit is currently on loan. :roll:

But yeah, if anyone has questions, try me. I'm no expert on these things but I'll try my best and can take pictures of some homemade wires etc (as soon as I get them back) for anyone interested. I could explain the mechanism and picking process now but instead I'll just link to a video by sneekypeeks on youtube. He's responsible for getting me interested in these locks in the first place... hopefully after watching this, you'll have a bit of a better idea of what I was just rambling about! :mrgreen:

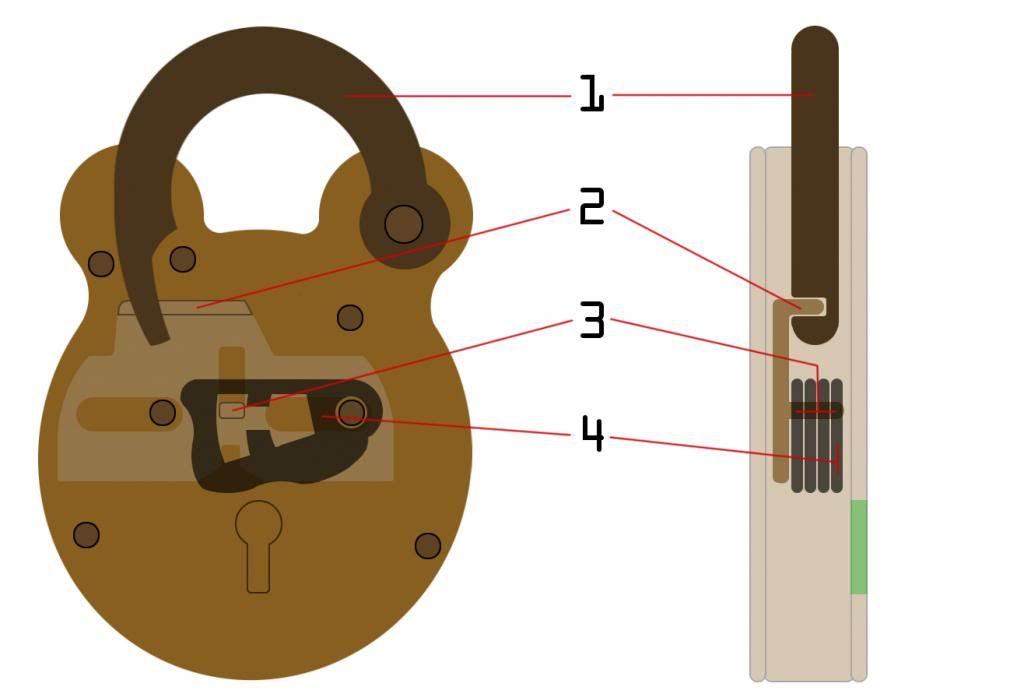
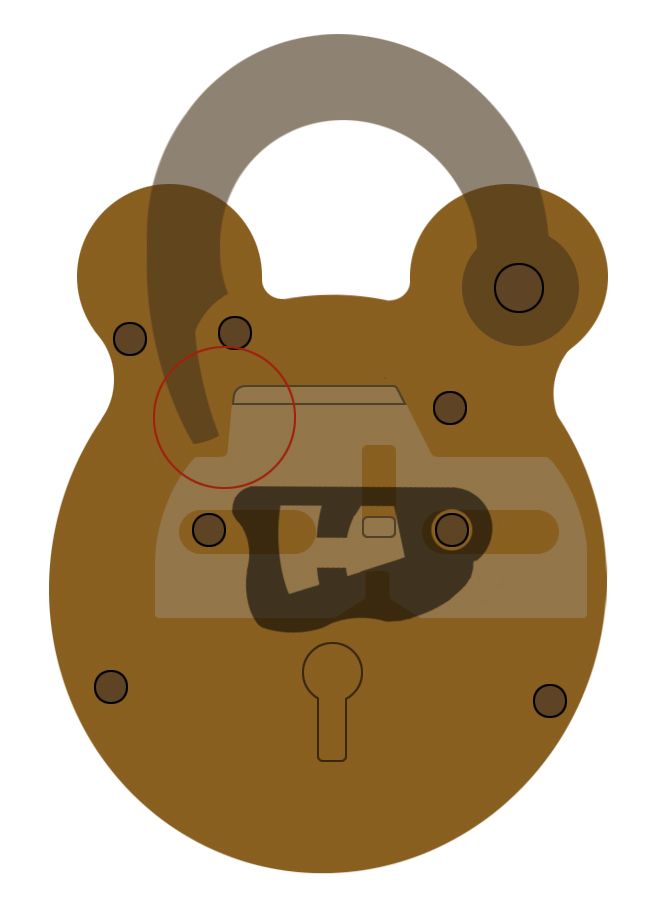
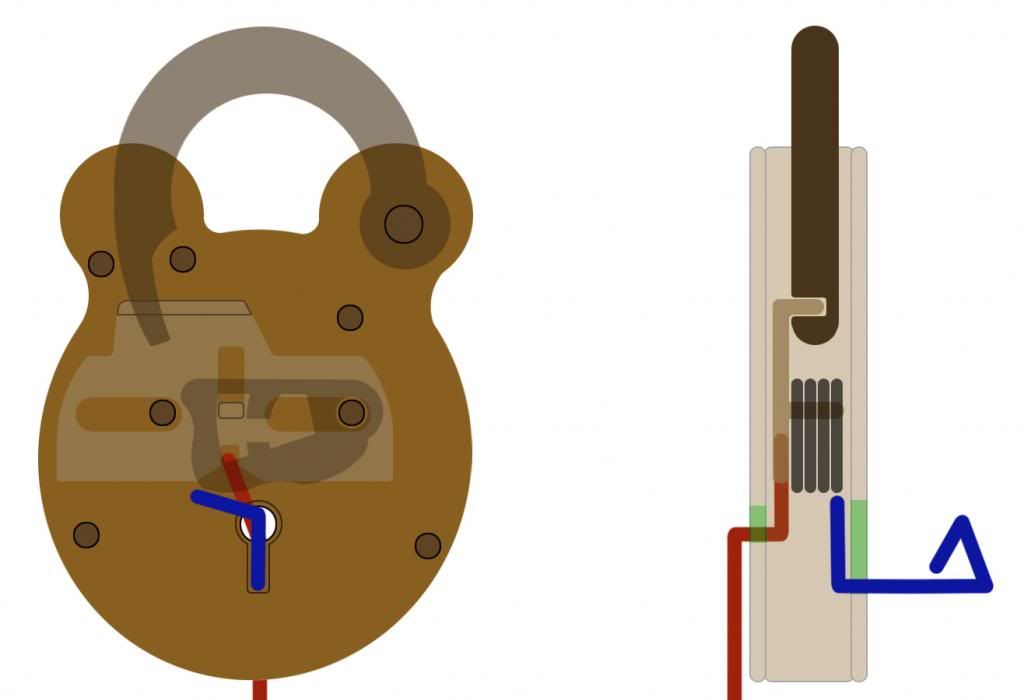
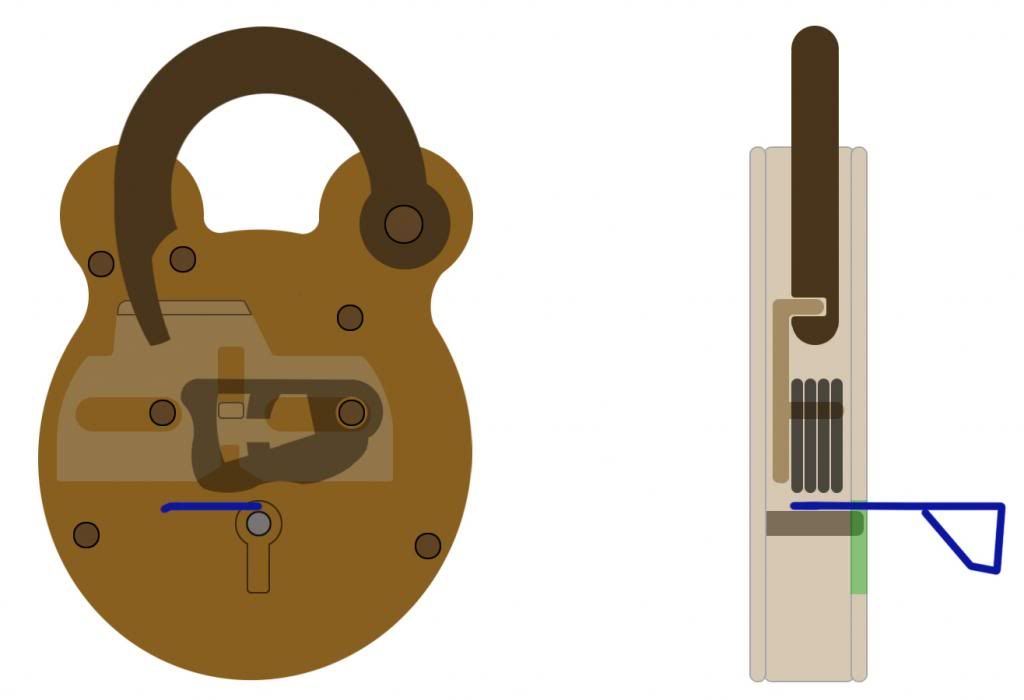
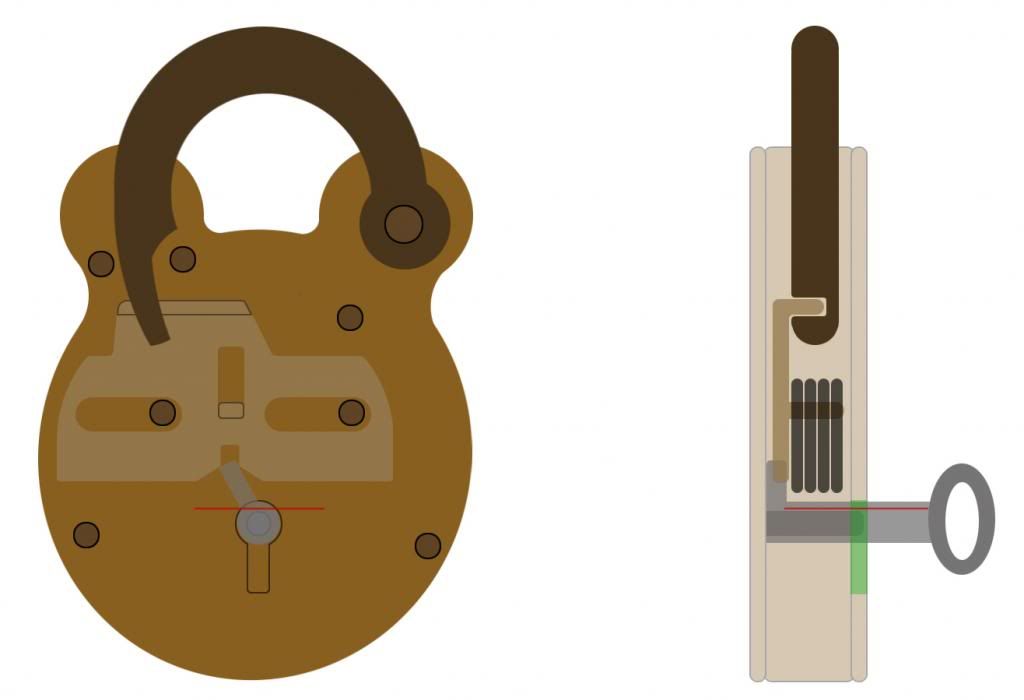
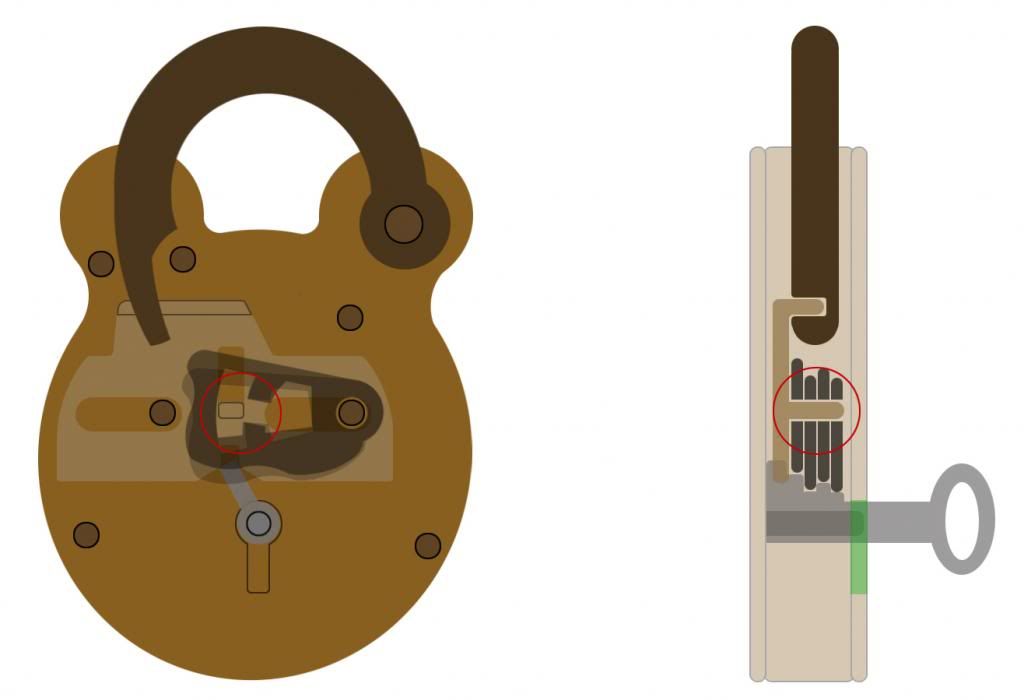
I'm actually gonna have a go at making a couple of basic lever padlocks in photoshop (one with a post and one without) to show how the different methods work, cos that way you can see all the internals etc and it'll make a lot more sense than just taking a bunch of pictures of tools. Should be a fun project. I'll update the thread once I do that but I'll answer some questions in the meantime if I can. Cheers everyone!

ps. if you're wondering why I don't just save this to a text file somewhere and post it later when I do have diagrams, it's because I'll commit better to actually making them if I've already started the thread. :lol:
Solomon
 
Posts: 1012
Joined: 9 Jan 2009 14:51
Location: Northern Ireland

Re: Lever padlock picking (commercial picks + basic wires)

Postby fgarci03 » 26 Mar 2013 20:08

Great video. Thanks for the info here!

I understand and I didn't mean to get a compreensive list. Sorry for misleading you in that :P
What I meant is, I saw the padlock you picked with them. The tension wrenches have a hole in the middle, to fit the "notch" in the center of the keyway. Are those the only kind of locks you can pick with them? Or any lever lock (that they fit in of course) will do?

Here I don't see many of those. I see mostly the one I showed on the image. And I was in the process of getting a 2-in-1 pick. But I'd have to chose the measure of it and stick to locks with that sized key. Your pickset has various sized wrenches, so if they work on locks like those (with levers on both sides of the bolt) I assume it would be best to get a kit like that, than a 2-in-1. :mrgreen:
Go ahead, keep plugging away, picking on me! You will end up on bypass or with rigor mortise.
- GWiens2001
fgarci03
 
Posts: 1009
Joined: 18 Dec 2012 21:38
Location: Porto/Portugal

Re: Lever padlock picking (commercial picks + basic wires)

Postby Solomon » 26 Mar 2013 20:43

fgarci03 wrote:Great video. Thanks for the info here!

I understand and I didn't mean to get a compreensive list. Sorry for misleading you in that :P
What I meant is, I saw the padlock you picked with them. The tension wrenches have a hole in the middle, to fit the "notch" in the center of the keyway. Are those the only kind of locks you can pick with them? Or any lever lock (that they fit in of course) will do?

Here I don't see many of those. I see mostly the one I showed on the image. And I was in the process of getting a 2-in-1 pick. But I'd have to chose the measure of it and stick to locks with that sized key. Your pickset has various sized wrenches, so if they work on locks like those (with levers on both sides of the bolt) I assume it would be best to get a kit like that, than a 2-in-1. :mrgreen:

That particular wrench will suit any padlock with a post (the "notch" you refer to) providing the post isn't too big, and if the upstand reaches the bolt correctly. The smaller 2 wrenches are for padlocks without a post, and are designed to fit different 2 different heights of bolt. If you mean the pic you sent to me via PM, these will absolutely not be suitable because that's a safe lock. It is pickable, but not with these tools, and even with the proper pick it's not particularly easy to do (not to mention you have to pick it 4 times consecutively to fully retract the bolt, which can be tedious).

Unfortunately if you wanna pick double bitted european style safe locks, there is very little information on them out there and you pretty much have no choice but to invest in the various dedicated 2-in-1 picks available for them or take them apart and make the tools yourself. It takes skill, knowledge and a lot of time to do. You have a cool lock and it's definitely a worthwhile project, but if you're looking for something versatile which will cover a bunch of different safe locks so you don't have to buy a lot of tools then unfortunately you're outta luck.

There are picks for british lever locks with curtains which are suitable for various gauges, but they still don't cover everything. 2-in-1 picks are only suitable for non-curtain locks, and whereas european lever locks rarely have a curtain, you would still need a lot of them to cover the various gauges and different manufacturers. I'm not gonna go into any more detail because safe discussion is restricted to the advanced forum and I don't want it dirtying up my nice thread. Padlocks from now on, k? :mrgreen:
Solomon
 
Posts: 1012
Joined: 9 Jan 2009 14:51
Location: Northern Ireland

Re: Lever padlock picking (commercial picks + basic wires)

Postby fgarci03 » 26 Mar 2013 20:54

Just to clarify to others (I've PM'ed you), that is not a safe lock. I agree that the pic I sent you didn't reaveal much and would be mistaken as such. But the lock I'm talking about is this one wich I made a cutaway: viewtopic.php?f=10&t=56694

Well, I know I'd have to have a large set to be able to pick EVERYTHING. But I find most lever locks here are almost the same sized key as this one (at least the ones I can get my hands on cheap :P). From my measures, it seems a 7gauge.

And now I understand the difference between the 3 wrenches :mrgreen:

And yes, it's a tedious work to pick it 4 times to fully unlock it (assuming it is fully locked of course). But heck, all lockpicking is "tedious" untill the lock pops open isn't it? :mrgreen:

Thanks for this post. It was SOOOO helpfull!
Go ahead, keep plugging away, picking on me! You will end up on bypass or with rigor mortise.
- GWiens2001
fgarci03
 
Posts: 1009
Joined: 18 Dec 2012 21:38
Location: Porto/Portugal

Re: Lever padlock picking (commercial picks + basic wires)

Postby Solomon » 27 Mar 2013 4:20

At last! Diagrams are done. This took about 4 hours, so if you wanna use these images elsewhere make sure to give me credit or I will hunt you down and flick your ear when it's at its very coldest.

With that out of the way, let's do this. I chose the "old english" style of padlock because it's my favourite. There are different mechanisms but they all follow the same principle.

Fig. 1 - the basic parts.

1 - Shackle. When locked, this is held in place by the bolt assembly. When unlocked, it's free to flop open and shut like a shutter door on a windy day.
2 - The bolt. The bolt assembly is all one piece, and is required to slide all the way to the right to free the shackle. This part interlocks with a groove in the shackle, which you can see in the side view.
3 - The stump. When the levers are all at their correct heights, this passes through the gates. I won't be discussing false gates to keep things simple, so there aren't any in this example.
4 - The lever pack. This particular lock has 4 levers, but some will have 5 or 6. Some only have 3, and some have 7 or more.

The green section marked on the side view is the keyway. This will come in handy later for illustrating where the wires are resting.

To explain quickly, the principle of picking is the same as the pin tumbler lock but the parts are different and we use different tools. Apply tension to the bolt, feel for the binding lever, lift it until it finds the gate and the lever sets... then repeat for the other levers until the stump is free to pass through and free the shackle.

Fig. 2 - the open position. Note that the bolt is completely out of the way of the shackle (circled), so it is now free to pivot into the open position. The stump is in the other side of the lever now, and to re-lock, it must be picked again back in the opposite direction. In the case of locks with false gates, it's easier to pick back to the locked position, so whereas it isn't something to panic about, it is worth mentioning. In some padlocks (ie. chubb cruiser) you only need to pick one lever (the "drop lever") in order to re-lock. Props go to safelocks for that bit of info, I only learned that recently. If you're careful when sliding the bolt across, you can open it just enough to free the shackle without it re-locking in the open position but as I said, I wouldn't worry about it if it does happen. It's easier with some locks than others.

Fig. 3 - Shackle tension. A flat piece of steel such as a hacksaw blade is ground down to fit behind the bolt and apply pressure. We push against the blade (1), which pivots on the rivet (2) and thus pushes against the bolt (3). Circled is the stump, which will bind against one or more levers.

This only seems to work on larger padlocks, as with smaller ones it has a tendency to slip around the side of the bolt where it can't apply tension. It isn't really necessary to tension this way anyway, unless there is a post in the keyway (described later) and you want to use a modified key to pick the levers.

Fig. 4 - Front keyway tension. For this method we use a wire bent at one end, approximately 1.5x the height of the keyway. It takes a little trial and error to get the size right, but it doesn't have to be exact. If possible, you may as well have the lock in the open position to speed things up a bit. The second bend can be made to face downards, out to the right, left, or any angle you wish. Well, apart from straight up, obviously. As long as the upstand is the correct height and it leaves the keyway clear for your pick wire, you can do whatever you want with it.

Fig. 5 - rear tension. Some padlocks, most notably the Squire range (with the exception of the Valiant HSV), have a hole in the back for the tip of key to poke through. This makes for a handy place to insert a tensioner. Same idea as before, but with a shorter upstand (just about the height of the keyway). A picture says a thousand words.

Now, I mentioned locks with a post in the keyway earlier. This is pretty common so you'll want to know how to deal with it. The best option is to use shackle tension and a modified key blank (or spare key). Simply file away the beef until you have a little upstand left at the tip, a tiny bit thinner than one of the levers. It's handy to have the lock open so you can tell when you've got it just thin enough, then take a bit more off and you're done. I haven't bothered to mock up a diagram for that. Just use shackle tension as pictured, insert your modified key and turn to lift the levers. Couldn't be simpler.

It is possible to use a wire, but there are complications:

Fig. 6 - front tension with a post in the way. Same idea as in Fig. 4, but your space is limited by the post and using a straight bend might not adequately tension the bolt (if at all). Depends on the lock whether you can do this or not, but generally speaking if you put a curve in your upstand, it'll give you just enough to get it picked. Alternatively you can use a sharp bend towards the tip, like a hook pick, but with a second sharp upwards bend (see Fig. 7) but this is trickier to get the dimensions right and you don't really get that much extra clearance out of it anyway. From my experience, you'll have an easier time getting onto the bolt using an even curve and the zigzag type isn't an option if the keyway is very tight so you're better off keeping it simple.

The issue with this type of tension is that the bolt cannot be fully thrown (see Fig. 8). You can see here that the levers are all raised to their correct heights and the stump has entered the gates - however, the post is preventing the wrench from moving the bolt any further. If you remove your tools, the bolt assembly will sit in limbo like this, so you need to go in with a short wire to hook into the bolt and flick it fully across. It's not much of an issue when you get the feel for it.

OK solomon, enough about tension!! What about the levers? Yeah, I'm getting to that. Let's go back to the simple ones without the post for starters.

Fig. 9 - Traditional picking, all in the front. Here, the tension wire is in red and the pick wire is in blue. The pick wire I prefer to use is this style, but I encourage you to experiment and see what feels right for you. To make this style of wire, you bend an upstand at the end, 90 degrees upward, like what you can see in the side view but a good bit taller (because we will be creating a bend out to the left afterwards). I prefer to form some kind of handle before I start fuskering with the tip but that's up to you.

The second bend can be 90 degrees, but I've found it's better to have it angled up slightly like I've drawn in the front view in Fig. 8. The actual upstand before the left-hand bend should be the height of the keyway, minus the thickness of whatever wire you're using for tension. This way it can rest at the bottom of the keyway (but on top of the tension wire) and the left-hand bend sits fairly close to the levers. That way, you can simply rotate it and it lifts the levers nice and high without having to physically push upwards. The length of the left-hand bend doesn't matter providing it's not too short, but you don't want it too long either. About the height of the keyway is a decent guideline.

Fig. 10 - picking with rear hole (huhuh) tension. Same idea as before really. Not sure why I even did this one as it's pretty self-explanitory if you've been paying attention thus far, but meh. Eye candy. :mrgeen:

And there we have it! I'm by no means an expert on these but I think this is enough to teach people the basics. Hope you enjoyed reading, and if you learned something then great. Cheers!
Solomon
 
Posts: 1012
Joined: 9 Jan 2009 14:51
Location: Northern Ireland

Re: Lever padlock picking (commercial picks + basic wires)

Postby fgarci03 » 27 Mar 2013 4:57

I think this is the first lever lockpicking "tutorial" arround here!
Very helpfull. I already knew the theory behind it, but the shapes and sizes of the wires are indeed a huge kicker on this!

The diagrams are great! How did you do them?
Thanks!

I think this will turn out to be a sticky :mrgreen:
Go ahead, keep plugging away, picking on me! You will end up on bypass or with rigor mortise.
- GWiens2001
fgarci03
 
Posts: 1009
Joined: 18 Dec 2012 21:38
Location: Porto/Portugal

Re: Lever padlock picking (commercial picks + basic wires)

Postby Solomon » 27 Mar 2013 5:05

fgarci03 wrote:I think this is the first lever lockpicking "tutorial" arround here!
Very helpfull. I already knew the theory behind it, but the shapes and sizes of the wires are indeed a huge kicker on this!

The diagrams are great! How did you do them?
Thanks!

I think this will turn out to be a sticky :mrgreen:

Thanks! I'm not surprised, it's not the easiest mechanism to make diagrams of. :lol:

I did them in photoshop, just used a few stills from sneeky's video for reference and scale... the rest was patience. I can assure you there was zero sleep involved. :shock:
Solomon
 
Posts: 1012
Joined: 9 Jan 2009 14:51
Location: Northern Ireland

Re: Lever padlock picking (commercial picks + basic wires)

Postby fgarci03 » 27 Mar 2013 5:13

Yes I noticed the time gaps. You talked about doing them before I went to bed, and when I woke up here they were! :mrgreen:
Go ahead, keep plugging away, picking on me! You will end up on bypass or with rigor mortise.
- GWiens2001
fgarci03
 
Posts: 1009
Joined: 18 Dec 2012 21:38
Location: Porto/Portugal

Re: Lever padlock picking (commercial picks + basic wires)

Postby Solomon » 27 Mar 2013 5:21

Haha... see, this is what happens when I get an idea in my head. Locks and photoshop are an especially bad combination for me. :mrgreen:
Solomon
 
Posts: 1012
Joined: 9 Jan 2009 14:51
Location: Northern Ireland

Re: Lever padlock picking (commercial picks + basic wires)

Postby femurat » 27 Mar 2013 6:23

Great tutorial Solomon, I vote sticky!

The only improvement I can suggest is to insert the images directly in the text. Is there a reason why you linked them instead?

Cheers :)
User avatar
femurat
Site Admin
 
Posts: 3745
Joined: 22 Sep 2008 9:06
Location: Italy

Re: Lever padlock picking (commercial picks + basic wires)

Postby Solomon » 27 Mar 2013 7:02

Thanks femurat! I linked them because they're huge, and I didn't wanna scale them down cos I spent so long on the detail. Suppose I could've made smaller versions that clicked through to high res, but meh. Tabbed browsing! It's the future. :lol:
Solomon
 
Posts: 1012
Joined: 9 Jan 2009 14:51
Location: Northern Ireland

Re: Lever padlock picking (commercial picks + basic wires)

Postby fgarci03 » 27 Mar 2013 7:46

see, this is what happens when I get an idea in my head.

I have that problem too.

And I get late to work or miss college because of that :mrgreen:
Go ahead, keep plugging away, picking on me! You will end up on bypass or with rigor mortise.
- GWiens2001
fgarci03
 
Posts: 1009
Joined: 18 Dec 2012 21:38
Location: Porto/Portugal

Re: Lever padlock picking (commercial picks + basic wires)

Postby Solomon » 27 Mar 2013 18:20

UPDATE! It's occurred to me that in my sleepless state, I talked about tension wires for getting around the post but not pick wires. (Mods, if possible could we edit this into the earlier post? That'd be sweet :D)

For picking around a post, the best bet is to use thin gauge wire. A simple left-facing "L" bend with a handle is all you need (see Fig. 11. The trick to using this is to "balance" it on top of the post, which can be achieved by resting your index finger against the face of the padlock just beside the keyway. When the wire rotates, your finger prevents it from slipping around the right hand side of the post. Simple is best. There are ways of shaping a wire so it can rest along the bottom ofthe keyway and reach around the post, but it's tedious and unnecessary.

If you're using a pipe key as a tensioner, you simply insert your modified key and file a flat on it to let the wire over the top.

In Fig. 12 I have removed the levers from the front view so you can see how the tip of the key interacts with the bolt. The flat is represented by the red line; you can see clearly why this space needs to be freed up. This flat must be the entire length of the key. It looks as though the key bow presents a bit of an obstacle for the wire to get past, but notice on the front view you can see that the bow sits off to an angle. The wire slides nicely along the right-hand side. You can even file a little groove into the bow to stabilise it further if you wish. It's not particularly comfortable to pinch the top and bottom of the key bow for tension, but it works. And you get used to it. A great idea I saw once was to use a longer blank, and actually bend it downwards using a butane torch. This not only gives you great comfort and control, but also lets you really pile the tension on if need be. Big thanks to Daz for this idea.

And while I was doing that diagram, I figured I'd mock up a working key for you guys too. You can see the key sitting in the notch in the bolt, the levers are all raised to their correct heights, and now further turning of the key will throw the bolt into the open position. This is probably the first thing I should've done, but better late than never right? :mrgreen:
Solomon
 
Posts: 1012
Joined: 9 Jan 2009 14:51
Location: Northern Ireland

Re: Lever padlock picking (commercial picks + basic wires)

Postby fgarci03 » 27 Mar 2013 18:52

Great!

I'm probably going to give my first attempt at a lever padlock tomorrow :mrgreen:


Sticky.. Sticky!
Go ahead, keep plugging away, picking on me! You will end up on bypass or with rigor mortise.
- GWiens2001
fgarci03
 
Posts: 1009
Joined: 18 Dec 2012 21:38
Location: Porto/Portugal

Re: Lever padlock picking (commercial picks + basic wires)

Postby Solomon » 11 Apr 2013 9:07

fgarci03 wrote:Great!

I'm probably going to give my first attempt at a lever padlock tomorrow :mrgreen:


Sticky.. Sticky!

Been a bit longer than a day now! Any luck? :mrgreen:
Solomon
 
Posts: 1012
Joined: 9 Jan 2009 14:51
Location: Northern Ireland

Next

Return to European Locks, Picks and Hardware

Who is online

Users browsing this forum: No registered users and 1 guest