|
Picked all the easy locks and want to step up your game? Further your lock picking techniques, exchange pro tips, videos, lessons, and develop your skills here.
 by s3curity » 29 Jul 2014 19:04 by s3curity » 29 Jul 2014 19:04
Impressioning magnifiers.
Any thoughts on this? I, myself, wear glasses and portable and lighted are considerations.
-
s3curity
-
- Posts: 13
- Joined: 12 Jul 2014 7:34
 by GWiens2001 » 29 Jul 2014 20:49 by GWiens2001 » 29 Jul 2014 20:49
First impressioning magnifier I got was this one that I got for $10 from Deviant's website (enterthecore.net):  It even has a built in light source, though batteries are harder to come by. Have used the desktop lights with magnifier that hobbiests have used for ages like this:  and finally bought a Martin Pink's Professional Impressioning Tool from a lockie friend of mine who no longer impressions locks.  However, my best luck has been with my eyes, and good old-fashioned sunlight coming from an angle. As you gain experience, the less equipment you need to impression, just as you need fewer picks to pick locks as you get better with one or two of them. Gordon Just when you finally think you have learned it all, that is when you learn that you don't know anything yet.
-

GWiens2001
- Site Admin
-
- Posts: 7609
- Joined: 3 Sep 2012 16:24
- Location: Arizona, United States
 by smokingman » 30 Jul 2014 7:00 by smokingman » 30 Jul 2014 7:00
I started out using a jewelers loupe, but stopped pretty soon into it.
I find that the naked eye works best, and tilting the blank to change the angle that light is hitting it.
If you magnify every little scratch or line, you get to where you "can't see the forest for the trees".
What is the best way to educate the masses? ... " A television in every home."
What is the best way to control the masses? ... " A television in every room."
From "Charlie" AKA " Flowers for Algernon"
-

smokingman
-
- Posts: 337
- Joined: 15 May 2013 12:09
 by GWiens2001 » 30 Jul 2014 9:01 by GWiens2001 » 30 Jul 2014 9:01
Have to agree. That 45x impressioning magnifier was so strong, I would have a hard time telling if I was viewing the peaks or the cuts! Also had a 10x magnifier that fit onto a small flashlight. That worked fairly well, but sent that off to another member. Maybe he can chime in. (Hint, hint)
Gordon
Just when you finally think you have learned it all, that is when you learn that you don't know anything yet.
-

GWiens2001
- Site Admin
-
- Posts: 7609
- Joined: 3 Sep 2012 16:24
- Location: Arizona, United States
 by Kheops » 13 Aug 2014 14:56 by Kheops » 13 Aug 2014 14:56
I have tried many different techniques, and must admit, a 3-5X magnification with sun light is ideal. That being said, sometimes sunlight is not available, or you need more magnification. I made myself a magnifier, here's how: First you need: A) a project box (from an electronics supplier), small, ± 2-3 inches by 4 inches by 1 inch. B) A watchmaker's eye loupe. C) A cheap dollar store LED flash light, not too big, think: 2 or 3 AAA. D) A normally off push switch, and E) a door sweep, ideally the brush type. So, you cut out 4 holes in the project box, one round hole for the loupe on the smallest side (I will refer to it as the "top" from now on), and two facing each other on the largest sides, rectangular holes, and a small hole for the switch on one of the other sides, positioned in such a way as to make it easy to push on with the same hand that holds the viewer. 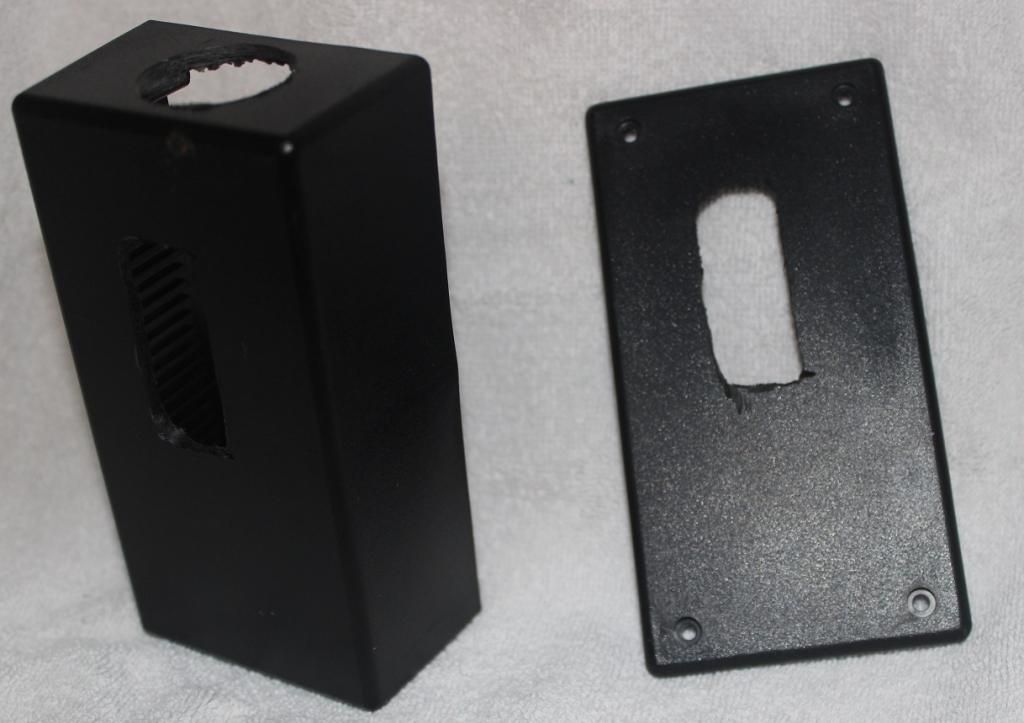 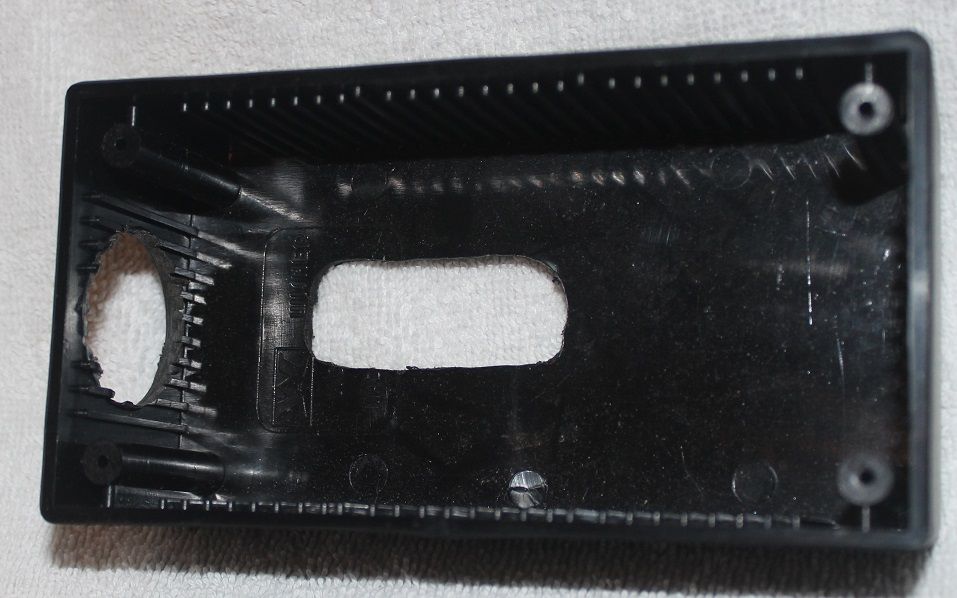 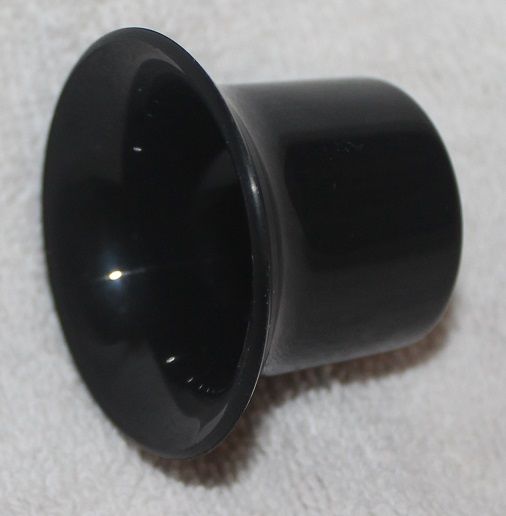 Then, you rip apart the flash light. What you want to keep in working condition are the DELs and the battery adapter. Epoxy the DELs,and the eye loupe next to one another on the top. Epoxy the brush door-sweeps on the sides. Now all you have to do is wire the little switch between your LEDs and your battery adapter and close the box. 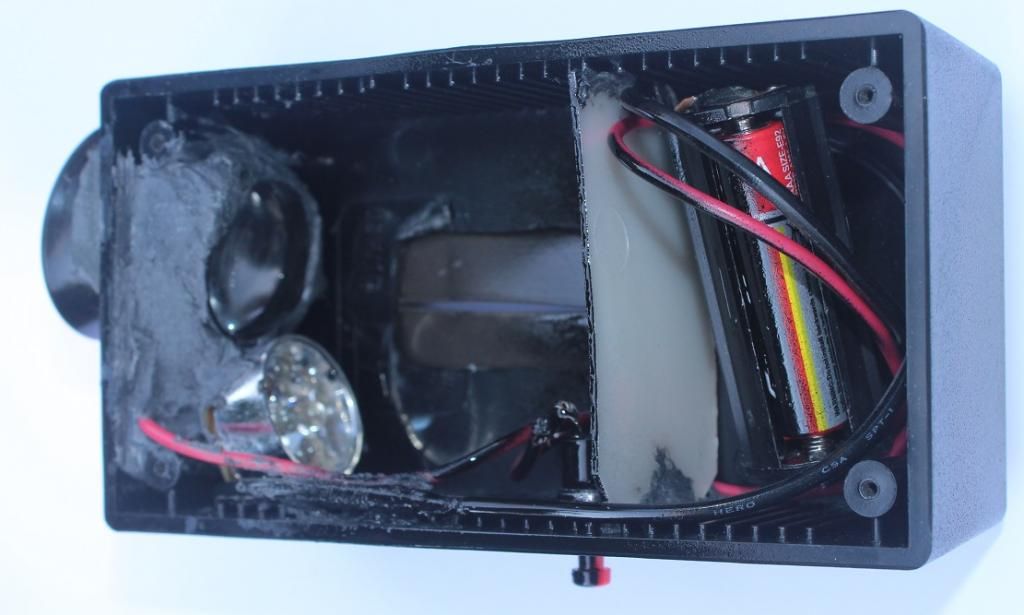 I apologize for the pictures, I am aware they aren't perfect. I didn't have any brush type door-sweeps at my disposal when I built it, so I used squeegee type door-sweeps (not quite as elegant unfortunately). I glued a piece of plastic to keep my batteries from wobbling around and then spray painted it (because it was white and reflected too much light). The eye loupe I used is Bausch & Lomb 10 watchmaker's loupe. What you'll need to work out by trial and error is the ideal distance between the rectangular holes for your door-sweeps, by which you will be introducing your key, and the focal point of the loupe. You may also want to try tilting the loupe. I find if your loupe is tilted: 1. It leaves more room to figure out how to glue your DELs in place, and 2. The angle provides a second angle to view the key if you turn your viewer around and view from the other side. The whole thing cost me around 30$, the loupe being the single most expensive component (around 10$).
-
Kheops
-
- Posts: 78
- Joined: 25 Feb 2014 7:48
- Location: Montreal
 by phrygianradar » 15 Aug 2014 23:59 by phrygianradar » 15 Aug 2014 23:59
I have lately been getting into impressioning locks, and I have been using a jewelers loop. But I tend to agree with Gordon, like usual...  The more I practice, the more it seems that my naked eyes can pick up the real marks. The loop tends to show way too much! Here is a cool Yale lock that I picked up in Oklahoma and got a key impressioned for it in a couple of tries: 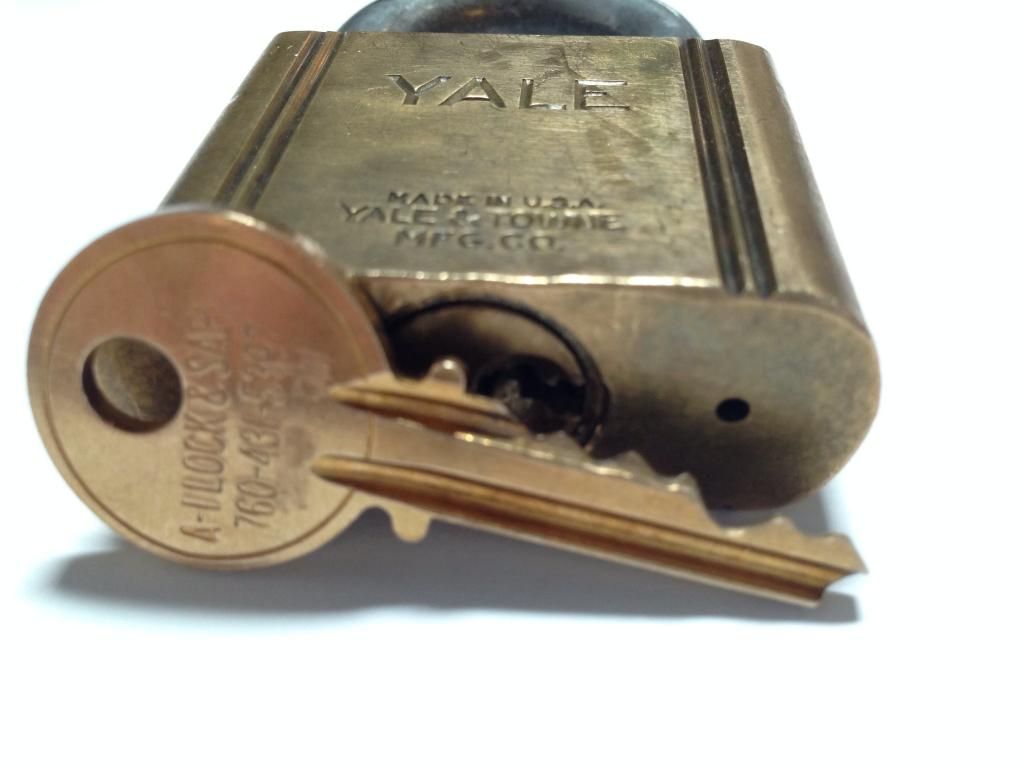 The pins on this lock are so worn down, it was really hard to see the marks. But, the fact that I was able to do it and I had the patience to keep working at it really helped my skills grow so I'm happy that I stuck with it! What helped me more than anything else was using a calipers. I bought another Yale lock off of eBay and this one I actually impressioned in one go! That's a rarity for me, it usually takes me two or three blanks before I get one that works. I tend to go a little bit faster than I should… and less I am impression in a four pin Master lock 
-
phrygianradar
- Supporter

-
- Posts: 471
- Joined: 2 Feb 2013 0:57
- Location: San Diego, CA
 by phrygianradar » 16 Aug 2014 0:03 by phrygianradar » 16 Aug 2014 0:03
I forgot to mention one thing. I have been using 600 grit sandpaper to polish the key blank after I file if I'm having a hard time seeing the marks. It really helps the marks standout to me and I have never heard anybody else mentioned doing that before. But I can't believe that I'm the first one to think of it but, that really, really works for me so I wanted to pass that on. I know it doesn't have anything to do with what you magnify the key blank with, but that is been a lot of help for me. The only downside is that it's a little more time-consuming.
-
phrygianradar
- Supporter

-
- Posts: 471
- Joined: 2 Feb 2013 0:57
- Location: San Diego, CA
 by GWiens2001 » 16 Aug 2014 8:19 by GWiens2001 » 16 Aug 2014 8:19
Great job with that Yale, PR. The key looks good, and the paracentric keyways can be trickier to impression when the pin is marking on the inner edge. Working on a CISA with the Y52 keyway, and it is not making good marks.
Yes, quite a few of us use the sandpaper trick. Have no choice about using sandpaper when I am impressioning at work where I have only the standard rough files from the tool trucks. On an easy-to-impression lock (such as a Master or Schlage), it does not matter. But on something that leaves very little marks (like a Wilson Bohannan), it is quite a bit more difficult, and the sandpaper finish helps.
The grit I use can vary based on the pin shape, as some grits show the marks better. I use rougher grit (200) for the WB padlocks, because the rougher surface will show the knocked down areas created by the round pins better than the finer grits, while the opposite is true of more pointy key pins.
Another thing that helps is to first pick the lock, then draw a picture of roughly what the finished key should look like. Maybe even draw a large copy of the keyway, with lines to show about where in the keyway the pins are at when the lock is picked. It can help you to know if you are on the right track with your key while impressioning.
Gordon
Just when you finally think you have learned it all, that is when you learn that you don't know anything yet.
-

GWiens2001
- Site Admin
-
- Posts: 7609
- Joined: 3 Sep 2012 16:24
- Location: Arizona, United States
 by phrygianradar » 17 Aug 2014 11:05 by phrygianradar » 17 Aug 2014 11:05
GWiens2001 wrote:Great job with that Yale, PR. The key looks good, and the paracentric keyways can be trickier to impression when the pin is marking on the inner edge. Working on a CISA with the Y52 keyway, and it is not making good marks.
Yes, quite a few of us use the sandpaper trick. Have no choice about using sandpaper when I am impressioning at work where I have only the standard rough files from the tool trucks. On an easy-to-impression lock (such as a Master or Schlage), it does not matter. But on something that leaves very little marks (like a Wilson Bohannan), it is quite a bit more difficult, and the sandpaper finish helps.
The grit I use can vary based on the pin shape, as some grits show the marks better. I use rougher grit (200) for the WB padlocks, because the rougher surface will show the knocked down areas created by the round pins better than the finer grits, while the opposite is true of more pointy key pins.
Another thing that helps is to first pick the lock, then draw a picture of roughly what the finished key should look like. Maybe even draw a large copy of the keyway, with lines to show about where in the keyway the pins are at when the lock is picked. It can help you to know if you are on the right track with your key while impressioning.
Gordon
All great advice! I haven't thought of using rougher paper, but that is a good trick to keep in mind. As for drawing out the approximate pins depths; you should see my work bench! It is covered with "pin map graffiti"… I did another Yale (I'm on a Y1 kick, I guess) that I just wanted to test my skills on, so I didn't pick it first and just tried to impression it blind. I was shocked that by taking my time and using the sandpaper trick I got it in one key blank! Another first for me! After doing nothing but picking locks it has been really fun to start to impression. I think that is the natural progression though.  I picked a lock off a storage unit I was hired to open and impressioned a key so I can re-sell the lock to someone else in the future, or just give it to someone in need. Saved me a couple of bucks and was good practice. Very easy though; like a Master lock. Four pins and nice deep marks. No loupe or sandpaper needed!
-
phrygianradar
- Supporter

-
- Posts: 471
- Joined: 2 Feb 2013 0:57
- Location: San Diego, CA
 by dls » 15 Nov 2014 17:08 by dls » 15 Nov 2014 17:08
I never use a magnifier i have tried it but always just use the old magnifiers on the front of me head and a candle. The main problem for me is blanks as i mostly do lever locks and the comercial pin and pipe(barrel) ones available are pure crap they are mostly resistance welded and the bits fall of if you fart. So i usualy make my own, many of the rst pipe blanks are not even drilled concentricly never mind drilled straight.
get the right blank and the job is half done, for pin tumbler a generic blank which will work in a wide range locks and similar profiles will be sloppy in the keyway and works best in my opinion as you can bind the pins then lift or jiggle the blank more than an exact factory blank which is tight in the keyway.
When picking starts to hurt take your finger out
-
dls
-
- Posts: 283
- Joined: 10 Mar 2011 16:57
- Location: ireland
Return to Pick-Fu [Intermediate Skill Level]
Who is online
Users browsing this forum: No registered users and 32 guests
|
