|
Picked all the easy locks and want to step up your game? Further your lock picking techniques, exchange pro tips, videos, lessons, and develop your skills here.
 by WolfSpring » 26 Nov 2010 22:56 by WolfSpring » 26 Nov 2010 22:56
Not sure if this is where this goes, move if you need to, anyway: So I got my tools in the mail today, the key holder and magnification headset. So I figured I'd give them a try. I've only got a triangle file not sure the grade it's a found around the office file, I'm in Iraq so there's no run to the shop and get stuff. My subject was a 5200(yeah I'm obsessed with them it's what I have all around) anyway. I took out pins 2 and 4 leaving only 3 pins, first time might as well as make it a little easier to learn. Took me 40 minutes. As you can see pin one gave me hell, not sure if it's an 8 or a 9 depth, and I do have to push the key in a little bit and once it turns the key is pretty loose, but it works and I'd be able to code it and cut it and thats the end goal right??? Anyways, it's a better feeling than that first successful pick on a brand new lock!  What most people call intelligence I call common sense.
-
WolfSpring
-
- Posts: 291
- Joined: 12 Aug 2009 9:32
- Location: Colorado
-
by femurat » 27 Nov 2010 3:34
Great job! I remember very well the excitement when my first key started turning... after shaking it so much it's unbelievable to see that plug turn! Welcome aboard 
-

femurat
- Site Admin
-
- Posts: 3769
- Joined: 22 Sep 2008 9:06
- Location: Italy
by jos weyers » 28 Nov 2010 15:32
nice! two pointers: high and low peaks next to each other are the hardest: taking out pins doesn't HAVE to make your life any less harder. & position one is the one closest to the shoulder. so it was actually pin 5 that was giving you a hard time. keep up the good work. hope to see you in the US open (?) 
-
jos weyers
-
- Posts: 213
- Joined: 16 Dec 2008 12:42
-
by MacGnG1 » 28 Nov 2010 15:52
Sweet job! im working on getting some files to start impressioning.
Nibbler: The poop-eradication is but one aspect of your importance.
-
MacGnG1
- Supporter

-
- Posts: 1362
- Joined: 9 Apr 2008 22:14
- Location: Know Where, MD, USA
-
by WolfSpring » 7 Dec 2010 15:16
Update.
Tonight I impressioned a full 5 pin 5200 lock, it took me two hours. Thanks to Jos and others for the advice of a good file. I got a vacuum vise, a fine cut round file and a key holder, I actually did this one by naked eye, only used the magnification one time at the very beggining. For those just getting into impressioning this is my advice:
1. A good fine cut file
2. Stability, both the lock and the key a vise and a key holder.
3. Light you have to have decent lighting
4. Magnification is a big help if your eyes aren't very good.
5. Know what you are looking for, watch a vid on you tube before you even try this to see what marks look like, maybe I'll do a video myself since I am a noob showing what I saw.
6. Patience and Practice(Most important)
And thats all you need besides the lock and correct key blank. I choose 5200's because I'm in the Army people cut them a lot and leave the cut ones ont he groun, that and key blanks are cheap.
Thanks again for all the help, I'll get a picture up later of the finished key, it is a little bent, but functional.
What most people call intelligence I call common sense.
-
WolfSpring
-
- Posts: 291
- Joined: 12 Aug 2009 9:32
- Location: Colorado
-
by Ophidian » 15 Feb 2011 19:25
Nice job!
To PICK a lock all you need is self control, patience, endurance and a pick...
To OPEN a lock all you need is impulsivity, anger, intolerance and a sledgehammer...
-
Ophidian
-
- Posts: 68
- Joined: 19 Jun 2010 6:14
- Location: Sweden, Stockholm
-
by Oldfast » 21 Feb 2011 11:14
WolfSpring, Couldn't decide wheather to post here or in your other post ( viewtopic.php?f=3&t=49500). Both, GREAT posts, thanks for sharing! It'd be nice to see some others add to this post their first experience with impressioning and some of the troubles they ran into. Admittedly, I never had much interest in trying this until a friend wanted some help. He had four Master#3's (all keyed alike) that he had lost the key to. So, I thought what the heck, I'll give it a try. To make it a challenge, I refrained from reading or watching any vids prior to giving it at least one good attempt. If I had read your post first, I probably would have had a key in a matter of minutes rather than hours  . But that's ok- it was a great learning experience. And, all that time and perseverence just added to the excitement when the key started working! Your right, it was comparable to my first pick! 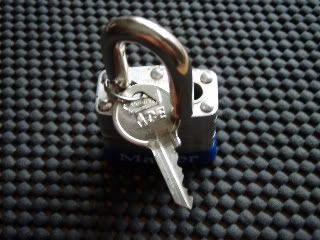 Couple notes: I too, found it rathter difficult to keep the correct spacing as the cuts got deeper. And just like yours, I find my key works more smoothly in both directions if pushed in lightly before turning. Looking at the key, I can see the pins don't set in the deepest part of each cut. Instead, they ride just slightly up from that (toward the bow). Raimundo makes a good point about the interaction between a loose plug, the key shoulder, and the cap lamination. This probably accounts for why I was unable to get much of an impressioon at times. And, as you've already mentioned, the right tools can make a big difference. My file was adequate but probably not the best choice. And the only available key holder was a set of vice grips (which I would not recommend). All in all, wonderful experience and very gratifying. Thanks again for sharing WolfSpring, and please, keep us updated to your progress (when you have time  ).
-
Oldfast
-
- Posts: 81
- Joined: 29 Dec 2010 15:01
- Location: Michigan
by raimundo » 27 Feb 2011 10:51
I use a baby 4inch vice grip, any larger and the weight of the tool interfers with what im doing. larger heavy tools can cause blank breaking from heavier handedness.
I cut a notch at the back of the keybow and clamp the VG on there very tight with that notch in the wire cutter. it makes a light weight handle. For masters, I cut back the shoulder as far as possible while still retaining the indexing/registering function of the shoulder.
Locksmiths dont generally impression little padlocks as they are easy to cut and sell replacements for.
Wake up and smell the Kafka!!!
-
raimundo
-
- Posts: 7130
- Joined: 21 Apr 2004 9:02
- Location: Minnneapolis
by Oldfast » 27 Feb 2011 15:54
Raimundo, could you elaborate on filing down the shoulder of the key? I think I understand, but want to be sure. I'm assuming you file the top of the shoulder down, leaving the vertical portion of it untouched to serve its' purpose of stopping the key from going in any farther. Another question. Do you have a personal preference as to which way to turn. Should I be impressioning in both directions each time I insert the key or is it good practice to use only one direction? Also, I think on my first attempt, I used way too much force for both turning and jiggling. I know that using too much force, or not using enough, will keep you from getting a good impression. It's probably hard for someone to put into words for me, how much force is actually required, but I'd imagine it's far less than I was using. I guess experimenting will probably be my best bet to find the answer to this. My next attempt: A 5-pin Master #17. The warding on these are on the opposite side of the keyway compared to most, so I found that it takes an M11 blank rather than the M1. And, after a half dozen auto places, I finally found the tool I was looking for. The handle from this tool works well as a key holder. Not my idea- seen this on youtube. And, as always, thanks for any advice. 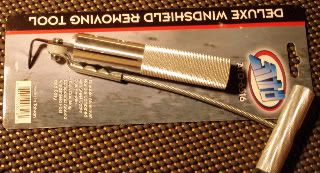  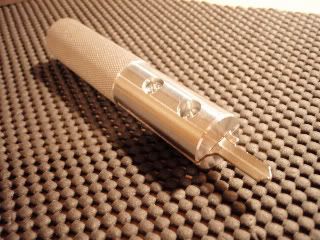
-
Oldfast
-
- Posts: 81
- Joined: 29 Dec 2010 15:01
- Location: Michigan
by raimundo » 28 Feb 2011 9:07
I bump both left and right both up and down, as for turning, if we're still on the impressioning subject, it turns when it turns, some locks open either way but with an impressioned key, one direction or another will sometimes turn first, it just means that you are almost done, if it dosent turn both ways, assuming its not blocked by the boltworks from turning one direction, turn it in the direction that it will turn and bump while its turned, this will mark the positions that still need a bit more reduction.
Wake up and smell the Kafka!!!
-
raimundo
-
- Posts: 7130
- Joined: 21 Apr 2004 9:02
- Location: Minnneapolis
by Oldfast » 28 Feb 2011 15:43
Thanks for the tips. Second impressioning went much better than the first. Took about an hour 20 (less than half the time it took me with the Master#3). The key slides in and out smoothly and is easily turned without having to push it in first. I filed down the shoulder as you mentioned (it made a big difference). The new handle works nice as well. I used less force this time when turning and jiggling and the impressions were clearly seen throughout most of the process. The files I'm using do the job, but I think I'm gonna look into buying a set. Anyone have any recommendations on where and/or what to look for? 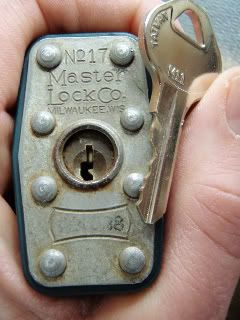
-
Oldfast
-
- Posts: 81
- Joined: 29 Dec 2010 15:01
- Location: Michigan
by raimundo » 1 Mar 2011 9:35
That is exactly how I file the shoulder.
congradulations on the job,
afte a while the twenty minutes should be about average time
for everyone but Jos Weyers.
Wake up and smell the Kafka!!!
-
raimundo
-
- Posts: 7130
- Joined: 21 Apr 2004 9:02
- Location: Minnneapolis
by Varjeal » 1 Mar 2011 13:00
You likely want a file with a swiss #4 or 6 cut. I actually prefer a tapered round file but some like the "teardrop" shaped ones. Keep your filing strokes smooth and even and this will help in the identification of marks.
Also, if your marks are not showing up in the middle of your cuts, it means you've got the spacing off and you should probably either start over or correct immediately.
*insert witty comment here*
-
Varjeal
- Moderator Emeritus
-
- Posts: 2869
- Joined: 3 Oct 2003 15:05
- Location: Western Canada
by Oldfast » 2 Mar 2011 10:05
Thanks Vargeal. Guess I should look around a bit more though before asking. Just found your tutorial- viewtopic.php?f=2&t=1396. Very clear, very precise. You answered all the questions a had (+ some I would've eventually had). I've read several articles on impressioning now, and it seems most authors prefer the swiss #4 cut over the 2 or 6. Only question now is round or pippel. I've been using a round file for the cuts, but I usually have to grab a different one for turning those "U's" into "V" shapes. Because of that, I'm leaning toward a pippen, for it would be a dual-purpose file accomplishing both these jobs. You say you prefer a round - are you able to create the angles with that same file, or do you just use a couple of different ones?
-
Oldfast
-
- Posts: 81
- Joined: 29 Dec 2010 15:01
- Location: Michigan
by femurat » 2 Mar 2011 10:35
A round file is all you need. Just push towards the side while you file up and you'll get nice flat angles. Cheers
-
femurat
- Site Admin
-
- Posts: 3769
- Joined: 22 Sep 2008 9:06
- Location: Italy
Return to Pick-Fu [Intermediate Skill Level]
Who is online
Users browsing this forum: No registered users and 5 guests
|


