|
When it comes down to it there is nothing better than manual tools for your Lock pick Set, whether they be retail, homebrew, macgyver style. DIY'ers look here.
 by Knows-Picker » 10 Apr 2007 10:37 by Knows-Picker » 10 Apr 2007 10:37
ok, I know that alot of us are using 1/2" steel stock to make our picks. I used to just cut it on both sides and make a pick, grinding away the material from both sides to make the business end. I started playing around with how to make more picks out of my investment in my stock and came up with a simple repeating pattern. Bear in mind that I am not an artist on paint, and that this is just a rough template but check this out.
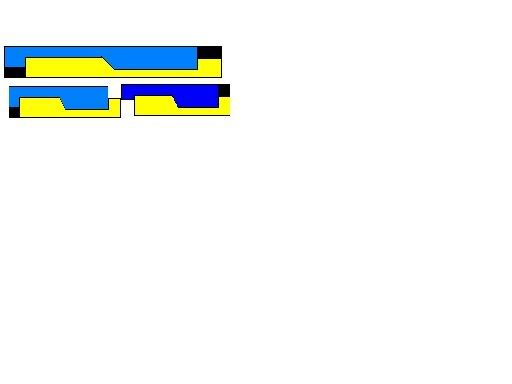
As you can see, if you look at the top, by offsetting the two picks on top of one another, you can actually stack these one behind another to have almost no wasted metal. This way I got 12 picks out of 2' of material where as I would have usually gotten 6. This gives you a nice thick handle, a good business end, and tons of picks out of a lot less material. I use a dremel cut off wheel to split the two blanks, and then finish them into whatever picks I am wanting at the time. I still have to grind from both sides to make a few picks, but most can be made from this design with no problem. If someone is good at autocad and could make an accurate sized templates for everyone that would be great. Once again, this is just a rough drawing, but it should give everyone the idea. It repeats itself like the fish to bird drawing, meaning no wasted space.[/url] I hear what you are saying.....that doesn't mean I agree with you....Just that I am nodding my head to placate you and silence your futile attempts to win the argument.
-
Knows-Picker
- Supporter

-
- Posts: 143
- Joined: 3 Dec 2005 17:23
- Location: Ocala,Fl
-
by raimundo » 10 Apr 2007 11:01
when I used to make picks out of feeler gauge stock, the 12" kind, I would break the length to 3and a half or four inchs then I would split each piece diagonally length wise starting not at the corner, but a bit down from there to allow for the height of the picktip and this is the same on both ends. I did not split the metal with a dremel, I would use a c clamp and two blocks of wood to clamp the metal very tight then I would use one of the 'general tool' carbide scribers, (this particular scriber has a thick base to the point, unlike starretts scriber) and I would scribe a line very hard into the metal, then go over it a couple of times, where the line came out on the end, I then take a triangle file and cut a lead in to the fracture line, and clamp one side into a vise, with the scribed line at the edge of the jaw. with a plier, starting on the wide end sticking up, I break the metal, by bending it until I hear the fracture then when I hear the fracture, I move deeper along the line from the start and bend again to hear the fracture proceed a little futher, by the time you crack the piece off, the half that sticks above the jaw and is gripped by the plier, becomes a bit curled from the bending, but this is temporary, and you can immediatly remove those curls by using the plier to reset it to flat. You now have a piece of metal that is broken in half, with a sharp fractured edge, but you have not lost any metal in the kurf. (the width of the cut that is turned into shavings) the technique will yield two picks for the same half inch wide piece of metal, and it will cost you a carbide scriber every few picks.
about the undesired curve that you remove from the metal after breaking it, flat jaw plier, without teeth will be best to do the break off with, as it will not contribute new tool marks to the surface of the pick.
Metal has memory, it wants to unbend to its former shape, but memory decays over time and temp. you unbend while the memory is fresh, and it will work well, three things can recrystalize the metal in a new shape, heat destroys memory, time eventually erases memory, and work will harden metal, such as flexing or pounding or filing. so remember the tool to take out a bend it the same one that put it there applied at the same spot but forcing in the opposite direction
-
raimundo
-
- Posts: 7130
- Joined: 21 Apr 2004 9:02
- Location: Minnneapolis
by Knows-Picker » 10 Apr 2007 12:02
I used to use the diagonal line about 1/3 bottome to 1/3 top. I just find that this makes a nice hadle, and with the dremel set at about 6,500 rpm unstead of the 10,000 for hi speed that I can neatly make these cuts in about 45 seconds or so per set of 2. There is no over heathing as I dip about after every straight cut, and they turn out very reliable, generic pick blanks, that when you have about 10-15 of them makes running through a complete set of picks a very easy process. Ray, you have that jewlers background, and you have ALOT of know how on how to make GREAT looking picks, but alot of us don't have your skill/knowlege and so this is a pretty easy method for those of us who aren't way past the commercial level pickmaker that you are.!!!  This should help out some people I hope, like me who first started making picks out of banged out clothes hanger to slowly progressing to some pretty decent metal work. Some day I hope to have a name like yours on here,lol... Until then I will continue to learn. I hear what you are saying.....that doesn't mean I agree with you....Just that I am nodding my head to placate you and silence your futile attempts to win the argument.
-
Knows-Picker
- Supporter
-
- Posts: 143
- Joined: 3 Dec 2005 17:23
- Location: Ocala,Fl
-
by bumber » 10 Apr 2007 13:09
great idea guys i think i shall do this a few picks over. But dont you get weird ||||||____^ picks like my "image"? instead of nice ||||||------^?, which I think look a little nicer. 
-
bumber
-
- Posts: 763
- Joined: 3 Apr 2007 21:20
- Location: Florida
-
Return to Lock Picks
Who is online
Users browsing this forum: No registered users and 26 guests
|


