|
When it comes down to it there is nothing better than manual tools for your Lock pick Set, whether they be retail, homebrew, macgyver style. DIY'ers look here.
 by femurat » 5 Nov 2009 3:33 by femurat » 5 Nov 2009 3:33
You can go up to 2000 grit if you want. Usually I start with 500, then I pass to 600 and then to 1000. After that I use a felt disc with a polishing compound on my dremel to give the final touch (and to protect the pick from rust). This time I tried to make a comparison between the SandingBLOB idea and the traditional method. I choose to finish the pick in less than 10 minutes, so I had time just for a quick sanding job. If you spend half an hour sanding the comparison is not fair. Cheers 
-

femurat
- Site Admin
-
- Posts: 3770
- Joined: 22 Sep 2008 9:06
- Location: Italy
by Legion303 » 5 Nov 2009 8:33
Rotation in the sanding blob results in the pick being rounded off, but would a little of the old in-out help any? You could do it by locking the pick into a jigsaw or reciprocating saw and trying it like that.
-steve
-

Legion303
-
- Posts: 2348
- Joined: 6 May 2006 6:52
- Location: Denver, CO
by chriss » 5 Nov 2009 10:12
Hello all,
If I understand you right, you simply put the pick into the chuck of your drill and let it rotate in oiled sand.
Wouldn't it be more promising to mount one or more picks to an arm/boom to
a) avoid the neutral central line where no sanding occurs
b) increase the speed of the pick in the sand
c) reach a more even sanding effect
d) quicken up the whole process
A more advanced method would it be if you mount the picks in rotating holders
and add some gears which slowly rotate the picks while being dragged through the sand.
(But this is too complicated for me)
I've attached a quick sketch to clarify my thoughts.
Kind regards from germany,
Chris
-
chriss
-
- Posts: 5
- Joined: 5 Nov 2009 9:16
by femurat » 9 Nov 2009 4:59
So many helpful ideas... I'm surprised! Steve, I think rounding the edges is the most important part in the sanding process. That's why I choose to make the pick turn. Anyway I agree with you about the benefits of some in-out. The risk with a reciprocating saw is to consume the tip and left the shaft unaffected. To avoid this I think I need a box of sand, not a glass, so I can push forward the saw to sand the shaft too. Chris, your idea is brilliant since it gives many benefits. But be careful: if you mount the pick on an arm you risk is to bend the pick! I guess you can avoid this by mounting the pick perpendicular to the arm. This way it's more hydrodynamic and is under less stress, but still benefits the increased speed. Cheers
-
femurat
- Site Admin
-
- Posts: 3770
- Joined: 22 Sep 2008 9:06
- Location: Italy
by Legion303 » 9 Nov 2009 7:11
True on rounding the edges, but that's easy enough: mount the jigsaw hanging over the jar of sand and put the jar on something that rotates (like a lazy susan). Rotate it back and forth slowly. Solve the "sanding the shaft" problem by making the pick extra long if needed and trimming off excess after sanding. :)
As far as the length of time is concerned, 20 minutes of leaving a drill running while you read a book is time better spent than 10 minutes sanding like mad with a manual rig, assuming you can refine the process enough to act as a substitute. Although it occurs to me that you'd better have a good drill--the Harbor Freight Chinese model won't last long under that kind of abuse.
-steve
-
Legion303
-
- Posts: 2348
- Joined: 6 May 2006 6:52
- Location: Denver, CO
by Eyes_Only » 9 Nov 2009 21:43
With rounding off I just use needle files, a lot of sand paper.........and take my sweet time.   If a lock is a puzzle, then its key is the complete picture
-
Eyes_Only
- Supporter

-
- Posts: 4111
- Joined: 17 Dec 2003 20:33
by femurat » 19 Nov 2009 12:28
I liked Chriss idea, but I tried to make it simpler! 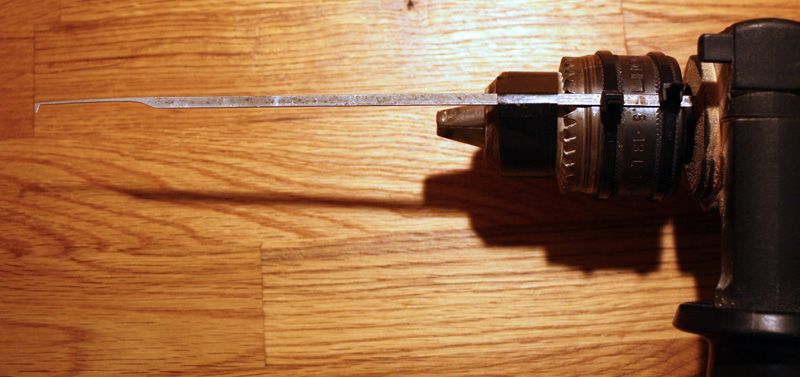 This was just an experiment to develop the process, so I used an old and rusted bristle. There are some big scratches on the pick, next time I need to "clean" it before I start. Better if I use a less ruined one... I roughly shaped a pick with a cut off disc on my dremel, a 3 minutes job. Then I run the drill for a few minutes on the SandingBLOB. As you can see the pick is attached to the chuck so its speed is a lot higher than if it is inserted like a normal drill bit. The upper part of the shaft and the handle are not finished, I need more sand on the bottle. Anyway I think I got a very good result: the tip is perfectly sanded and its shape is not altered. 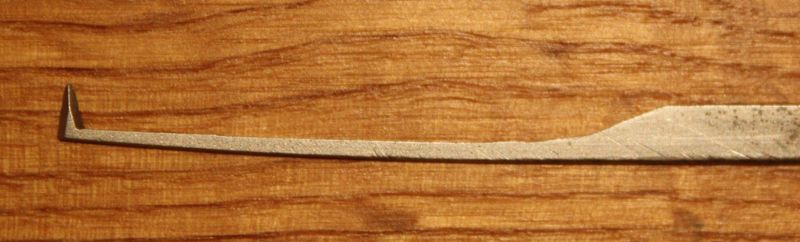 I like this improvement. Next time I'll round a little the edges with a needle file and use the SandingBLOB just for finishing. Cheers
-
femurat
- Site Admin
-
- Posts: 3770
- Joined: 22 Sep 2008 9:06
- Location: Italy
by raimundo » 22 Nov 2009 8:43
Thats some kind of dimple pick isn't it. those type need to be made for left and right handed locks, I try to taper/bevel both sides and make it universal. and more rounded less sharp. Yours would work even if the pins were not rounded on the tips, my double sided type depends on the bevel of the pin tip to get under the pin.
Wake up and smell the Kafka!!!
-
raimundo
-
- Posts: 7130
- Joined: 21 Apr 2004 9:02
- Location: Minnneapolis
by nothumbs » 22 Nov 2009 20:21
I wonder if a rock tumbler could be used for this. Suppliers also might be a good source for various grits as well.
It's a good day when I learn something new.
-
nothumbs
-
- Posts: 478
- Joined: 22 Mar 2007 15:23
- Location: Northern California
by femurat » 23 Nov 2009 6:19
You're right Ray, this is how I modify an half diamond to work better with dimple locks I know what you mean about rounding the tip. With sandpaper it's automatically rounded. In the SandingBLOB the shape is unaltered. I have to consider this aspect when I shape the pick. Also, when I make double-side dimple picks they tend to be sharp like knives. Maybe it's better to make them with a flat edge and then just round the edge with sandpaper. I'll try this. Nothumbs, I had to search for "rock tumbler" because I didn't know what it was. This is exactly what I had in mind! Well, actually I was thinking about a sandy beach while I was on the seaside... but that's almost the same. I think a rock tumbler will work fine. If anybody has the option to try let us know how it turns out. Cheers
-
femurat
- Site Admin
-
- Posts: 3770
- Joined: 22 Sep 2008 9:06
- Location: Italy
by nothumbs » 23 Nov 2009 20:37
Ray, any chance you've tried this? I figure with the jewelry background if anyone might have a tumbler around it would be you.
I've heard of using nut shells in a tumbler, like walnut shells, as well as various sands and grits. When my kid was younger we had an inexpensive tumbler we use to polish rocks. Had to keep it in the garage under a box as the motor made so much noise while running, and you have to leave them running for days at a time.
It's a good day when I learn something new.
-
nothumbs
-
- Posts: 478
- Joined: 22 Mar 2007 15:23
- Location: Northern California
by raimundo » 30 Nov 2009 9:29
I haven't ever owned a tumbler, and so have not used one for this, but I have worked many years ago at a punch press and there we used a large industrial size tumbler to deburr the parts, usually with ceramic media for the tumbleing, you can get media that look like little saturn things balls with rings around them, or you can use some three point star things, or stuff that just looks like vitamin pills.
Its also possible to polish steel to a patina in a media of steel ball bearings and soap. It burnishes the surface like hitting it with a million tiny ball peen heads. The soap keeps things slippery and lifts off the dross.
Wake up and smell the Kafka!!!
-
raimundo
-
- Posts: 7130
- Joined: 21 Apr 2004 9:02
- Location: Minnneapolis
Return to Lock Picks
Who is online
Users browsing this forum: No registered users and 37 guests
|


