Lock Picking 101 Forum
A community dedicated to the fun and ethical hobby of lock picking.
       

Lock Picking 101 Home
Login
Profile
Members
Forum Rules
Frequent Forum Questions
SEARCH
View New Posts
View Active Topics


Live Chat on Discord
LP101 Forum Chat
Keypicking Forum Chat
Reddit r/lockpicking Chat


Learn How to Pick Locks
FAQs & General Questions
Got Beginner Questions?
Pick-Fu [Intermediate Level]


Ask a Locksmith
This Old Lock
This Old Safe
What Lock Should I Buy?


Hardware
Locks
Lock Patents
Lock Picks
Lock Bumping
Lock Impressioning
Lock Pick Guns, Snappers
European Locks & Picks
The Machine Shop
The Open Source Lock
Handcuffs


Member Spotlight
Member Introductions
Member Lock Collections
Member Social Media


Off Topic
General Chatter
Other Puzzles


Locksmith Business Info
Training & Licensing
Running a Business
Keyways & Key Blanks
Key Machines
Master Keyed Systems
Closers and Crash Bars
Life Safety Compliance
Electronic Locks & Access
Locksmith Supplies
Locksmith Lounge


Buy Sell Trade
Buy - Sell - Trade
It came from Ebay!


Advanced Topics
Membership Information
Special Access Required:
High Security Locks
Vending Locks
Advanced Lock Pick Tools
Bypass Techniques
Safes & Safe Locks
Automotive Entry & Tools
Advanced Buy/Sell/Trade


Locksport Groups
Locksport Local
Chapter President's Office
Locksport Board Room
 

How to make great looking wooden picks

When it comes down to it there is nothing better than manual tools for your Lock pick Set, whether they be retail, homebrew, macgyver style. DIY'ers look here.

How to make great looking wooden picks

Postby cuttinedge1 » 7 Mar 2014 19:01

This will be a tutorial for how to make great looking wood handled picks.
Materials:
1 six sided wooden pencil
Thin string
1 File any type
Sand paper
Knife
Pick without a handle

Optional
Lacquer coating
wood stain
marker/sharpie

Step 1
Cut the pencil to the length of the handle you want and cut off the tip. Sand or file off the yellow paint.

Step 2
Lay the pencil down on a flat surface with a flat side on the table. Take a knife and scour the pencil lengthwise in the middle of the flat side facing up then then push the tip of the knife into the wood all along the wood then turn it over and repeat on the other side. The wood should split fairly close to down the middle. If i doesnt just cut the wood in the groove some more and pry it.

Step 3
Take the tip of the knife and pry out the lead from the wood then sand the inside of the wood where the lead came from and the faces of the wood that were made when the wood was split. Next sand the out side of the wood.

Step 4
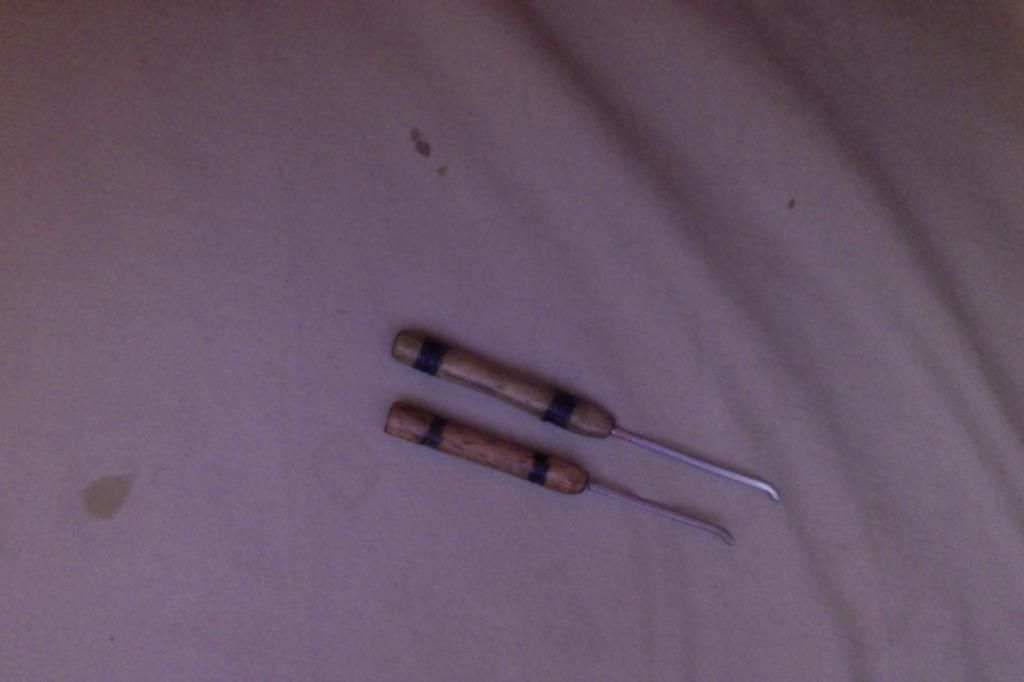
File the outside of the wood into a cylindrical shape and feel free to make the middle a little skinnier to add contour to the pick. Next file a thin groove going around the circumference of the wood at the front and back of the handle.

Step 5
If the pick you made was made from a round piece of metas such as music wire or a thin nail there is just place it where the led used to be. If you are using windshield wiper inserts or hacksaw blades you may need to file a groove the with of your pick into the wood. Next take your string (I like strong nylon string) and tie the two pieces together tight. This one works http://www.animatedknots.com/commonwhipping/ but this one looks better and is tighter http://www.animatedknots.com/westcountr ... dknots.com because you can pull each knot tight. Do this on both ends and pull very tight then melt the ends if you are using synthetic string (nylon polyester etc). If you are using cotton or other organic thread just tie it tight and snip the ends close to the knot. Take the Sharpie and color the string (try not to get it on the wood) to hide the melted ends.

Step 6
Bevel the end of the wood to make it more comfortable and make sure the edges of the wood line up. Do any final filing to make it comfortable.

Step 7 - Optional
If you want a darker handle put on a wood stain. Brush it on and let dry then sand it lightly. Some wood stains have a lacquer coating but I find them insufficient. Apply a coating such as Aero Gloss and let dry then sand lightly and your done. :D

Image
cuttinedge1
 
Posts: 166
Joined: 5 Mar 2014 20:08

Re: How to make great looking wooden picks

Postby femurat » 8 Mar 2014 1:48

Welcome to the forum cuttinedge1. Nice tutorial. I'd prefer to glue the wood and pick together before tighting the two sides together with the strings. Some glue would help to keep the pick in place tightly.

Cheers :)
User avatar
femurat
Site Admin
 
Posts: 3745
Joined: 22 Sep 2008 9:06
Location: Italy

Re: How to make great looking wooden picks

Postby cuttinedge1 » 8 Mar 2014 9:02

Thanks, I did not glue them because if I want to change the pick I could do so without destroying the entire pick. If you tighten the string enough the pick will stay tight but I am working on a pick in which the bach is bent up so and a chennel is cut in the wood so it wont rotate in the handle
cuttinedge1
 
Posts: 166
Joined: 5 Mar 2014 20:08

Re: How to make great looking wooden picks

Postby cuttinedge1 » 8 Mar 2014 20:09

Sorry for the terrible picture.
cuttinedge1
 
Posts: 166
Joined: 5 Mar 2014 20:08

Re: How to make great looking wooden picks

Postby cuttinedge1 » 17 Mar 2014 19:23

Here is a new on I made with real wood
Image
cuttinedge1
 
Posts: 166
Joined: 5 Mar 2014 20:08


Return to Lock Picks

Who is online

Users browsing this forum: No registered users and 10 guests