Lock Picking 101 Forum
A community dedicated to the fun and ethical hobby of lock picking.
       

Lock Picking 101 Home
Login
Profile
Members
Forum Rules
Frequent Forum Questions
SEARCH
View New Posts
View Active Topics


Live Chat on Discord
LP101 Forum Chat
Keypicking Forum Chat
Reddit r/lockpicking Chat


Learn How to Pick Locks
FAQs & General Questions
Got Beginner Questions?
Pick-Fu [Intermediate Level]


Ask a Locksmith
This Old Lock
This Old Safe
What Lock Should I Buy?


Hardware
Locks
Lock Patents
Lock Picks
Lock Bumping
Lock Impressioning
Lock Pick Guns, Snappers
European Locks & Picks
The Machine Shop
The Open Source Lock
Handcuffs


Member Spotlight
Member Introductions
Member Lock Collections
Member Social Media


Off Topic
General Chatter
Other Puzzles


Locksmith Business Info
Training & Licensing
Running a Business
Keyways & Key Blanks
Key Machines
Master Keyed Systems
Closers and Crash Bars
Life Safety Compliance
Electronic Locks & Access
Locksmith Supplies
Locksmith Lounge


Buy Sell Trade
Buy - Sell - Trade
It came from Ebay!


Advanced Topics
Membership Information
Special Access Required:
High Security Locks
Vending Locks
Advanced Lock Pick Tools
Bypass Techniques
Safes & Safe Locks
Automotive Entry & Tools
Advanced Buy/Sell/Trade


Locksport Groups
Locksport Local
Chapter President's Office
Locksport Board Room
 

Kaotik's Tension Wrench "How-To" Guide

When it comes down to it there is nothing better than manual tools for your Lock pick Set, whether they be retail, homebrew, macgyver style. DIY'ers look here.

Kaotik's Tension Wrench "How-To" Guide

Postby Kaotik » 16 Dec 2006 2:19

This is a how-to guide on making a Double Prong and a Serrated Tension Wrench out of Street Sweeper
Bristles.

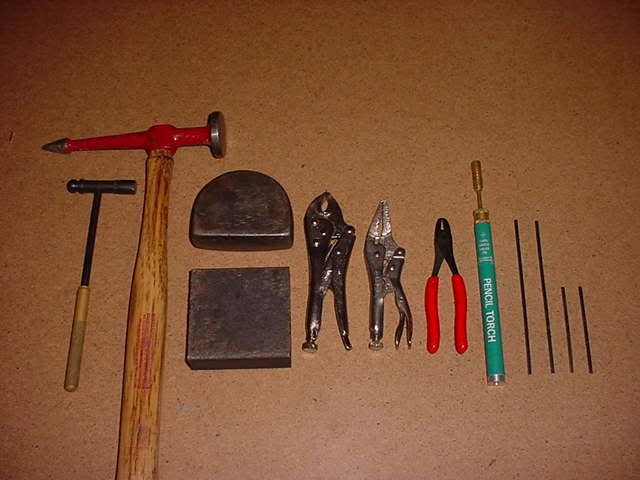
Tools you will need:

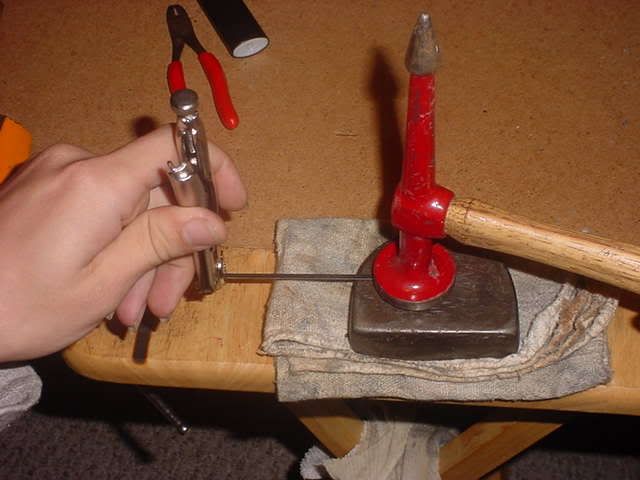
From left to right; Jewelers Hammer, Flat Faced Hammer (any hammer with a moderately flat
striking surface will work fine), Metal Blocks ( or you can use the flat Anvil like surface that is
attached to a vice), 5" Snub-nosed Vice Grips, 5" Needle-nosed Vice Grips, Small pair of Pliers,
Pencil Torch ( any torch would work, I use this one because it will concentrate the heat to a
small area) and 4 Street Sweeper Bristles (2 long and 2 short). Tools that are not in the picture
that are used: Vice, Dremel/Grinder and files.
Image

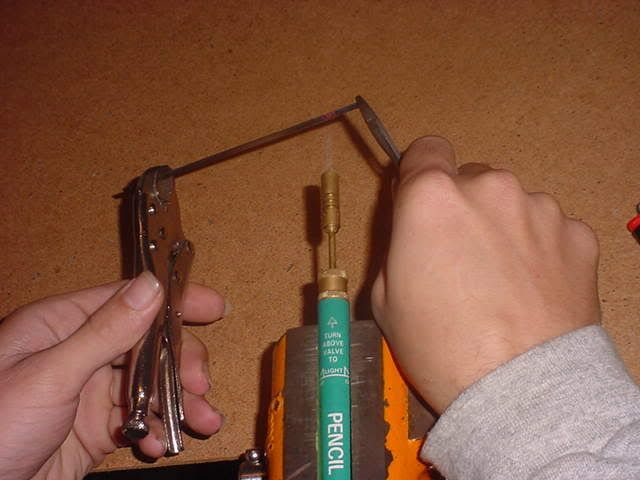
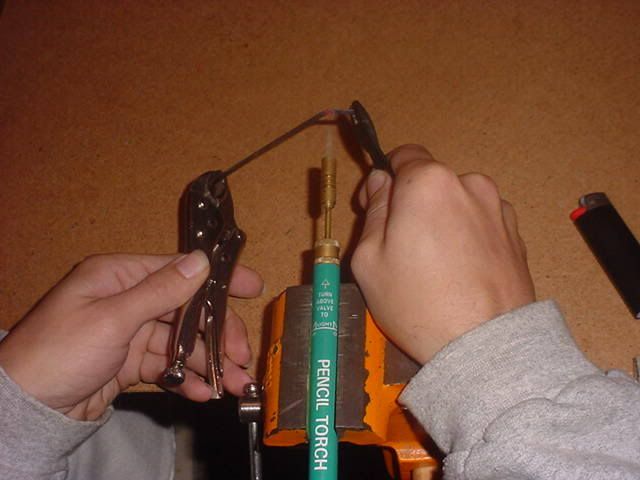
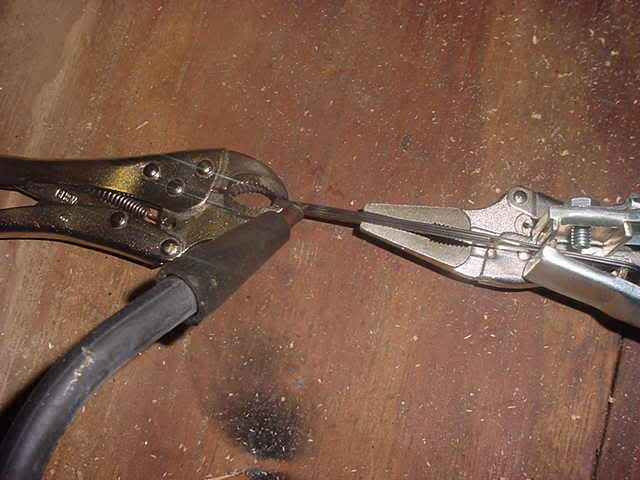
Set up torch in the vice or on a level surface to work on safely, grip one end of the bristle in vice grips
or pliers, then heat the opposite end about a half an inch from the end till it is red hot then bend to
a 45 degree angle.
Image
Image

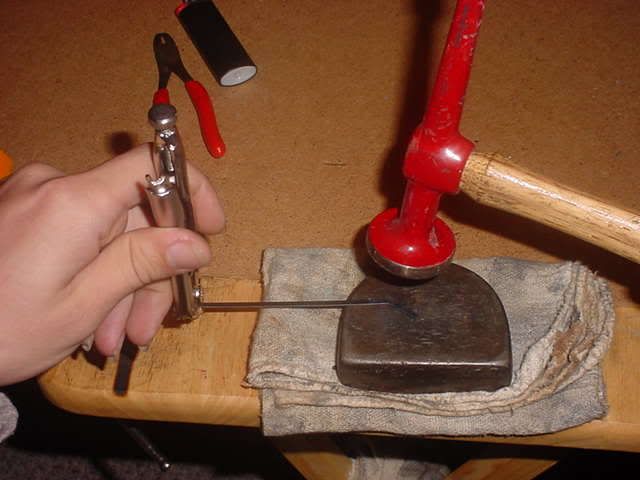
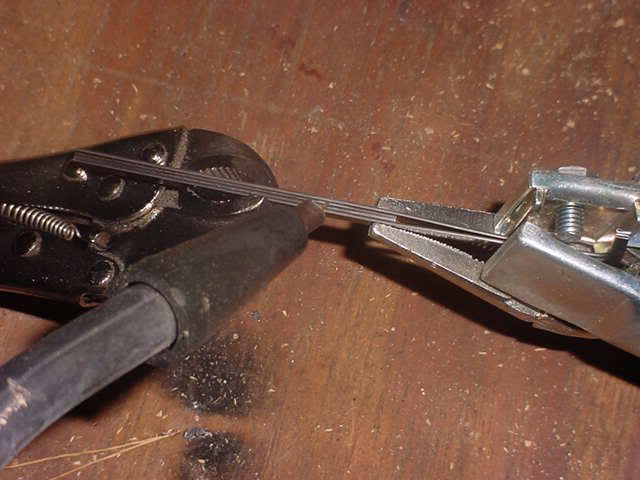
At this point, you will notice the bristle will start to buckle on the inside of the bend. Hammer
the bristle flat while red hot on a hard metal surface such as a metal block (Dolly) or the anvil
like surface on a vice. This is to stretch the outside of the curve while shrinking the inside curve
to create a nice bend while keeping the bristle flat.
Image
Image

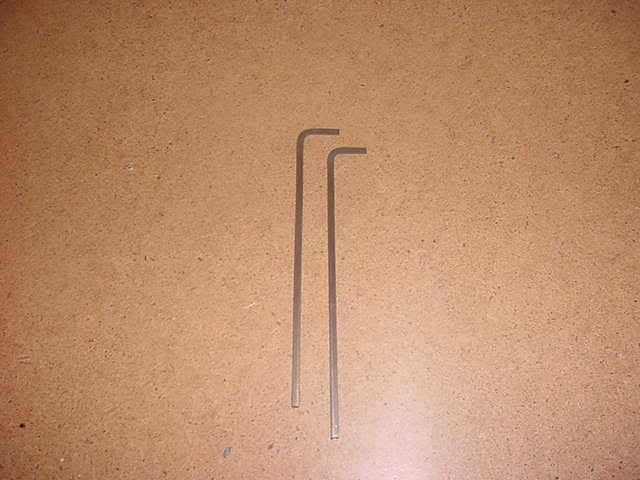
Repeat this process until a 90 degree angle is achieved. Do the other bristle the same way.
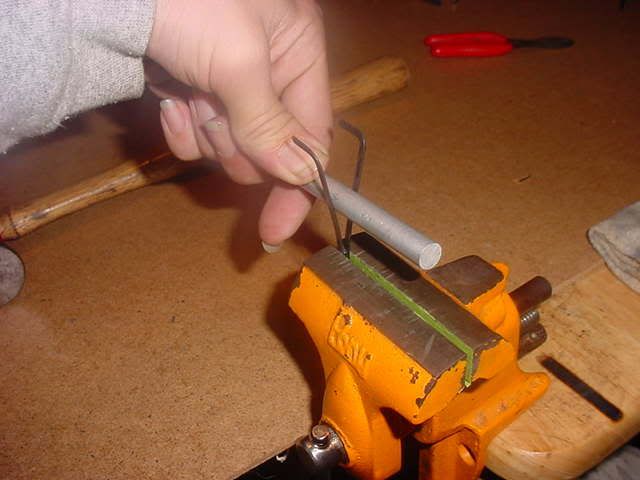
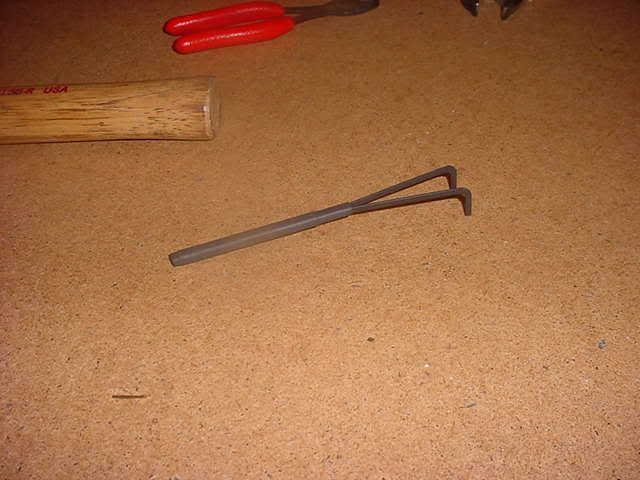
You should now have something that resembles the two bristles shown.
Image

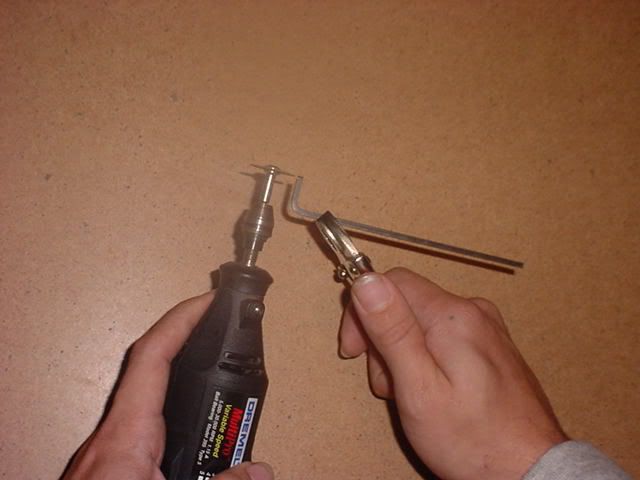
Once you have both bristles bent, clamp them both together with a pair of vice grips or pliers
and trim the ends with a Dremel tool or bench grinder, both the working end as well as the
bottom end. Trimming them together will insure an even cut of both pieces.

You will want to do this same step to the two smaller pieces that will become spacers for these
outside pieces. *Note: It is not necessary to use spacers, it is purely optional.
Image

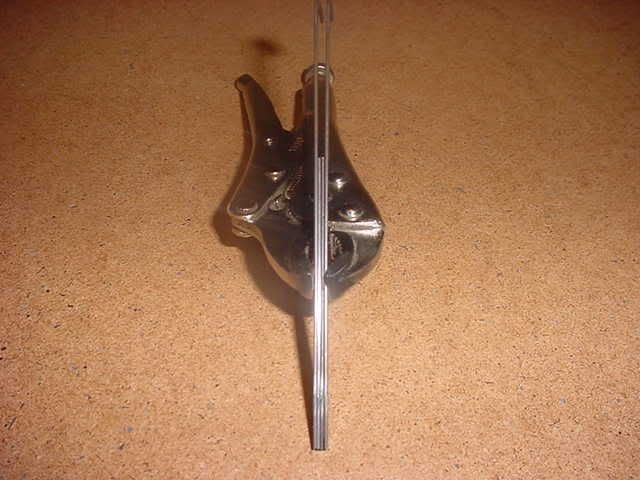
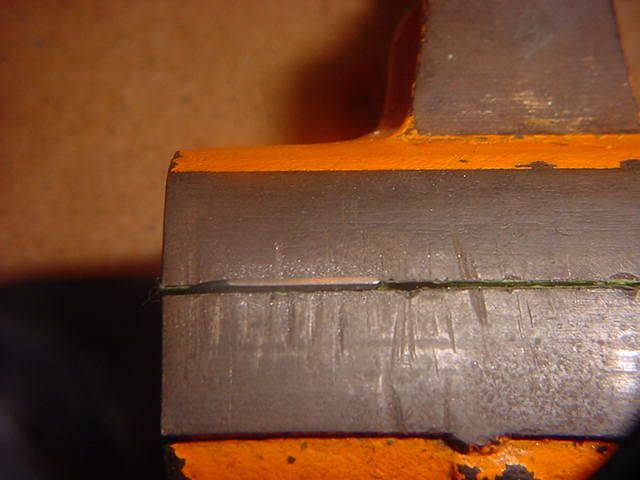
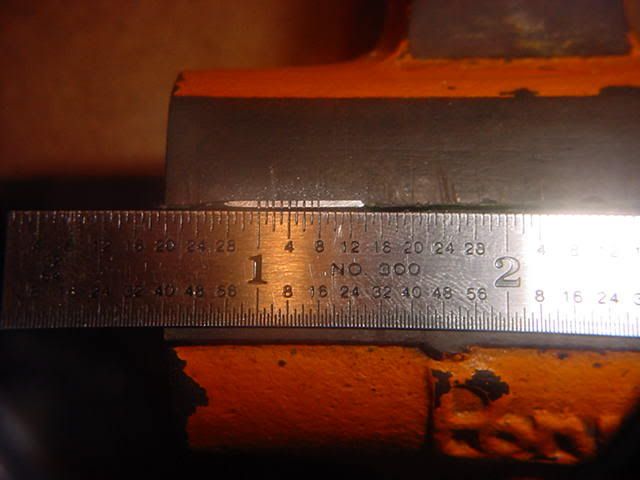
Now sand the outsides of each bristle to insure a good metal contact surface in between each
bristle and a small area on the edges about a half an inch from the bottom. The picture
may not show the area very well but is needed as this will be the area that will be welded.

Another area a half an inch from the top of the center (spacer) bristles of the other side will
need to be sanded or ground down so that there is a spot weld at the bottom of one side and
a spot weld at the top of the other side.

If you want to skip some steps just sand all the sides and edges of all four bristles then clamp
together for welding. *Note: Be sure to clean all areas before welding.
Image

Now clamp the bristles together with a pair of vice grips on each side of the area to be welded.
Weld the edge of the four pieces together on both sides (one spot for each side). *Note: Be
sure to practice on a few bristles to get the wire speed and temperature settings adjusted or
these little babies will warp or just melt on you. *Note: If a welder is not accessible, any type of
2-part Epoxy (liquid or putty) such as JB Weld, Quick Steel or Milliput can be used to bond the surface
pieces together. Be sure to sand and clean the surfaces well before adhering.
Image
Image

Now that it is all welded, grind the welds down so that the area is smooth and flat. Next put the
tension wrench in the vise where the center bristles are level with the top of the vice jaws and
spread the two outside (working end) pieces apart with a pieces of aluminum rod. A wooden
dowel rod or a pair of pliers will work as well.
Image

Now that the tension wrench is spread open you can now keep them sanded or coat them with
any color of enamel or urethane coating of your choice, then wrap a piece of 3/16" or 4.8 mm
heat shrink tubing around the bottom half or dip them in plastic coating for a smooth gripping
handle.

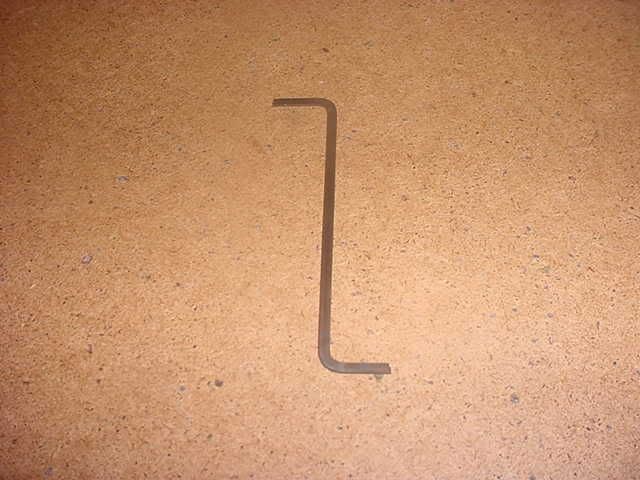
When all done, you should have something that looks like this.
Image


As a double bonus, this is how to make a flat serrated tension wrench using a street sweeper
bristle. One end is to be used in the bottom of the cylinder; the other end will be used for
top of the cylinder near the key pins.

While using the same bending method, bend one end in one direction and the
opposite end in the other direction.
Image

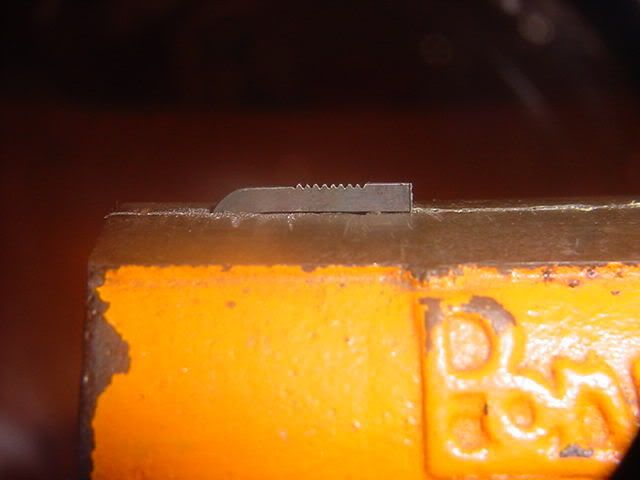
On the top of one end, file the round edge flat. This will be the area in which the teeth will be
filed into.
Image

Use a square or triangle needle file to make 8 or 9 marks every 32nd of an inch. The marks made
will be where the valley of the teeth will be and the area between the marks will be the peaks or
tip of teeth will be. Be sure to file 3-4 strokes per mark to insure all valley's are the same depth.

*Note: If 9 marks are filed, there will be only 8 teeth, If 10 marks are filed there will be 9 teeth
and so on.
Image

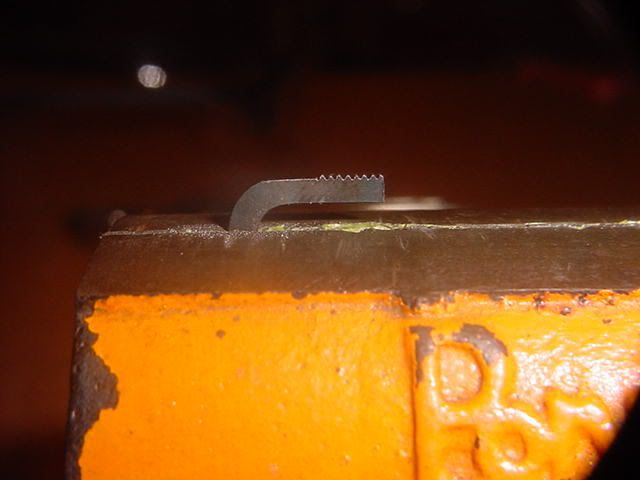
You should now have something that looks like this. Now file the flat area on the left
(based on this picture) lower than the teeth. This will make the teeth protrude and stick out
higher to grip the inside of the cylinder.
Image

Now that the left side of the wrench is filed down, cut off the remainder of the bristle on the right
side at the peak of the nearest tooth.
Image

Now for the other end of the bristle, cut with a dremel or file a third of the width so that
the the lower round edge stops the bristle from going any closer to the first key pin.

Make 3-4 marks depending on how many teeth you want to have, using the triangular needle
file. File down each mark 3 or 4 strokes on each mark so the valleys are the same depth till
the teeth have a sharp pointy edge. Cut, grind or file remainder off to the first peak shown here.

*Note: Be sure to file a recessed area near the edge to allow the teeth to protrude and grip the
inside of the cylinder.
Image

When done, sand with progressively finer grits of sand paper for a smooth shiny finish. You
should now have something that looks like this. *Note: The tool can be tempered if used with a heavy
hand or it can be left as is. I always temper my tools for long life and durability.
Image

Hope you have enjoyed this How-To and that it helps. If there are any questions or comments, please
feel free to post them.

Kaotik
Image
Kaotik
Moderator Emeritus
 
Posts: 1200
Joined: 10 Jun 2006 13:38
Location: Texas, USA

Postby iNtago » 16 Dec 2006 2:25

great just great

still waiting for the jack knife pick how too :lol:
Image
iNtago
Supporter
Supporter
 
Posts: 479
Joined: 10 Sep 2006 18:45
Location: Brenham, Texas

Postby mjwhit » 16 Dec 2006 3:40

:shock: Wow
Shot man brilliant post... Just what I wanted. Guess what im doing tomorrow?


Are you serious about the jacknife how-to iNtago? You can have a quick look at my knife-near the end of the homebrew hall of fame. Since then Ive polished and put Silvo on it, but you get the idea.
I could do a how to once I get some light-if there is enough demand.

Unless someone else with more skills (hint hint Kaotic) wants to beat me to it.
Image
mjwhit
 
Posts: 266
Joined: 25 Nov 2006 19:40
Location: New Zealand

Postby Romstar » 16 Dec 2006 3:54

Nice work, all around.

Romstar
Image
Romstar
 
Posts: 2823
Joined: 18 Apr 2004 3:13
Location: Nova Scotia, Canada

Postby iNtago » 16 Dec 2006 4:06

It was a joke

kaotik wrote:Hmmm, I will have to make another one to make a step by step guide on it, and it would be interesting to share with you all. I think I will give it a go.


but still thats one great guide

take a break and make another :twisted:
Image
iNtago
Supporter
Supporter
 
Posts: 479
Joined: 10 Sep 2006 18:45
Location: Brenham, Texas

Postby Fah_Cue » 16 Dec 2006 5:13

Very nice T/W there
Image
Fah_Cue
 
Posts: 305
Joined: 30 Aug 2005 5:59
Location: Sydney, Australia

Postby jordyh » 16 Dec 2006 9:49

You know, i'm not that much into pickmaking, but you make me want to run to my shed and get working.
jordyh
 
Posts: 877
Joined: 15 Dec 2005 8:01

Postby Kaotik » 16 Dec 2006 16:41

Thnks guys!

Glad I have spread a little inspiration around. Try playing around with the ideas and see if there are some other things you can make of it.

Maybe Spossum or Ray will post on how the Serrated T/W works for them. It works great for me but it's always good to have another opinion.

iNtago: Your right I did make that comment about the Jackknife, And I will give it another go. I just try not to overload myself with to many projects at once, I notice when I do that, nothing gets done...LoL. So I take it one at a time as new ideas or homebrew's come at me.
Image
Kaotik
Moderator Emeritus
 
Posts: 1200
Joined: 10 Jun 2006 13:38
Location: Texas, USA

great guide!

Postby Spossum » 17 Dec 2006 11:32

Thanks Kaotic for making a great guide. I hope this one gets a sticky. Reading the comments above made me laugh a little, because you have motivated me to get out in my garage today also.

I will also say that I got a wonderful surprise a couple of days ago from Santa Kaotic. I have one of those serrated tension wrenches. It looks even better in my hand than it does in the photos. Kaotic is a first rate craftsman, his work is outstanding. The serrated wrench gets a nice grip, and I especially like the small notched out end. I can get a great grip in the top of the key-way with it, and it leaves so much room to work with my pick.

Thanks very much Kaotic. I have sent off a bundle to you, and it's not switches.
Image
Spossum
 
Posts: 92
Joined: 12 Aug 2006 8:41
Location: Kansas USA

Postby dmux » 17 Dec 2006 11:35

great work, now just to get a hold of street sweeper bristles
dmux
 
Posts: 611
Joined: 28 Dec 2004 10:56
Location: MD

Postby scorpiac » 17 Dec 2006 11:41

Excellent Guide, Thanks!

Phil.
Image
scorpiac
 
Posts: 206
Joined: 27 Oct 2006 22:05
Location: P.E.I. Canada

Postby Exodus5000 » 18 Dec 2006 13:36

What a nicely organized guide. Good job Kaotik. This makes me wonder about something...

I wonder how epoxy would work as a pick handle? Like, make a handle mold with something like a plastic sleeve in it. Then put the pick in the molde and fill the bloody thing with epoxy and let dry. Hmmm...
[deadlink]http://img441.imageshack.us/img441/6973/exodus5000ac5.jpg
Exodus5000
 
Posts: 952
Joined: 6 Apr 2004 23:57
Location: Sturgeon Bay, Wisconsin, USA

Postby zeke79 » 18 Dec 2006 13:46

Sticky :wink: .
For the best book out there on high security locks and their operation, take a look at amazon.com for High-Security Mechanical Locks An Encyclopedic Reference. Written by our very own site member Greyman! A true 5 Star read!!
zeke79
Admin Emeritus
 
Posts: 5701
Joined: 1 Sep 2003 14:11
Location: USA

Postby Exodus5000 » 18 Dec 2006 16:48

and a well earned sticky at that.
[deadlink]http://img441.imageshack.us/img441/6973/exodus5000ac5.jpg
Exodus5000
 
Posts: 952
Joined: 6 Apr 2004 23:57
Location: Sturgeon Bay, Wisconsin, USA

Postby Kaotik » 18 Dec 2006 21:15

Exodus5000 wrote:I wonder how epoxy would work as a pick handle? Like, make a handle mold with something like a plastic sleeve in it. Then put the pick in the molde and fill the bloody thing with epoxy and let dry. Hmmm...


I thought about that to, but not making a mold. With some of the long drying/curing epoxies out there, coat the pick handle one side at a time and before is hardens cover it up with something textured, file down the edges and repeat on the other side then paint it.

I could however see a mold being better, but might have to account for shrinkage. A good idea none the less.
Image
Kaotik
Moderator Emeritus
 
Posts: 1200
Joined: 10 Jun 2006 13:38
Location: Texas, USA

Next

Return to Lock Picks

Who is online

Users browsing this forum: No registered users and 12 guests