|
When it comes down to it there is nothing better than manual tools for your Lock pick Set, whether they be retail, homebrew, macgyver style. DIY'ers look here.
 by Kaotik » 31 Mar 2007 0:29 by Kaotik » 31 Mar 2007 0:29
That might work, as I have not tried it I can't say for sure.
Though some or a majority of two part epoxies are of thick consistancy and do not poor very well, especially if the foil is obstructing majority of the space between the straw and the wiper inserts.
If the epoxy has a long working time after mixing it could be injected with a syringe, but you may want to close one end of the straw so is not to poor out the other end while filling. There is also Sonic straws that are pretty big and might do the trick, but would make a rather big handle unless grinded or filed down after curing.
Another suggestion is just to sand the insides of the inserts, epoxy and then dip them Plasti-dip or wrap in heat shrink tubing.
Let us know how it goes.
-
Kaotik
- Moderator Emeritus
-
- Posts: 1200
- Joined: 10 Jun 2006 13:38
- Location: Texas, USA
by DrPepper » 13 Apr 2007 21:49
Hello, here is my first attempt after following this guide.
I used junior hack saw blades as I dont have any sweeper bristles.

 
Thanks for the tips.
-
DrPepper
-
- Posts: 4
- Joined: 10 Apr 2007 5:09
- Location: The Land of Great Wheather, Los Angeles, California
by Kaotik » 14 Apr 2007 15:00
Nice, very nice indeed. That one turned out really well, you did a good job.
What is it you used to fuse the pieces together, and is there anything in the middle of the outside pieces??
-
Kaotik
- Moderator Emeritus
-
- Posts: 1200
- Joined: 10 Jun 2006 13:38
- Location: Texas, USA
by DrPepper » 20 Apr 2007 1:47
Thank you Kaotik, but you deserve some credit as I would never have done this if not for your guide.
1. I welded the pieces together. It was my second weld ever! I used a wire feed arc welder.
2. Outside pieces...?  This may mean two things so two answers...
-The handle is four blades thick, made by using two blades for the "Outside pieces" and one cut in half and doubled up for the center two.
-While welding I screwed up (twice) and welded the two top "Outside pieces" (that form the Y) together. However, it was about a 1mm weld and next to the handle, so I cut one side with my dremel and then ground down the "bump" from this slip up and bent the now newly created tab down to create a bow when the wrench is inserted into a key way...

Sorry I don't have a pic of the wrench with the bow at the moment.
I also polished the wrench to a mirror finish. Here you can see the rim of the quarter reflecting in of the handle.

-as a side note, I had to heat and bend the blade three times for both side pieces to get a 90 degree angle. This lead to several light hits of the hammer to fix the bending of the pieces. As a result there are hammer marks that would be impossible to remove without removing a lot of material and making the pieces very thin. When I make another one (soon) I will try to bend it with one move and flatten the bend with one strike of the hammer. 
-
DrPepper
-
- Posts: 4
- Joined: 10 Apr 2007 5:09
- Location: The Land of Great Wheather, Los Angeles, California
by raimundo » 20 Apr 2007 9:35
a smooth head on the hammer and a flat un scarred anvil block will leave the least tool marks, if you are flattening a piece of metal that you bent and have reason to avoid tool marks, look at your hammer and anvil bloc use the best you have, un scarred if possible. bending metal with heat can work well sometimes and other times it leaves a brittle fracture area in the bend, it all depends on how hot is got for how long, and whether it was quenched.
-
raimundo
-
- Posts: 7130
- Joined: 21 Apr 2004 9:02
- Location: Minnneapolis
by Kaotik » 22 Apr 2007 16:38
DrPepper, you did a good job. Even if you have marks left from flatening the metal, it's not really that important. As long as the tool works, it will suffice just the same.
When things get back on track for you, try making the other one in this guide, it was really fun to do and even nicer to work with.
-
Kaotik
- Moderator Emeritus
-
- Posts: 1200
- Joined: 10 Jun 2006 13:38
- Location: Texas, USA
by Mark » 19 Aug 2007 20:45
Reading this thread made me think that somebody might be interested in converting commercial tweezer picks to a fixed size. That way they no longer tend to pop out of the keyway and they work just as well, maybe better in my opinion, than Falle style tension wrenches. Here's how I have been making them for many years:

-
Mark
-
- Posts: 3
- Joined: 18 Jan 2004 21:57
by Kaotik » 19 Aug 2007 21:12
One could also (which I have seen) file small grooves on the sides of tension ends to grip the cover, which would help hold them in.
That's something I will probably adapt to the wishbone wrench in this thread.
Mark, good job, I don't think I would use anything like that but i'm sure someone would. Clean them up a bit, refinish them and you will have a nice looking set their.
-
Kaotik
- Moderator Emeritus
-
- Posts: 1200
- Joined: 10 Jun 2006 13:38
- Location: Texas, USA
by yanksfan » 28 Jan 2008 19:02
where do you get street sweeper bristles i cant find them anywhere
-
yanksfan
-
- Posts: 113
- Joined: 24 Jan 2008 17:05
- Location: Illinois
by dougfarre » 29 Jan 2008 0:14
On the side of the road downtown.
-
dougfarre
-
- Posts: 1263
- Joined: 10 Nov 2005 21:57
- Location: Houston, Texas
-
by Trip Doctor » 29 Jan 2008 20:00
Is it possible to make a decent 180 degree bend with street sweeper bristles or windshield wiper blades, without much damage to the metal? Would I want to do this in one bend, or two bends at slightly different places? I basically want to make a "U-Turn", and preferable a thin U.
Also, would heating up a larger area of the pick allow for less buckling?
Very cool guide btw Kaotic.
-
Trip Doctor
-
- Posts: 597
- Joined: 18 Feb 2007 23:17
- Location: MN, US
by MBI » 29 Jan 2008 23:02
Trip Doctor wrote:Is it possible to make a decent 180 degree bend with street sweeper bristles or windshield wiper blades, without much damage to the metal? Would I want to do this in one bend, or two bends at slightly different places? I basically want to make a "U-Turn", and preferable a thin U.
Also, would heating up a larger area of the pick allow for less buckling?
I've folded windshield wiper blade inserts back over on themselves with no problem. I did it without heating, in one fold and hammered it flat. I don't know if this would always work since there's probably some variation in steel quality from one insert to another. I'd imagine there's probably a better method of doing it than the way I did it, but I was in a hurry, and it did work. I've used the tools for a few months with no breakage.
-
MBI
- Moderator Emeritus
-
- Posts: 1346
- Joined: 9 Oct 2007 2:29
- Location: Utah, USA
-
by Trip Doctor » 30 Jan 2008 21:41
MBI wrote:I've folded windshield wiper blade inserts back over on themselves with no problem. I did it without heating, in one fold and hammered it flat. I don't know if this would always work since there's probably some variation in steel quality from one insert to another. I'd imagine there's probably a better method of doing it than the way I did it, but I was in a hurry, and it did work. I've used the tools for a few months with no breakage.
Really? You've folded it 180 degrees sideways (like the first wrenches Kaotic showed here in his post), or .. "flatways" (where the faces of the blade face each other) ?? I tried to do that sideways without any heat.. and I didn't even come close. The blade would slip out of either the vise grips or pliers  .
-
Trip Doctor
-
- Posts: 597
- Joined: 18 Feb 2007 23:17
- Location: MN, US
by Kaotik » 1 Feb 2008 2:38
That is a good question, but what direction do you intend to bend the metal strip? Folded onto itself or flat ways?
The thin stainless wiper inserts will bend quite easily when folded back on to itself and bristles will more than likely fracture or break without heat, but stainless nor street sweeper bristles will bend (as shown in my pictures) very easily without heat.
The metal will be altered when heated or bent but can always be annealed and/or retempered to an extent to make the tool function as you want it to.
-
Kaotik
- Moderator Emeritus
-
- Posts: 1200
- Joined: 10 Jun 2006 13:38
- Location: Texas, USA
by MBI » 1 Feb 2008 4:30
Trip Doctor wrote:Really? You've folded it 180 degrees sideways (like the first wrenches Kaotic showed here in his post), or .. "flatways" (where the faces of the blade face each other) ?? I tried to do that sideways without any heat.. and I didn't even come close. The blade would slip out of either the vise grips or pliers .
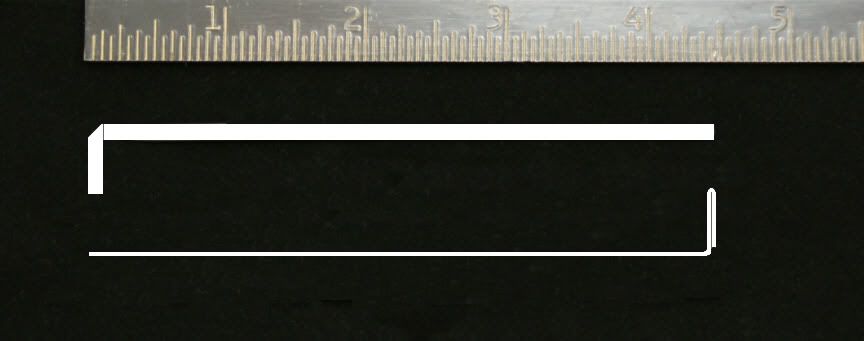
I was talking about folding it over with the flat sides facing each other. I've done it with a 90 degree angle to make a vertical tensioner that would lay completely flat in a compact pick case, and I've also folded it straight back over (in-line with itself) to double the thickness so the end of a tension wrench would fit a wide keyway a bit better. I don't have any photos of these wrenches but I just threw together this diagram in photoshop in case I'm not describing it well; this shows the two ways of bending that I'm talking about. Hopefully the details in the will show up well enough for you to see what I mean.
I started with two pairs of pliers and bent a windshield wiper insert as flat as I could, then put it on an anvil and gently tapped the fold with a hammer until it was completely flat. The only problem I ran into is that on the 90 degree bend it kept opening wider with each tap of the hammer so it was about 120 degrees once I was finished tapping it flat. I tried using the wrench that way but the wide angle made it keep falling out of the keyway. On my second attempt I bent it to about a 60 or 70 degree angle so that once I finished tapping it had opened up to about 90 degrees and it worked much better. I didn't show it in the diagram but I also serrated the edges of the flat 90 degree one so it helps keep it in the keyway better.
As for bending them sideways like in Kaotic's tutorial, I did try to do it once without heating it. It sort of worked but the diameter of the curve was much wider than Kaotic's. It was a tedious process and if I did it again I'd definitely use heat. It's the top one in the picture below. The bend was originally a bit longer but after making it I thought it seemed too long to be practical so I filed it down a bit shorter. To make it I laid the thin edge of a street sweeper bristle over a curved mandrel and gently started tapping the curve into it. If it started to twist or buckle I'd lay the flat side down on a smooth surface and tap it flat. I just alternated hammering the two different directions until I got to where I wanted it.
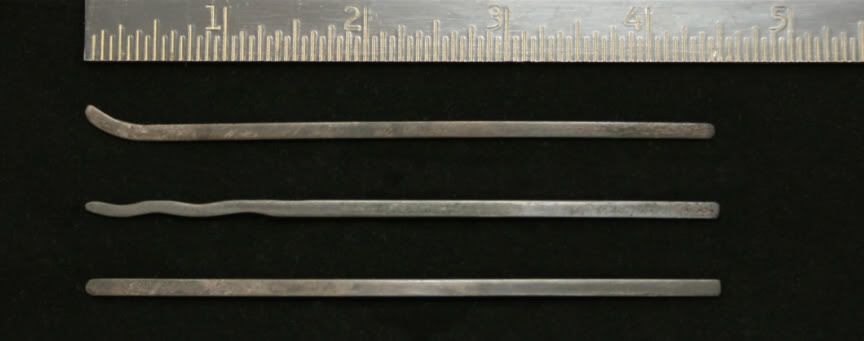
Of course, now that I've posted this picture I think an explanation is needed for these crude abominations that are masquerading as lockpicks. Back when I was a kid I thougt it was very cool when spies could pick locks, so I decided to make some lockpicks. This was before the internet and I had never seen a real lockpick, or even a picture of one, so I just had to use my imagination. I had also never heard of a tension wrench, so this little set only had picks. Of course, they never really worked on any lock worth mentioning, but I felt very cool for having them. I think it's kind of funny that even way back then I used a street sweeper bristle to make my picks.
-
MBI
- Moderator Emeritus
-
- Posts: 1346
- Joined: 9 Oct 2007 2:29
- Location: Utah, USA
-
Return to Lock Picks
Who is online
Users browsing this forum: No registered users and 14 guests
|


