|
Information about locks themselves. Questions, tips and lock diagram information should be posted here.
 by Wolf2486 » 28 Jul 2005 14:09 by Wolf2486 » 28 Jul 2005 14:09
For about a week now I've been attempting to repin a dimple lock (a lock with three sets of pins). This task goes above the line of frustrating; the pins are very small (lost some of those), and so are the springs (lost ALL of those). Also in the process of repinning one set, one must make sure the pins inside the other two sets do not fall out; however, that isn't too hard due to the propinquity of the sets to eachother. I was curious if anyone else attempted (and perhaps succeeded) repinning this lock? If so, what means did you go by?
The last two questions are the reason for this post and I apologize for the complaining before; however, writing this post really seemed to assauge my anger and frustration, at least to the point of attempting to repin this lock again. Thank You for your patience.
Wolf,
Lock picking is an art, not a means of entry.
-
Wolf2486
-
- Posts: 287
- Joined: 15 Jul 2004 16:46
- Location: Pennsylvania
-
by TOWCH » 28 Jul 2005 14:37
What lock is this? Kaba Gemini? Forgive me, the only dimple lock you ever see over here is Mul-T-Lock and I don't bother keeping as up to date.
Is the pin cap replacable or are you doing this plug follower stylie? If it's the later, I'm imagining a hollow tube plug follower, with a hole to feed the driver pins through, rotate and move on to the next pin stack. You can issolate all the pin stacks in this manner. Then just pin the plug and slide it in. I would pass on the best advice I ever got on this forum and that is work over a towl on a clean surface. Good luck.
-
TOWCH
-
- Posts: 1587
- Joined: 20 Jul 2004 0:19
- Location: Oregon
by Wolf2486 » 28 Jul 2005 15:14
Yes it is a Kaba Gemini, It is kind of complicated but there really isn't a plug and housing per se. I have some pictures that may help explain it better:
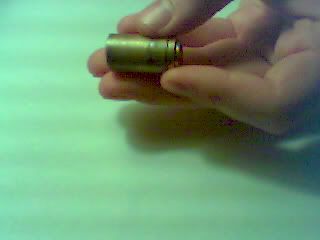
This is the core that comes out of the housing (notice no holes for pins)
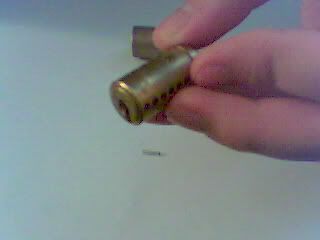
This is after you have taken the first sleeve off (the thing with no holes). This is also where you place the driver pin and spring (just insert them into the holes, but the springs must be held down with your finger when you put the sleeve back on, which is usually how you lose them).

This is the very center where the key pins go. (That's the easy part).
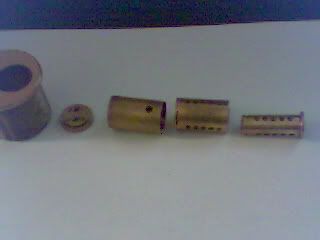
From right to left, this is the order everything will fit. (the core to the farthest right goes into the one beside it and so on).
Hope this helps a little. Lock picking is an art, not a means of entry.
-
Wolf2486
-
- Posts: 287
- Joined: 15 Jul 2004 16:46
- Location: Pennsylvania
-
by Santos718 » 28 Jul 2005 15:16
nice pictures. I can see why your having trouble repinning.

MacBook Pro all the way!!!
-
Santos718
-
- Posts: 669
- Joined: 17 Jun 2005 21:46
- Location: Queens, NyC(Home), Berrien Springs, MI(School)
-
by TOWCH » 28 Jul 2005 15:20
:shock: The hardest thing I've ever reassembled is a Primus. If you get it back together my hat is off. The bright side is, now we have some righteous pictures of a Kaba Gemini for the viewing pleasure of all future forum searchers.
-
TOWCH
-
- Posts: 1587
- Joined: 20 Jul 2004 0:19
- Location: Oregon
by HeadHunterCEO » 28 Jul 2005 17:08
that looks wild
never played with one of them before
whats the purpose of the 2nd shearline?
Doorologist
-
HeadHunterCEO
-
- Posts: 1262
- Joined: 7 Apr 2004 21:10
- Location: NY,NY
by raimundo » 29 Jul 2005 7:58
spread a towel on your workbench, the springs wont bounce and roll. Some people like the textured rubber of the underside of a mouse pad, but the towel is the old traditional way.
-
raimundo
-
- Posts: 7130
- Joined: 21 Apr 2004 9:02
- Location: Minnneapolis
by Shrub » 29 Jul 2005 10:26
Your a braver man than i, i started to strip one down then got frightend and thought better of it, 
I like the idea of the tube with a hole in but for another lock type,
Can you get away with some strips of soda can, roll them so you have a sort of shim that holds itself around the lock but only wide enough to hold one set of pins, you would put 3 pins at a time in, place a shim over it, when done and ready to slide the lock back together you just remove each shim one at a time,
Also what about the use of candle wax or blue tak or selotape, only dumb ideas but somthig may come to you by reading this,
Good luck and let us know how you get on.
-
Shrub
- Moderator Emeritus
-
- Posts: 11576
- Joined: 23 May 2005 4:03
- Location: uk
by vector40 » 29 Jul 2005 15:44
I am just dazzled and amazed that somebody worked the word "propinquity" into an LP101 post.
-
vector40
-
- Posts: 2335
- Joined: 7 Feb 2005 3:12
- Location: Santa Cruz, CA
by Mad Mick » 29 Jul 2005 21:37
vector40 wrote:I am just dazzled and amazed that somebody worked the word "propinquity" into an LP101 post.
What does 'dazzled' mean?   If it ain't broke.....pull it down and see how it works anyway!
-
Mad Mick
-
- Posts: 2314
- Joined: 8 Jan 2004 19:19
- Location: UK
by Shrub » 30 Jul 2005 5:59
Its the name given to the feeling that we will all have if we hear that Wolf has managed to repin that lock
-
Shrub
- Moderator Emeritus
-
- Posts: 11576
- Joined: 23 May 2005 4:03
- Location: uk
by Wolf2486 » 30 Jul 2005 19:40
Alright, here's the deal. With a little help from my big hands, I've managed to get six pins into the lock (That was all I had left). Heres what I did: I pinned the lock like usual with the key pins (covering the holes that I was not working on with my fingers). Then I took a thin piece of tape and taped over the pins with double-sided tape. Next I inserted the driver pins (and they stayed due to the double-sided tape). Then came the hard part. I did my best to adapt springs from a Master padlock to work with the dimple lock. Putting the springs in was a near impossible task and took 2 days ( the first day I just put the lock down and went to bed in frustration). After all that, I put the lock back together. The next hard part was breaking the tape ( which I forgot to mention had to be replaced once because I had a bump in it and it wasn't thin enought to go inside the larger cylinder). Then I put the key into the lock (naturally the key didn't got in cause of the tape). So I took a rubber mallet and smacked the key in, the force of the mallet broke the tape, and alas! I now have six pin Gemini. Though I must be honest with all of you, if I had all the pins and had to put springs in all the chambers, I don't believe I could've done it. Anyways, I do apologize for not being able to repin the lock to normal form... but 6 is better than none.
Lock picking is an art, not a means of entry.
-
Wolf2486
-
- Posts: 287
- Joined: 15 Jul 2004 16:46
- Location: Pennsylvania
-
by Shrub » 31 Jul 2005 5:46
My new challange, find out the rekeying process for the gemmini, im sure there is one somewhere and i know someone who used to work for them in the service department,
If i can find anything ill get back to you, i would imagine there is a specific tool for doing them.
-
Shrub
- Moderator Emeritus
-
- Posts: 11576
- Joined: 23 May 2005 4:03
- Location: uk
Return to Locks
Who is online
Users browsing this forum: No registered users and 53 guests
|


