Lock Picking 101 Forum
A community dedicated to the fun and ethical hobby of lock picking.
       

Lock Picking 101 Home
Login
Profile
Members
Forum Rules
Frequent Forum Questions
SEARCH
View New Posts
View Active Topics


Live Chat on Discord
LP101 Forum Chat
Keypicking Forum Chat
Reddit r/lockpicking Chat


Learn How to Pick Locks
FAQs & General Questions
Got Beginner Questions?
Pick-Fu [Intermediate Level]


Ask a Locksmith
This Old Lock
This Old Safe
What Lock Should I Buy?


Hardware
Locks
Lock Patents
Lock Picks
Lock Bumping
Lock Impressioning
Lock Pick Guns, Snappers
European Locks & Picks
The Machine Shop
The Open Source Lock
Handcuffs


Member Spotlight
Member Introductions
Member Lock Collections
Member Social Media


Off Topic
General Chatter
Other Puzzles


Locksmith Business Info
Training & Licensing
Running a Business
Keyways & Key Blanks
Key Machines
Master Keyed Systems
Closers and Crash Bars
Life Safety Compliance
Electronic Locks & Access
Locksmith Supplies
Locksmith Lounge


Buy Sell Trade
Buy - Sell - Trade
It came from Ebay!


Advanced Topics
Membership Information
Special Access Required:
High Security Locks
Vending Locks
Advanced Lock Pick Tools
Bypass Techniques
Safes & Safe Locks
Automotive Entry & Tools
Advanced Buy/Sell/Trade


Locksport Groups
Locksport Local
Chapter President's Office
Locksport Board Room
 

HOW TO: No solder feather touch tensioner

When it comes down to it there is nothing better than manual tools for your Lock pick Set, whether they be retail, homebrew, macgyver style. DIY'ers look here.

HOW TO: No solder feather touch tensioner

Postby ToolyMcgee » 14 Aug 2008 5:54

I see people on the forums working with very little for tools. When you have next to nothing for lock picking equipment and even less for DIY projects it can be frustrating. Hopefully this can help some of you.

TOOLS:
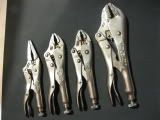
Vice grips - 2 smaller size pairs, but the more sizes the better
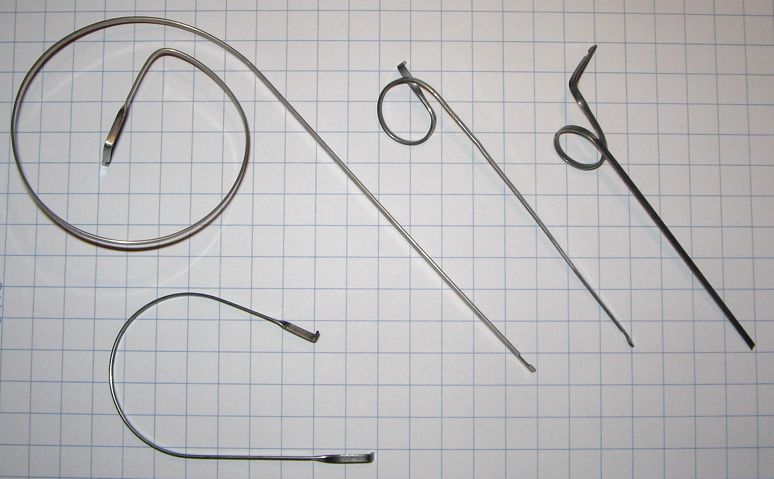
Spring - tightly coiled or loose coil, your choice.
Utility cutters - Essentially hardened wire cutters, or the cutter on a pair of vice grips could work.
Needle files - I used a knife file, but you could get away with a triangle.
Wiper insert, or street sweeper bristle - I recommend the widest wiper insert you have, but either will work.
OPTIONAL:
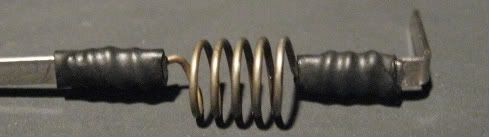
*Heat shrink - electrical tape or equivalent will work
*Grip Gloves - you'll want them
*Dremel tool - entirely optional

For clarities sake:
ImageImage
I hope needle files is self explanitory.

First off you will need to cut two pieces of wiper insert 1 1\2 and 2 1\2 inches long. The extra length is for redundancy and we will be taking off excess later.

To do this you can use a dremel tool and a cutting disk, or you can use your two pair of vise grips to shear the insert cleanly. I use two pair tightly clamped and very close together like this...
Image


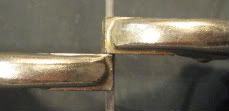
Now twist and the it should shear nicely. You can also grip with one pair and tightly bend up, and then down to shear it off. This is sloppier though and will require you to file off more sharp, bent edge.

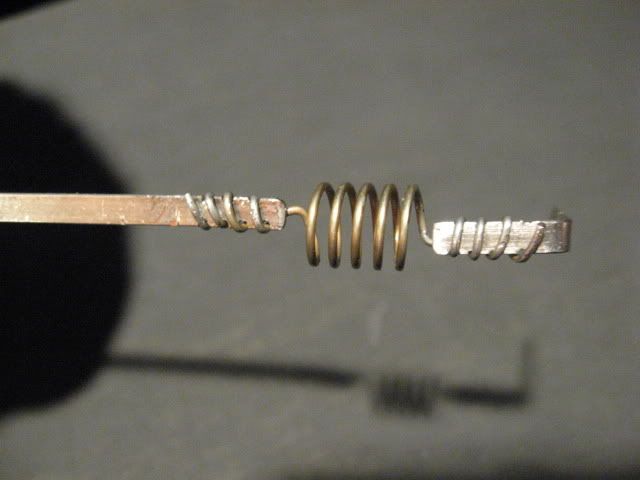
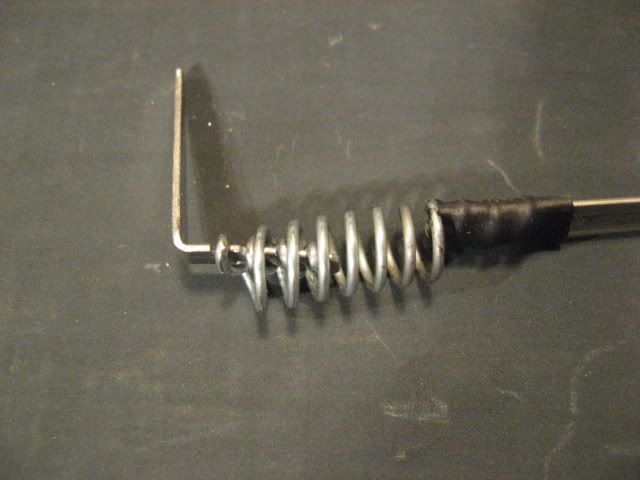
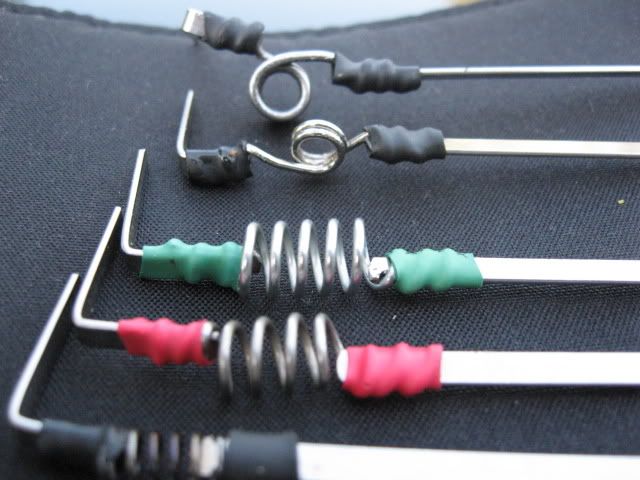
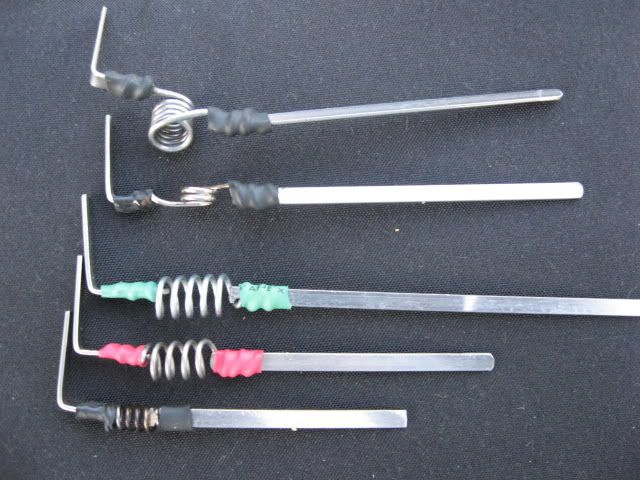
Now that you have you two pieces you will want to start cutting the alternating nothces into the ends. Start as close to the edge as you want the size of the teeth on the two pieces. Remember that this is the part we will be wrapping the spring around, so make sure it will fit in the notches nicely.
Image

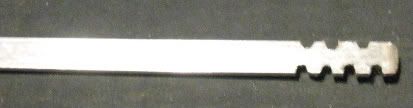
Ideally you want to make the cuts alternating so that one cut is in between the cuts on the opposite side. Do this on both pieces. I recommend if you have a slimmer wiper or a sweeper bristle you do less notches than pictured here. 3 to 3 or even 2 to 3. The thicker the spring the more stress the insert is going to have to withstand during wrapping.

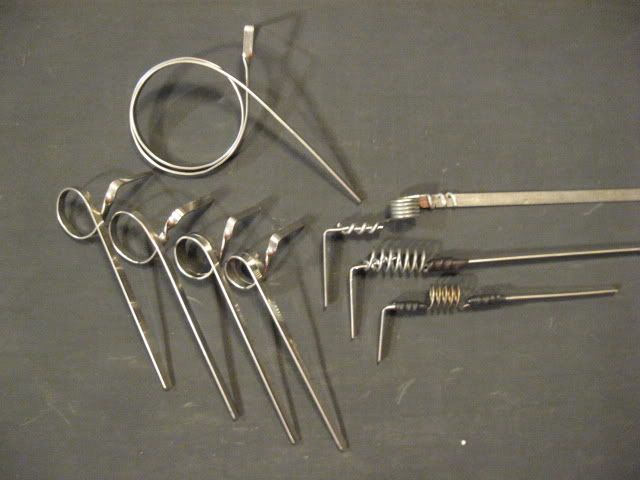
Now you want to take your spring and cut it to the desired length. 5 or 6 coils seems just about perfect, but depending on the spring strength and the desired effect you can use more or less. Remeber we are going to be uncoiling the spring, so you will want to cut 2 or 3 more coils on either side than you will want on the finished wrench. If you are trying to use needle nose pliers for this part, best of luck. It can be done.

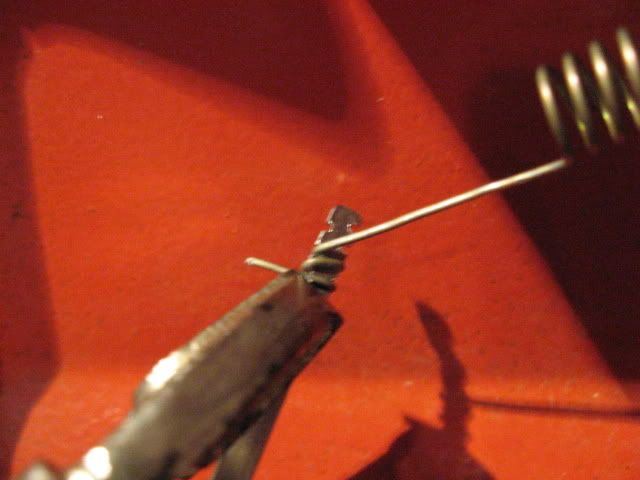
Now you are going to want to straighten the spring. To do this take your smaller vice grips and clamp them on the spring as near to the tip as possible while still gripping some of the curve. You want to use the leverage of the vice grips to straighten the spring as you close them. Don't make them too tight or you will strain yourself and unnecessarily mar the spring. As you straighten the spring you can bend it into a straighter shaper using your pliers, this is where having a larger pair of vice grips comes in handy as you can clamp the uncoiled, but still very curved spring, and further straighten it with little effort. Otherwise you will have to use your two pairs of smaller ones in a joint effort to accomplish this task. It is not necessary it be 100% straight as we will be recoiling it around the handle and tip piece, but it should be straight enough as to not get in the way. You want both ends to be on the same side of the spring.

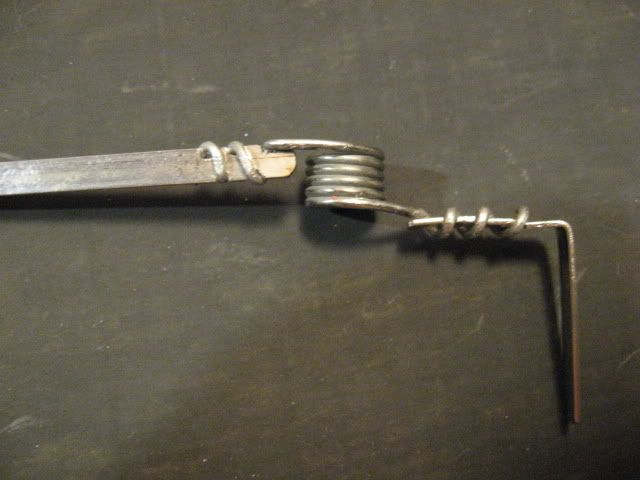
Now from the coil walk the notched blank end over end the desired length of straightened spring. 3 to 3 notches is 7 1/2 widths, 3 to 4 is 8 1/2, 2 to 3 is 6 1/2. You want enough straightened spring to start, wrap around once for each notch and end with enough left for a 90 degree bend at the end with left 1/2 width. To a large degree this is eyeballing it. It could be done reverse to possibly avoid excess straight spring, but then you risk a wrench that is tail high, low, perhaps even same sided and you will have little room to straighten more spring.

Roll up your sleeves men, because this is the hard part. Grip the approximated end of the spring tightly with one pair of pliers just below the first notch and begin to recoil the spring tightly around the blank. You can use another pair of pliers if you have to, but be careful to NOT put to much rotational stress on the blank itself. If you are using an especially strong spring you may need 3 pliers. 1 to grip the spring to the blank at the starting point, 1 for grip so you can tightly coil, and 1 to grip close to the loop being coiled to prevent excessive rotation. It seem like you would have to have 3 hands for this, but the bench will in effect hold the first pair in position for you as you coil.
Image
ToolyMcgee
 
Posts: 640
Joined: 27 May 2008 14:45
Location: Indiana

Postby ToolyMcgee » 14 Aug 2008 6:29

Could a moderator please combine this post with the previous one? Pretty please? :mrgreen:

Continue to coil the spring in this fashion until you coil through the final notch, now lay the spring flat to the blank an bend midway through the width upward at 90 degrees.

Repeat this process for the top half of the wrench. Now grip the blank that is to be the top half of the wrench as close to the spring as possible, and bend at 90 degrees. Trim to your dimensions and you should have something close to this.

Image

Now it only needs to be finished with heatshrink or tape.
Image

If you decided to use a closed coil spring it could look like this.
Image
Notice how even though it is a different spring and the handle orientation is different, the recoiled spring still needs to grip the last notch for a 90 degree bend.

Here is a stronger, thicker, wrench made similar to the first only with an inverted coil on the tip side.
Image
You will see the recoil is just as tight when done backwards, but more difficult to work around. I would advise against trying this one.

If you are skilled enough to make a working one of the above then maybe you could try making one of these.
Image
3 of these are double coiled. The large one and the two lower smaller loops. The bending method is similar to that of uncoiling a spring. For each progressive bend you make place your pliers on the middle of the previous bend and bend again. The main difference here being the tighter the coil you make the less you will be able to lock the pliers. The goal is to have loops with no creases because a crease will create a stress point that will deform the wrench under pressure.

Simply put the function of each is such that the more coils you have and the looser they are the more the tension is distributed to them and the lighter the touch of the wrench. Coil them tighter and the reverse is true to a certain point. I'll try to cover it more if anyone has questions.

I realize I have tried to cover alot here and havn't proof read it very well. Hopefully a moderator will show me mercy and let me edit it to add more pictures of the process. Enjoy.

-Tooly
ToolyMcgee
 
Posts: 640
Joined: 27 May 2008 14:45
Location: Indiana

Postby Kai » 14 Aug 2008 8:57

Great post man. Beautiful wrenches. Nicely done.
Kai
 
Posts: 15
Joined: 19 Jul 2008 19:09

Postby MacGnG1 » 14 Aug 2008 9:46

SWEET! those look really good
Nibbler: The poop-eradication is but one aspect of your importance.
MacGnG1
Supporter
Supporter
 
Posts: 1360
Joined: 9 Apr 2008 22:14
Location: Know Where, MD, USA

Postby jamie79512 » 14 Aug 2008 11:08

I like those alot, I was going to try and make one the other way but this looks a ton easier (and just as effective, if not more). Thanks for the idea
I am lord highmay..
jamie79512
 
Posts: 73
Joined: 12 Aug 2008 0:30

Postby Brianpojo56 » 14 Aug 2008 12:52

Nice work and nice guide Tooly. Oh yeah, and nice picture quality. Something smells sticky in here.
There's nothing what can't be done with a lil Trailer Park Ingenuity.
Brianpojo56
 
Posts: 74
Joined: 17 Jun 2008 15:19
Location: Florida

Postby nostromo » 14 Aug 2008 20:28

VERY nicely done, Tooly!!! The wiper inserts look like an especially nice pairing with a Bogota!!
nostromo
 
Posts: 346
Joined: 14 Jul 2008 2:18
Location: Pensacola, Florida, USA

Postby le.nutzman » 15 Aug 2008 11:26

Uh, can't see the purty pictures due to web sense filtering, can I just ask to buy two of these things from you? Yeah I know, i'm lazy.
Image
le.nutzman
 
Posts: 299
Joined: 19 Sep 2006 7:03
Location: Lincoln, Nebraska

Postby Schuyler » 15 Aug 2008 11:38

Nice work on your first sticky, tooly ;)
Schuyler
Supporter
Supporter
 
Posts: 3448
Joined: 24 Jul 2006 1:42
Location: Boston

Postby freakparade3 » 15 Aug 2008 13:34

I stickyed it, does that mean I get one free? :P J/k
Image
freakparade3
Moderator Emeritus
 
Posts: 3457
Joined: 17 Sep 2006 12:01
Location: Cedar Rapids, Iowa

Postby ToolyMcgee » 24 Aug 2008 19:37

le.nutzman: I don't think I will be selling any at the moment.

Jamie79512: There is nothing about this project that makes it easier than just using a soldering iron. I would try that first if you have the resources.

FreakParade3: Thanks for the sticky. I would have sent you one in a standard envelope for free, but you had to throw in the J/K. Now you have to beg me. :twisted:

Everyone else: I am too lazy to reply to you all individually, but thank you for the positivity.

I was trying to wait to post anything else to give people a chance to ask questions. Try to get a better idea of photos I could take to clarify the process, but a week has passed and no questions. I must have been clear enough. Here's a few more I made up.
Image
Image

From the bottom up is a small spring used in a medicine cabinet door popper, the next one is a larger spring from a similar kind of cabinet hardware, above that is another stainless steel closet door spring, the next is safety pin with another half loop, then just to prove it could be done I made the top one with a mouse trap spring. It was difficult, but I think the stainless springs are a bigger pain. Notice how the handles are all facing up this time so your finger isn't resting on the edge. Much more comfortable and functional this way.

You can use any spring you want, but I would stay away from anything as small as the little one, or very thin guage spring. They still work for picking pins, but you need another wrench handy to spin the plug, which isn't very handy at all. Also, I made the safety pin wrench to take a shot at all those who would condemn homemade tools. The joke is on me however as it doesn't have very much spring to it. In fact, just put a twist in your wrench and it will accomplish the same thing. Stupid pin...

-ToolyMcgee
ToolyMcgee
 
Posts: 640
Joined: 27 May 2008 14:45
Location: Indiana

Postby wolfy_9005 » 9 Sep 2008 3:42

would it be possible to add, say a split shot(lead weight you can crimp onto a fishing line) to the end, so you can have a hands free wrench? Wouldnt the spring stop it applying too much tension from the weight?

I know it's probably stupid(and would probably fall out), but i guess i will never know if i never ask :)
Strike Hard, Strike Fast and Show No Mercy.
wolfy_9005
 
Posts: 16
Joined: 8 Sep 2008 3:42

Postby ToolyMcgee » 9 Sep 2008 3:53

It's actually not as stupid a question as you might think. I wouldn't advise it, but it could be done and is indeed already a commercially available tool in the sense of resistance already being on the end of the wrench. I had success early on with placeing magnets at the end of a long wrench. Busted apart the little plastic screwdriver donuts and used the magnets inside as wieghts. It works, but you'll ultimately outgrow it because as you need to vary tension when picking a lock you'll get tired of adding and removing magnets instead of just using your finger. The spring won't cancel the effect of the wieght, just as my long double twist wrench didn't, and it will creat a hands free wrench with the proper wieght. Assuming of course you are using a 3 oclock wrench position. The problem with a hands free tool is that in not touching the wrench you aren't getting feedback from the wrench. The more feedback you recieve the better your ability to "see" inside the lock. Try it out though if you are curious. Always fun when new things work.

-Tooly
ToolyMcgee
 
Posts: 640
Joined: 27 May 2008 14:45
Location: Indiana

Postby wolfy_9005 » 9 Sep 2008 4:00

Yeh thanks. I guess it could mess up potentially 1-2hours work if you accidentally knock it out.
Strike Hard, Strike Fast and Show No Mercy.
wolfy_9005
 
Posts: 16
Joined: 8 Sep 2008 3:42

Re: HOW TO: No solder feather touch tensioner

Postby femurat » 17 Oct 2008 7:39

Image

This tutorial was fantastic! After reading it I made some experiments. Two of these are my attempt to follow one of your examples, the other two are... errors? Ideas? What do you think about the U and the spiral wrenches?

I tried all of these, they work.
The spiral has an extremely delicate touch, almost null so is the right tool if you need to use a very soft touch. This one could be hard to carry on your person, but I practice only in my own house so this is not a problem for me.
The U is soft almost like a straight one. This isn't the world's easiest tool but is very small.
In the picture the grid has 1 cm space (1 Inch is 2,5 squares).

Do you think this ideas could be developed? If you're inspired, I'm not going to patent them 8)
User avatar
femurat
Site Admin
 
Posts: 3745
Joined: 22 Sep 2008 9:06
Location: Italy

Next

Return to Lock Picks

Who is online

Users browsing this forum: No registered users and 11 guests