Well I thought I’d knock together a guide for a simple 2+3 lever lock; providing insight into the mechanics of these locks, descriptions of the basic tools and also the methods by which the locks can be picked. Since it will be bigger than usual I’ll split it into 4 sections:
1. The Lock Mechanism
2. The Picking Tools
3. Picking Technique
4. Overview
The lock I will be using is a Union sash lock with three levers inside of it; it is a low security version of a lever lock, and one which should be a nice introduction for anybody wishing to get into them.
Tools:
• A lock
• A cross-head screw driver
• Some turpentine, or kerosene to clean up the levers if they are dirty
• A clean cloth (for the above reason)
• Pliers + wire/spokes
• A vice
Safety:
• Band-aids – I’d be surprised if they were needed, but you may as well have them close by.
• Common sense - if what you are doing seems to have potential to cause injury then don’t do it unprotected.
• Goggles – the springs on the levers are under tension constantly, and will easily fly up towards you eyes, I don’t expect one to likely fly into your eyes, but I guess you can easily replace you goggles but not your eyes.
Section 1 - The Lock Mechanism
Since taking them apart is so easy this first section of the guide will be showing the inside.
Principle:
Unlike pin-tumblers, wafer-tumblers, tubular locks, and many more which all function along the principle of a rotating motion. A lever lock uses another system entirely. A lever lock remains locked so long as the thin pieces of metal named “levers†are not lifted to the right height- it is the fences on these which catch on the bolt as it slides across and impede it from moving any further. This mechanism relies upon a bitted lever key having the right heights, turning against the levers, and pushing them to the right heights.
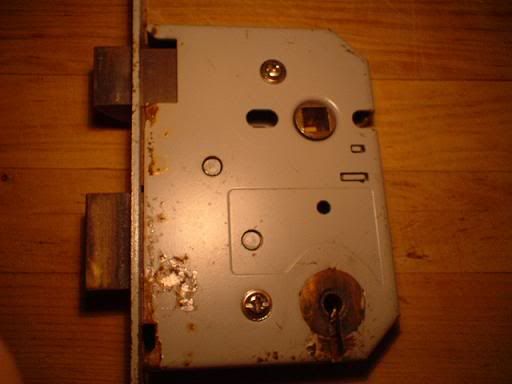
The exterior of a lever lock:
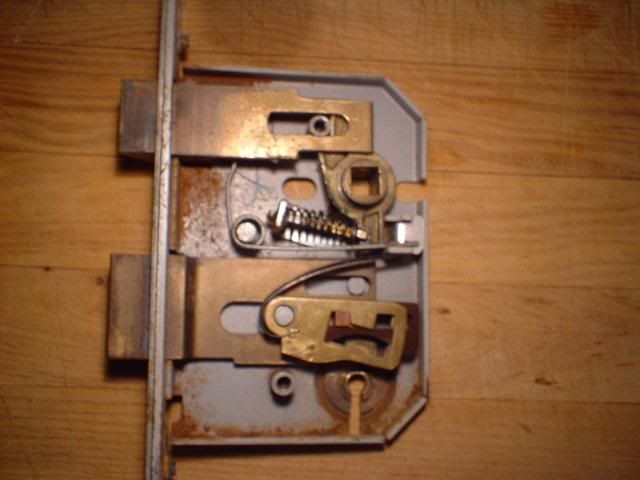
The interior:
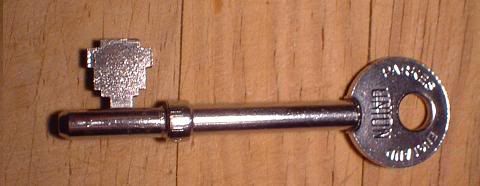
The key:
(Notice the warding pattern near the shaft of the key)
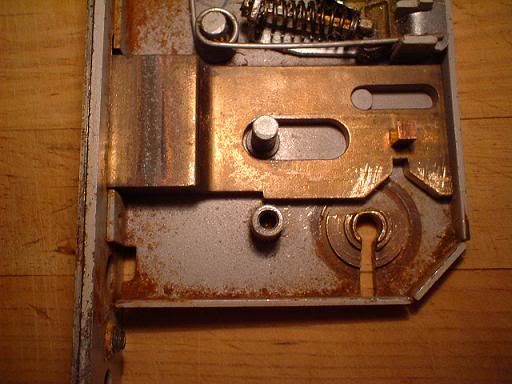
The empty case:
The bolt:
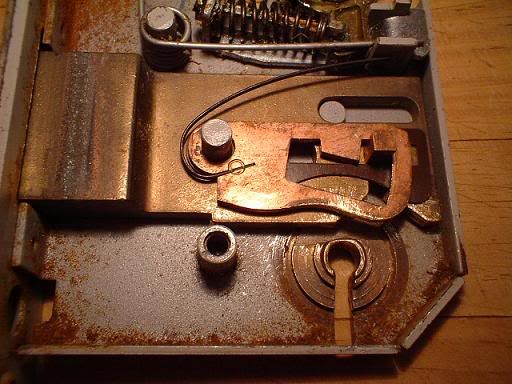
The first lever:
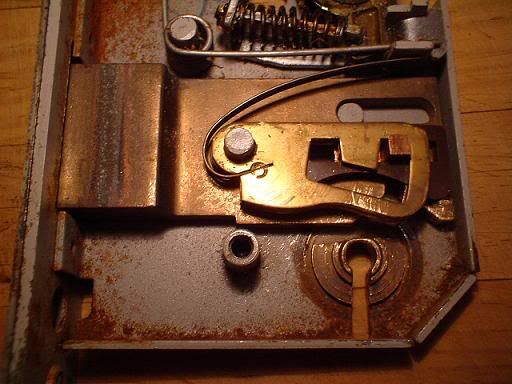
Second lever added:
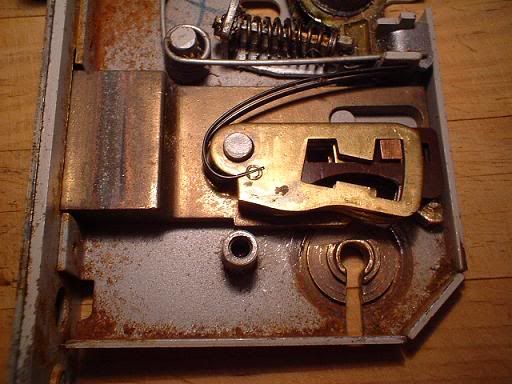
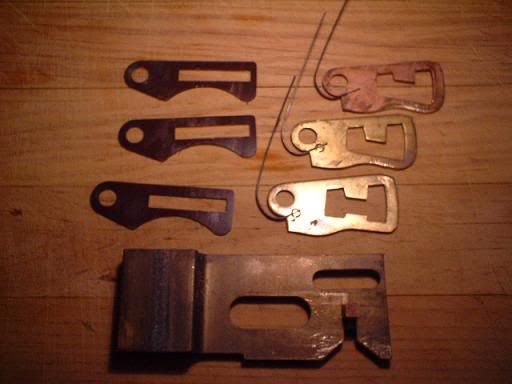
Third lever added: (notice the protruding fence at the bottom of the lever)
The Three Levers, the Bolt, and the Plastic Spacers
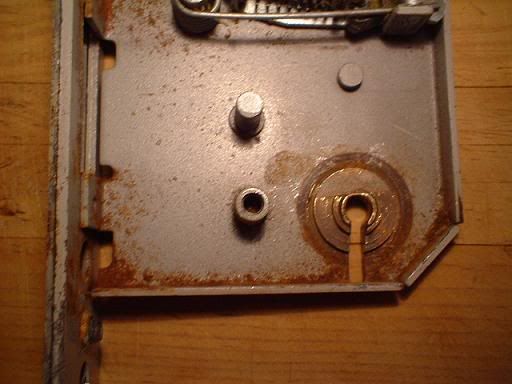
Now you have seen the mechanisms and components of a lever lock it seems fitting to explain how exactly the key operates, and inevitably opens. Despite not being a warded lock, this lock incorporates a simple system of wards which can be noted as the rings of raised metal around the keyhole, and also on the key bitting near the stem.
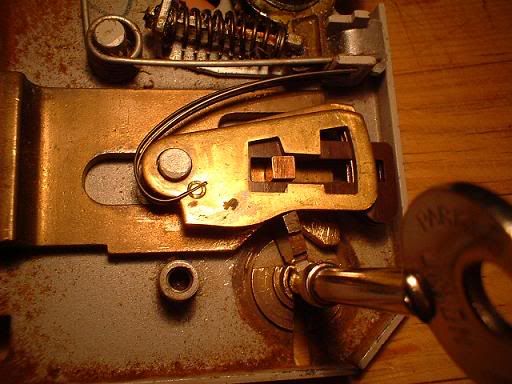
The key engaging the bolt:
The function of the levers, and also the part of the key which engages the levers should now be apparent from examining the first picture.
The first lever effectively creates a working lock whereby the key with the correctly cut bitting must be used to open the lock – unfortunately such a lock would offer no protection to manipulation. It is only when the second and third levers are added does security against picking occur.
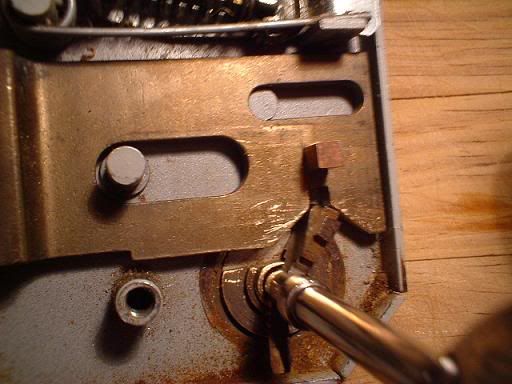
The first lever added and the key lifting it to the correct height:
(Especialy note that the lever has a larger gate than is necessary - this is because this lock is part of a masterkeyed system, and the key which I have shown will also open one or more other locks which are masterkeyed for this system - Briefly, if another key was modified, which did not lift this lever as high by 3mm then the lock would still open, but it would not however open the other locks designed to be opened by the master key. This masterkeying system is not normaly encountered outside this series of locks. The key I have shown appears to be the slave key for this masterkeyed system, because although it lifts the last lever higher than necessary it fits the warding perfectly and would not be able to pass a wide wariety of wards. This needn't cause worry and will not impede picking, but is usefull for further insight into the mechanism)
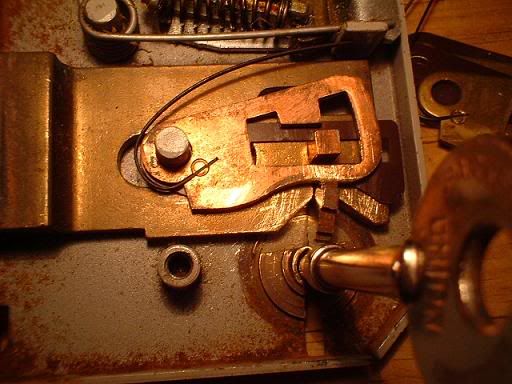
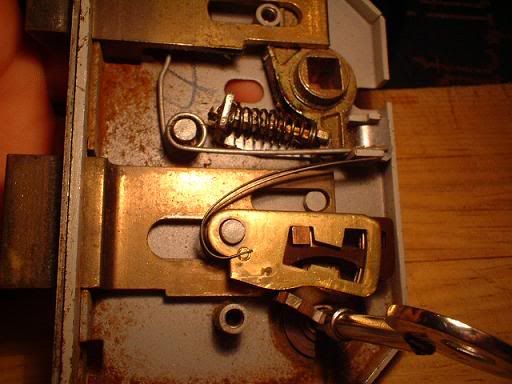
The second and third lever added:
(Note the way the stump has cleared the fences and gone through the gate of the levers)
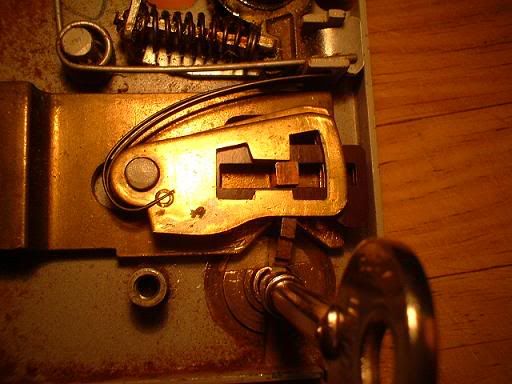
The bolt being pushed almost fully to the locked/unlocked position:
Finally the bolt has slid across fully into the opposite field and has now effectively either locked/unlocked a door:
Section 2: The Picking Tools
These locks are simple to pick based upon their minimal security features. To pick one you will require a wire wrench, and a wire lifter. Both of these can easily be made from various materials some better some worse. The best material to use is piano wire which is both flexible and strong, this is not especially expensive, but may cause difficulty in getting hold of it. Bicycle spokes are fine as a material, and withstand a fair but of abuse; they can be readily found, and can be cut off using the wire-cutting part of common pliers with little difficulty. The worst material in my opinion is the wire used in coat-hangers because it can easily be deformed.
To make the lever wires you will need:
• 2-4 bicycle spokes
• Pliers
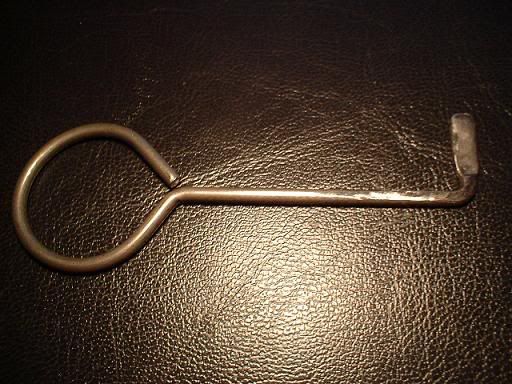
Now the first tool that needs to be made is the tension wire (bolt thrower), and this can be created in a variety of shapes, but as long as the part which protrudes at a 90º angle is long enough to engage the bolt it is long enough. You can simply create a loop with the metal, or use another design for the handle – so long as you are able to apply tension to the levers then you should have no problems. To find a relatively correct size for the tension wire remove the front cover and insert the wire from the other keyhole – so long as it is long enough to engage the bolt then it is long enough. If you have the key you can simply place the wire next to the key to get the right length - minus a few millimetres the highest point of the bitted part of the key should be the size of your wire bent at 90º.
Here is an example of a tension wire (bolt thrower):
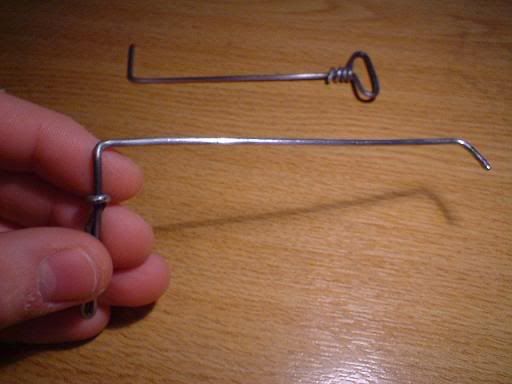
The next thing to make is the wire-pick – it follows a similar process to the tension wire, but will be of a different length in regards to the part bent at 90º - it must be long enough to lift the levers to their maximum height. Once again the correct size can be created by using the key - alternatively make it slightly smaller than the bolt-thrower.
Example of a wire-pick:
Section 3: Picking Technique
Single Lever Picking:
To pick the lock with the wires I recommend using a small vice – this will allow for the lock to be kept in the correct position whilst picking.
To begin you insert the pick by itself and try to feel the number of levers the lock has, on many of these locks there will be 2 or 3 levers, but you can run into locks like this with 5 levers.
Firstly insert the tension wrench and try to feel for the notch in the bolt to place your tension wrench on, and when you find it begin turning it. The bolt should move slightly and then stop; it is now binding against one of the levers and creating tension. Too much tension will cause the levers to be difficult to lift up, but likewise too little tension will not allow the levers to set. Insert the pick and feel for the lever which is most difficult to lift – once you find it lift it slowly until you feel the bolt move slightly, and the lever stops moving – essentially you have just set this lever – what you have done is lifted the lever so that the fence (protrusions inside the lever) of the lever is the right height for the stump to enter the gate (area where the stump can slide through). Repeat this for all 3 levers, and when they are all set the stump will align to the gates and freely slide thorough into the other field.
Whilst anti-pick notches cause you to miss-judge whether or not the lever is set it follows the same principal essentially – when the anti-pick is encountered it will feel set, but just like in a pin-tumbler when all the other levers are set it will refuse to open, this can be remedied by decreasing the amount of tension slightly and lifting the lever either a little higher, or a little lower depending upon where the anti-pick notch is. However anti-pick notches are not very common on 2, and 3 lever locks so this needent be worried about for the moment.
Overlifting
Now the previous method will allow you to open them quickly and reliably, but there is another method – it is called overlifting and it essentially involves using a pick big enough to lift all the levers at the same time, and merely lifting them upwards whilst applying tension – with the first 2 levers having no fence on the bottom of the lever then they merely need to be lifted to the maximum height to be in position, the 3rd lever does have a fence on the bottom of the lever and it is to prevent overlifting – to overcome this simply lower the 3 levers whilst applying medium tension, the last lever will align itself and the lock will open. This method is less effective on locks with anti-picking notches, and will take more skill, however on a 3 lever sash-lock with no security features it is devastating.
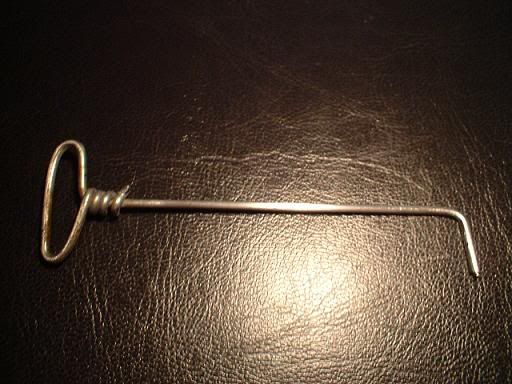
Here is an example of an over-lifter for a 2+3 lever lock which is commercially available:
(This can be improvised easily with standard wire)
Quick Addition:
Should you wish to learn more visually you can make a clear cover from plexi-glass – simply copy the shape of the original cover and use it as a template – this is not of great importance, but may help you visualise better after having seen the mechanism when it is being picked.
Clear Case:
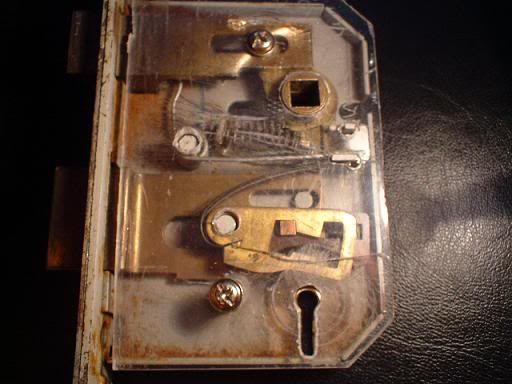
Clear Case Showing the Overlifting Process:
(Minus the bolt-thrower)

Section 4: Overview
So now you have seen the function of a lever lock you will understand how fundamentally different they are to pin-tumbler locks. The lock I have used is a very low security version of a lever lock, and has but a single security implement, and this being the extra fence on the bottom of the third lever which complicates merely overlifting all of the levers to gain easy access. On a higher security lever lock anti-pick-notches are used where the levers have small notches cut into them – when attempted to be picked these have a similar function to security pins in a pin-tumbler lock by giving the picker a sense that they have progressed when merely it is an anti-picking-notch engaging the stump. To base lever lock security on this sashlock 3 lever model would be an insult to lever locks, and fortunately the range of “British Standard†locks use many ingenious concepts to hinder picking; these can be a real pain to pick indeed!
There it is – the inside of a lever lock, and also its mechanism whereby it is unlocked by the key, the techniques used, and the tools required to pick it - Some of the tools and methods to pick it, i havent mentioned: tryout keys etc... but you needn't worry about such things if wanting to hobby-pick locks.
I hope this guide will give you an insight into what is truly an amazing type of lock, and perhaps encourages you to invest some time to examine one of these locks for yourself and even pick it – UK members will find an abundance of these locks, but people from abroad may have to get them shipped in.
The tools are easily made, and should be allow you to pick these low security locks with ease. I recommend starting with a 3 lever sashlock because this will pose few problems and is fairly inexpensive.
Thank you for reading my guide - illusion


 -l
-l zh
zh n)
n)