Lock Picking 101 Forum
A community dedicated to the fun and ethical hobby of lock picking.
       

Lock Picking 101 Home
Login
Profile
Members
Forum Rules
Frequent Forum Questions
SEARCH
View New Posts
View Active Topics


Live Chat on Discord
LP101 Forum Chat
Keypicking Forum Chat
Reddit r/lockpicking Chat


Learn How to Pick Locks
FAQs & General Questions
Got Beginner Questions?
Pick-Fu [Intermediate Level]


Ask a Locksmith
This Old Lock
This Old Safe
What Lock Should I Buy?


Hardware
Locks
Lock Patents
Lock Picks
Lock Bumping
Lock Impressioning
Lock Pick Guns, Snappers
European Locks & Picks
The Machine Shop
The Open Source Lock
Handcuffs


Member Spotlight
Member Introductions
Member Lock Collections
Member Social Media


Off Topic
General Chatter
Other Puzzles


Locksmith Business Info
Training & Licensing
Running a Business
Keyways & Key Blanks
Key Machines
Master Keyed Systems
Closers and Crash Bars
Life Safety Compliance
Electronic Locks & Access
Locksmith Supplies
Locksmith Lounge


Buy Sell Trade
Buy - Sell - Trade
It came from Ebay!


Advanced Topics
Membership Information
Special Access Required:
High Security Locks
Vending Locks
Advanced Lock Pick Tools
Bypass Techniques
Safes & Safe Locks
Automotive Entry & Tools
Advanced Buy/Sell/Trade


Locksport Groups
Locksport Local
Chapter President's Office
Locksport Board Room
 

Cut away key in knob type cylinder.

Information about locks themselves. Questions, tips and lock diagram information should be posted here.

Cut away key in knob type cylinder.

Postby I Pik U » 11 Sep 2006 22:01

Not sure if something has been posted in the past like this one. I did a search a saw the 7 pin tubular cut away cylinder, but did not find any like this one.

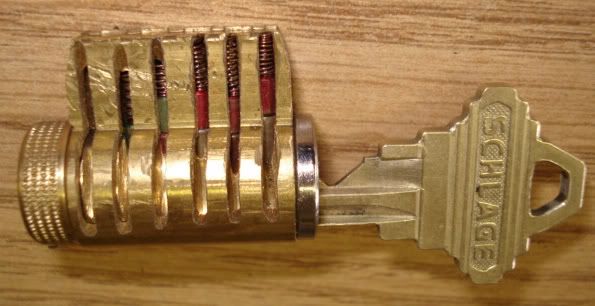
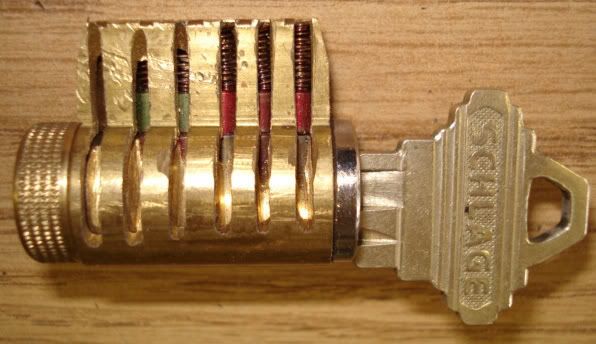
This is a Schlage 6 pin cylinder I cut notches into many years ago, to aid me in practising lock picking. Schlage brand of cylinders have been one of the tougher ones for me to pick, so I though that if I could see what was going on inside, it could help me to improve my technique.

I used a Rotary Tool with a cut off wheel to cut notches into the cylinder plug and outer casing. Then smoothed off any rough edges with a file.

Seeing the tumblers from the side while picking, gives me the visual confirmation when a pin tumbler is sucessfully being held above the shear line. I know this is cheating, but it's just an aid to get the feel of what goes on.

Here are some pictures:

Image
Image
Image
Image
Been playing with locks since '68.
I Pik U
 
Posts: 304
Joined: 8 Sep 2006 11:56
Location: Ontario, Canada

Postby lockedin » 12 Sep 2006 22:47

Nice, I need to get me a cutaway too.
Image
lockedin
 
Posts: 771
Joined: 11 Jun 2005 19:46
Location: CA

Postby mrdan » 13 Sep 2006 2:39

All right, that's it! I am going to do one up tomorrow to play with. 8)
mrdan
 
Posts: 356
Joined: 5 Aug 2006 1:34
Location: Dallas, TX

Postby cL4y » 13 Sep 2006 4:21

dude thats amazing,its 40$USD for a cutaway lock from shops,and this seems very simple,you should write a guide on how to do this,that would help ALOT of people new to picking.

This is one of the best ideas i have seen in awhile.
Image
cL4y
 
Posts: 277
Joined: 22 Apr 2006 9:04

Postby I Pik U » 13 Sep 2006 17:17

It's very simple to make.

First remove all the pins and springs from the cylinder, then reassemble the empty cylinder.
Using a Dremel/Rotary tool, I slowly cut a groove into the centre of each pin bore.
You can use a working key as a guide to find the centre of each cut.
Hold the key up to the outside of the cylinder, aligning the shoulder/stop to the face of the cylinder.
Mark the centre of each cut onto the outside of the cylinder.
Make your cuts as narrow as possable. If you make them too wide, the pins will fall out of your cuts.
Cut just far enough to be able to see a pin, if it were there.
Then disassemble the empty cylinder and carefully file any sharp loose edges. Not too much as you don't want to widen the cuts as to let the pins drop out. The plug just needs to be able to spin freely without getting caught up.

It has been a few years since I made up this cylinder, so I can't remember all the details, but that is generally how I did it. Just do a little at a time, as you can always cut a little more off if needed. If you cut too much to start, you can't go back.
Image
Been playing with locks since '68.
I Pik U
 
Posts: 304
Joined: 8 Sep 2006 11:56
Location: Ontario, Canada

Postby Kaotik » 13 Sep 2006 23:12

Like they say "Measure twice and cut once". :)
Image
Kaotik
Moderator Emeritus
 
Posts: 1200
Joined: 10 Jun 2006 13:38
Location: Texas, USA

Postby 5thcorps » 15 Sep 2006 8:18

Nice work! I'm gonna try one this weekend. It should certainly help determining what you're feeling is going on and having a visual to confirm or tell you to make adjustments. Has this improved your skill?
"Save the whales, Trade them in for valuable prizes."
Image
5thcorps
 
Posts: 346
Joined: 15 Aug 2006 9:38
Location: Haunted Falls Vt.

Postby I Pik U » 15 Sep 2006 21:18

I still have a difficult time pick the Schlage A series and BC160 series. I do need to practise more.


"Locksmiths always get in".


Actually, that quote makes me laugh, reminding me of a call I got once. I was called by a fellow Locksmith that was locked in an upstairs Apt. There was only one entrance to this Apt. He was on the inside of the door, at the bottom of the stairs, and the door was jambed shut! Took me a while to help him out. I can't remember exactly how I got the door open as it was over 15 years ago. I just remember that the lock, a mortise lock, was jambed becacause the cylinder hold screw had fallen down into the casing and jambed up the workings of the lock.
Image
Been playing with locks since '68.
I Pik U
 
Posts: 304
Joined: 8 Sep 2006 11:56
Location: Ontario, Canada


Return to Locks

Who is online

Users browsing this forum: No registered users and 3 guests