|
When it comes down to it there is nothing better than manual tools for your Lock pick Set, whether they be retail, homebrew, macgyver style. DIY'ers look here.
 by Peter Martin » 3 Nov 2006 12:42 by Peter Martin » 3 Nov 2006 12:42
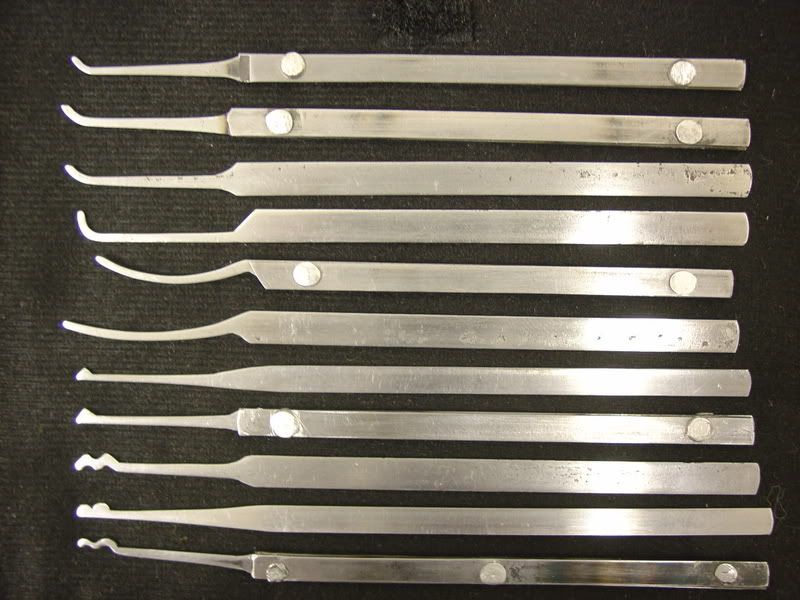
This is my first attempts to make a set that has riveted handles.
The picks have some defects from materials--the drain snake had rust and left pits which ccouldn't be polished out any further without excessive thinning and weakening the materials.
The bottom pick is a "snake" rake. This entire pick was slightly deformed (bent upwards) because I whacked the front rivet too hard during the peening process.
The new rule: Tap your rivets! Don't pound them!
The drain snake is .250" high and .025" thick. The smaller shiny picks (with no metal defects) have a height of only 3/16" but are the same thickness.
The metal on the "snake" is tarnished because I didn't take the time to polish them after annealing. To look nice to all polishing before assembly!
The spring steel has to be annealed or you can't drill the holes. hold the pick end in a vise when you anneal the handle portion--the vise will act as a heat sink and you won't have to harden/temper it. I used a #2 center drill to make the holes. The rivets also need to be filed flat to remove the hammer marks.
A last hint: the holes will NEVER line up perfectly or completely. Take your #4 round needle file, hold the two handles and the pick in alignment/together; look at the front hole and you'll see which drilled holes don't align. File the hole which doesn't align--it will be slightly larger, but it doesn't matter--the rivet will expand into the extra space. Do the front rivet first. Once the front is together, then align and file the inside of the holes for the rear rivet in the same manner. Rivet the back hole.
Good luck!
-
Peter Martin
-
- Posts: 396
- Joined: 1 Aug 2004 0:14
- Location: SD
by Lucky1406 » 3 Nov 2006 14:10
No offense, I'm just not understanding as to why you would want to rivet the handels. To make the handels thicker for more comfort? But, great job. The picks came out really nice. I was just thinking about a cool idea for picks. Have you ever seen those Boyscout knife/spoon/fork sets that lock together? Wouldn't it be cool to have a pick set that all locked together when not in use? So as not to loose any of the picks?coarse, I guesse you could just drill a hole in each pick, then cue a bolt to keep them together. hmmm, maybe not as cool as I had thought, lol oh well, keep up the good work,
Nick
-
Lucky1406
- Supporter

-
- Posts: 340
- Joined: 1 Aug 2006 1:37
- Location: College Station, Texas
by Peter Martin » 3 Nov 2006 14:19
I don't like the flexibility (side-to-side) of the steel handles and wanted to make them more rigid. I made a set of picks with heat-shrink tubing handles, which made made them easier to hold, but didn't add any rigidity. I think the stiffer slightly larger (wider) riveted handles are easier to hold.
I'm still not satisfied with the way the "finish" of the handles look--the generally poor final polishing on the handles and tarnishing from heat--so I may cover these with heat-shrink tubing also.
-
Peter Martin
-
- Posts: 396
- Joined: 1 Aug 2004 0:14
- Location: SD
by Bud Wiser » 3 Nov 2006 14:31
Thanks for sharing your work!
Personally I have not tried rivets yet. I prefer aluminum for handles and use Gorilla Glue to bond them.
Also I prefer my handles to be shorter and wider.
The ultimate pick for me is one that fits perfect in the hand, and is as light and smooth as possible. I polish my aluminum handles.
But I enjoy looking at what other people are doing because that's how I get my ideas!
-
Bud Wiser
- Supporter
-
- Posts: 1326
- Joined: 18 Jul 2006 22:47
- Location: Upstate NY
-
by Lucky1406 » 3 Nov 2006 14:31
Now I know that this sounds stupidly simple, but you could just glue the two pieces of medal together, then plastic shrink the handles. Not nearly as much fun, or as cool to look at, but it may work. Though, having a riveted pick set is really really cool. oh well. Let us know what you come up with.
Nick
-
Lucky1406
- Supporter
-
- Posts: 340
- Joined: 1 Aug 2006 1:37
- Location: College Station, Texas
by Lucky1406 » 3 Nov 2006 14:32
LOL, Bud Wiser got to the post like a second before me. oh well, great minds think alike, lol
Nick
-
Lucky1406
- Supporter
-
- Posts: 340
- Joined: 1 Aug 2006 1:37
- Location: College Station, Texas
by Peter Martin » 4 Nov 2006 0:15
The reason I try riveting... because HPC rivets their handles. They're easy to manipulate and they look pretty keen.
I also have a butt-load of rivets available and 25 feet of spring steel material to make into handles. So basically I'm just using stuff I already have lying around--even if it may be more trouble than it's worth right now.
-
Peter Martin
-
- Posts: 396
- Joined: 1 Aug 2004 0:14
- Location: SD
by Bud Wiser » 4 Nov 2006 1:07
Nothing wrong with that Peter! I don't think any thing we do is engraved in stone. We all do the best we can and like to share what we do. I probably will try riveting some handles eventually too. I've learned a lot reading what other people do. I find this part of the hobby to be just as much fun as the picking 
-
Bud Wiser
- Supporter
-
- Posts: 1326
- Joined: 18 Jul 2006 22:47
- Location: Upstate NY
-
by Romstar » 4 Nov 2006 15:21
I'll give you a couple of hints that may help you if you try to do this again.
1. If you don't have a rivet set, make one. Its a pretty basic appliance, and it really helps to make the rivets even.
2. Use a cobolt drill bit to make the holes. Use a center punch on the anvil of your vice, or the plate of your drill press. If you have neither of these, find a thick metal plate to substitute.
3. Use that same anvil or plate to hammer the rivets on. If you have the rivet set, one or two shots with the hammer is all it takes.
4. Make sure the rivets don't come too far above the handle. File them down before you flatten then if you have to.
5. You can cheat, and get the really small pop rivets in the proper size. Remove the stake, and the use the rivet set to mushroom them over.
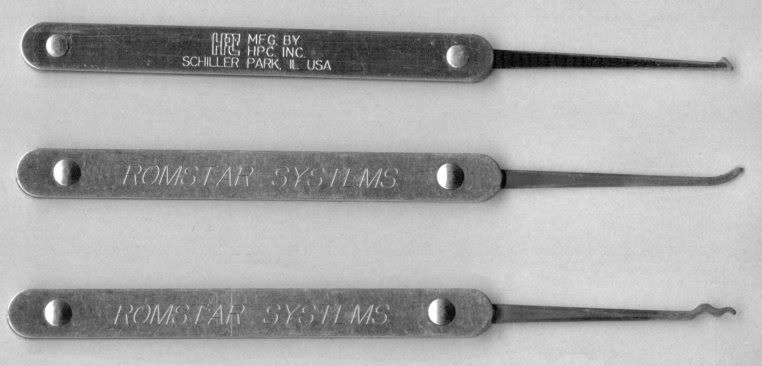
For a first try, thats actually pretty good. Especially since you are using plumbing snake. Just keep trying different things, and you will get what you are looking for. Eventually you will go from this:
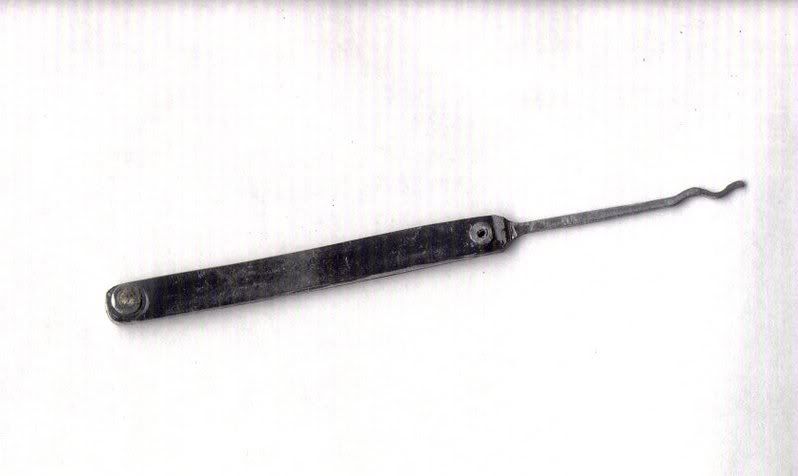
To this:
Good luck,
Romstar 
-
Romstar
-
- Posts: 2823
- Joined: 18 Apr 2004 3:13
- Location: Nova Scotia, Canada
by Kaotik » 4 Nov 2006 16:20
Romstar, Do both sides of the rivet that you use look the same on both sides, and what type of rivets (name/size) are you using?
-
Kaotik
- Moderator Emeritus
-
- Posts: 1200
- Joined: 10 Jun 2006 13:38
- Location: Texas, USA
by Romstar » 8 Nov 2006 12:21
Kaotik wrote:Romstar, Do both sides of the rivet that you use look the same on both sides, and what type of rivets (name/size) are you using?
No, the rivets do not look the same on the other side. Some of the rivets I use started out as pop rivets. The ones pictured are plain rivets that require a rivet set. I am having a devil of a time getting them again, but they look like they are open on the other side which is the side that needs to be mushroomed over with the rivet set.
The pop rivets I use are 3/32 diameter and 1/4 long. The problem with these ones isn't so much removing the spike as it is filing them down to a proper length before they go on the rivet set. The box of them here are Profast'ners AD32BS100.
I would love to find a supplier of steel or even brass 3/32 x 1/8 closed rivets. I know they make the bloody things, but nobody can seem to find them anymore. I got lucky once and got 500 of the things, but that was all she wrote.
I will post some pics soon.
Romstar
-
Romstar
-
- Posts: 2823
- Joined: 18 Apr 2004 3:13
- Location: Nova Scotia, Canada
by Kaotik » 8 Nov 2006 15:59
Cool, I think I can get some of that size aluminum pop rivets, and also some caps that cover the hole up. I have used some of those while repairing and modifying a greyhound bus into a RV, but I think with the caps it will make a pick look bulky.
I'll give it a shot and see what I can get in my area. I'll also look around and see if I can find some of the ones your speaking of, i'll keep you posted on what I find from the suppliers in my area.
Thanks.
-
Kaotik
- Moderator Emeritus
-
- Posts: 1200
- Joined: 10 Jun 2006 13:38
- Location: Texas, USA
by stlbolt » 8 Nov 2006 16:23
hmm id just take mine down to a shop and have them spot welded 
-
stlbolt
-
- Posts: 205
- Joined: 21 Dec 2005 3:32
Return to Lock Picks
Who is online
Users browsing this forum: No registered users and 28 guests
|


