|
When it comes down to it there is nothing better than manual tools for your Lock pick Set, whether they be retail, homebrew, macgyver style. DIY'ers look here.
 by Peter Martin » 12 Dec 2006 11:32 by Peter Martin » 12 Dec 2006 11:32
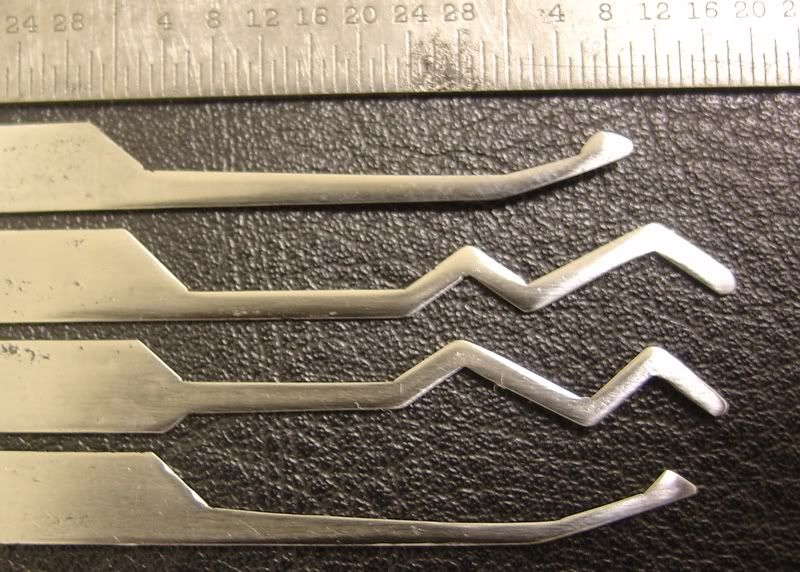
Based on Romstar's latest template, I made these picks this week. But when I took the photo and magnified it, there are a series of problems--specifically, corners are not sharp, the corners may be "undercut" (i.e. one side cuts deeper into the other angle), the diamond points don't have straight lines to their point (they look rounded), and some general polishing.
I used crocus cloth to polish them--and in my hand they are gleaming. You can't see the imperfections with naked eye--to me they looked very good until I took this picture.
What does everyone else do for Quality Control... do you magnify your picks and look at this stuff? Or is perfection the enemy of good enough?
-
Peter Martin
-
- Posts: 396
- Joined: 1 Aug 2004 0:14
- Location: SD
by UWSDWF » 12 Dec 2006 11:35
they look beautiful to me... I think you need to ask yourself is do the work for you?
If so great job, I'd be proud if I had made them.
 DISCLAIMER:repeating anything written in the above post may result in dismemberment,arrest,drug and/or alcohol use,scars,injury,death, and midget obsession.
-
UWSDWF
- Supporter

-
- Posts: 4786
- Joined: 27 May 2006 13:01
- Location: Toronto, ON. Canada
by parapilot » 12 Dec 2006 11:57
Lok great. I would round off the small part where the handle / shaft starts, it looks quite sharp, more so on the top pick. It will produce a stress point which could snap your pick. The working parts look top class though, well done.
-
parapilot
-
- Posts: 599
- Joined: 30 Mar 2006 15:50
- Location: Wirral, UK
by Anero » 12 Dec 2006 12:55
Yes i sometimes do that, i'll think i'm done with a pick take a couple pictures of it and notice and few minor things wrong with it and touch it up from there normaly it's just a little bit more filing or sanding. but your picks look awesome. i'll have to try to make a king and queen soon, what type of stock did you use?
-
Anero
-
- Posts: 192
- Joined: 28 Sep 2006 18:40
- Location: Moreno Valley, California
by REparsed » 12 Dec 2006 13:27
A good macro shot and the right lighting can show all kinds of tiny imperfections in what you'd think was a perfectly smooth surface.
To hold the pick below in your hand and look at it you'd swear it
had a flawless satin finish.
Your work looks really nice. Start with something like 320 paper and progressively work your way up to the crocus cloth.

-
REparsed
-
- Posts: 73
- Joined: 26 Sep 2006 17:40
- Location: NE Ohio
-
by Romstar » 12 Dec 2006 13:56
Peter Martin wrote:Based on Romstar's latest template, I made these picks this week. But when I took the photo and magnified it, there are a series of problems--specifically, corners are not sharp, the corners may be "undercut" (i.e. one side cuts deeper into the other angle), the diamond points don't have straight lines to their point (they look rounded), and some general polishing.
I used crocus cloth to polish them--and in my hand they are gleaming. You can't see the imperfections with naked eye--to me they looked very good until I took this picture.
What does everyone else do for Quality Control... do you magnify your picks and look at this stuff? Or is perfection the enemy of good enough?
I'm amazed. I know there are some great pick makers on here, but these are absolutely great!
They far surpass some of my students work, and I would be proud of them no matter what. If you take those same pictures of comercial picks, whether they are raw or you have polished them, you will discover even more flaws.
Here's the thing, if I am being really picky, I get out the magnifying visor and do my filing and sanding while looking through that. It will make a difference in what you see while you are finishing.
Do you need to do it? Nope, those are excellent, and you should be proud as sin.
Romstar 
-
Romstar
-
- Posts: 2823
- Joined: 18 Apr 2004 3:13
- Location: Nova Scotia, Canada
by Peter Martin » 12 Dec 2006 14:40
Anero,
The stock is 1/4"x.025" drain snake. I buy mine in a light rusty condition at a local "tool surplus" for $1.95 for 20 feet, then take the rust off with a 150 grit rubber polishing wheel on a Dremel. There are some pits left as you can see from the handles which won't polish out entirely.
I use Dykem blue layout ink, and then scribe four lines, 1/16" apart lengthwise across the tip, then scribe the series of vertical lines 5/32" wide (to match the spacing for Arrow/Schlage/Weiser/etc. locks ) before drawing the pattern.
Now that I can see the slight problems, I think I'll start looking at the tip shapes and finish more critically under a magnifying glass.
-
Peter Martin
-
- Posts: 396
- Joined: 1 Aug 2004 0:14
- Location: SD
by timal » 12 Dec 2006 15:32
Those are some really nice looking tools.
Have a Great Day !
-
timal
-
- Posts: 116
- Joined: 29 Oct 2006 20:25
- Location: Northern Alabama, USA
by Gordon Airporte » 12 Dec 2006 23:16
Uh huh, like you don't just want to show off 
So RELAX and pick up a lock instead of the sandpaper already.
Or... we could take this to extremes and start thinking like knife makers. I can imagine all kinds of laser-etched, cryo-treated, tropical wood sporting, 3D molded craziness. Something like that might make a good prize for a picking contest or something.
-
Gordon Airporte
-
- Posts: 814
- Joined: 15 Sep 2005 13:22
Return to Lock Picks
Who is online
Users browsing this forum: No registered users and 37 guests
|


