|
When it comes down to it there is nothing better than manual tools for your Lock pick Set, whether they be retail, homebrew, macgyver style. DIY'ers look here.
 by Oldfast » 25 Feb 2011 22:59 by Oldfast » 25 Feb 2011 22:59
I sometimes feel a little guilty taking SO much from this site and giving very little. So I snapped some pictures throughout the process of making my third homemade pick and thought I'd share them. For many of you, this whole process is like second nature, but I thought it'd be neat for you to see what all your posts have helped me do- thanks guys  I came across some old knives at my local second-hand store. I'm not to keen on recognizing good stainless steel from bad, but they looked fairly old, and they passed the "bend test". So, I bought all four of them for only 40 cents. I wanted to make a duplicate of one of my favorite picks from my slimline set - deforester 1/2 ball. The template for this was obviously pretty easy. 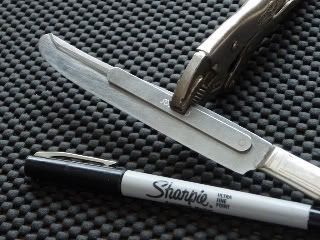 Then it's off to the bench grinder. This probably takes me longer than it should, but I'm always afraid of over-heating it. So I take it down very slowly, quenching it in ice water after every 2-3 light stokes. Leaving the handle on the blade for this initial phase made for easier work and more control. I'm left with a rough, but fairly precise shape. 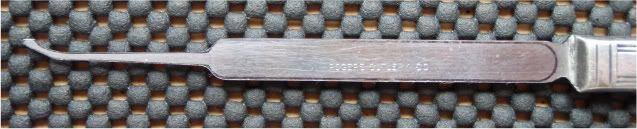 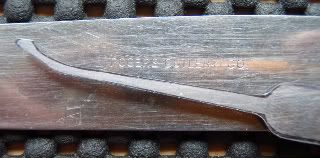 An assortment of hand files (+ some time) brings me closer yet. 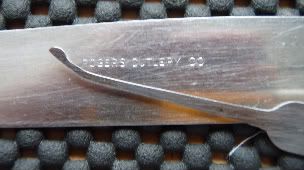 One more problem though before I can start sanding. As you can see, the width is perfect for the handle but way too wide for the pick. I was tempted to use the bench grinder, a belt sander, or a dremel to thin it out, but was too afraid by this point  . Anyway, I'm glad I didn't. Some adhesive sandpaper on a piece of wood gave me a very controlled taper in much less time than I had expected. 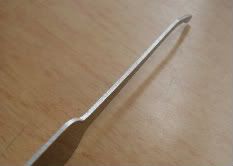 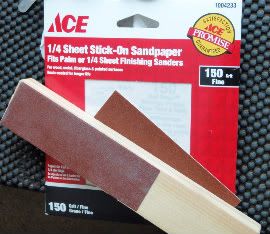  Now for the sanding phase. This could be exhausting if it weren't for the fact that I rather enjoy it (and I'm a little on the obsessive side  ). Grits: 220, 400, 600, 800, 1000-wet, 2000-wet, and finally, a dremel and some toothpaste. Did someone say mirror finish? 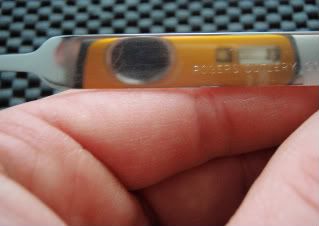 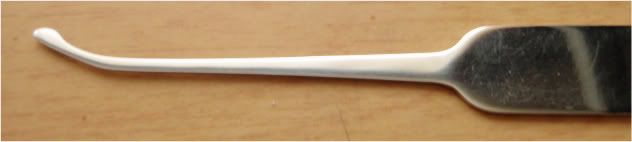   I've been using this pick for several days now and absolutely love it - hence, way too many pictures (sorry about that). The specs are nearly exact to that of my SouthOrd slimline, right down to the weight at exactly 3 ounces (unintentional). It's just as small but with far less flex, giving me alot more feedback. Thanks again to everyone here who help make this hobby so enjoyable for me.
-
Oldfast
-
- Posts: 81
- Joined: 29 Dec 2010 15:01
- Location: Michigan
by barbarian » 25 Feb 2011 23:32
Very nice looking work.
Brilliant polishing job !!
-
barbarian
-
- Posts: 258
- Joined: 28 Jun 2007 18:06
by Squelchtone » 26 Feb 2011 0:11
Excellent work!
My favorite part, aside from the top notch craftsmanship is that you retained the cutlery company name on the pick, that's awesome!
Thanks for the nice tutorial and photos, many people will benefit from it for years to come.
Squelchtone
-

Squelchtone
- Site Admin
-
- Posts: 11340
- Joined: 11 May 2006 0:41
- Location: right behind you.
by dmux » 26 Feb 2011 3:01
Wow, that's a pretty good way to get rid of a butter knife.
-
dmux
-
- Posts: 611
- Joined: 28 Dec 2004 10:56
- Location: MD
by raimundo » 26 Feb 2011 9:49
Stop that, your makin' mine look bad  Wake up and smell the Kafka!!!
-
raimundo
-
- Posts: 7130
- Joined: 21 Apr 2004 9:02
- Location: Minnneapolis
by Oldfast » 26 Feb 2011 15:20
Thanks so much for the encouragement. It means alot coming from you guys. Again, couldn't have done it without you. Squelchtone, funny you mentioned the logo. I too really like how it turned out like that and will try to duplicate that on the next one. But I must admit, this was purely accidental! During the placement of the pick I was concerned only with the thickness of the blade in that area, giving little thought to the company logo. Ironicallly, the logo not only ended up on my pick, but it ended up perfectly level! Ha, probably couldn't do it again if I tried! Also, I wanted to bounce an idea off you guys and get some feedback before I possibly ruin something. I'd like to put something decorative on the end of this handle. I was thinking of drilling 3 holes, each progressively smaller than the last - the biggest of the 3 being at the end of the handle. It'd probably look something like the 3 smallest holes on this throwing knife.  Couple of options: If I drilled all the way through, I'd definately bevel both sides of each hole, giving it a nice look. On the other hand, I wouldn't necessarily have to drill all the way through, which would leave me with a sort of circular " concave divet". Obviously, this would take some material weight off the end and would probably balance the pick out (which I don't think really matters). But mainly this would be purely decorative. Has anyone seen something like this? Any thoughts on whether I should or should NOT try this?
-
Oldfast
-
- Posts: 81
- Joined: 29 Dec 2010 15:01
- Location: Michigan
by Squelchtone » 26 Feb 2011 18:39
I don't have a great answer for your question, but that example knife you have is begging for some 550 parachute cord to be wrapped around the handle and through the holes.. like this one: 
-
Squelchtone
- Site Admin
-
- Posts: 11340
- Joined: 11 May 2006 0:41
- Location: right behind you.
by Violaetor » 27 Feb 2011 16:36
Oldfast wrote:Thanks so much for the encouragement. It means alot coming from you guys. Again, couldn't have done it without you. Squelchtone, funny you mentioned the logo. I too really like how it turned out like that and will try to duplicate that on the next one. But I must admit, this was purely accidental! During the placement of the pick I was concerned only with the thickness of the blade in that area, giving little thought to the company logo. Ironicallly, the logo not only ended up on my pick, but it ended up perfectly level! Ha, probably couldn't do it again if I tried! Also, I wanted to bounce an idea off you guys and get some feedback before I possibly ruin something. I'd like to put something decorative on the end of this handle. I was thinking of drilling 3 holes, each progressively smaller than the last - the biggest of the 3 being at the end of the handle. It'd probably look something like the 3 smallest holes on this throwing knife. Couple of options: If I drilled all the way through, I'd definately bevel both sides of each hole, giving it a nice look. On the other hand, I wouldn't necessarily have to drill all the way through, which would leave me with a sort of circular " concave divet". Obviously, this would take some material weight off the end and would probably balance the pick out (which I don't think really matters). But mainly this would be purely decorative. Has anyone seen something like this? Any thoughts on whether I should or should NOT try this?
Putting divets into such thin metal would be VERY difficult particularly trying to line them up on both sides, and if you were able to line them up you would more than likely just end up cutting through. I would suggest (if you try it) making holes, using a countersink bit, that will give you varying diameters with the same bevel profile and easy to centre from both sides.  Looking to get something made? Send me a PM!
-
Violaetor
-
- Posts: 91
- Joined: 31 Dec 2010 10:39
by Oldfast » 28 Feb 2011 16:27
Violaetor, thanks for your thoughts on this. Not exactly what I wanted to hear  , but your right. Definitely doable, but difficult. Even more so if my goal was to not drill entirely through the piece. However, I think it would look much better with holes anyway- be it a small hole at the bottom of a divet, or a "straight through" hole with a bevel. For now, I think I'll take your advice and leave well enough alone. I'll definitely do some experimenting with this in the near future though, for I think it would make for a mean lookin' pick.
-
Oldfast
-
- Posts: 81
- Joined: 29 Dec 2010 15:01
- Location: Michigan
by maxmixer » 8 Apr 2011 19:01
Brilliant work BTW ! I never even thought on Knifes, i'm about to try some home made picks, just bought a new bench grinder this week... I was going to start with, feeler gauges or hacksaw blades, this is great.... maxmix Oldfast wrote:I sometimes feel a little guilty taking SO much from this site and giving very little. So I snapped some pictures throughout the process of making my third homemade pick and thought I'd share them. For many of you, this whole process is like second nature, but I thought it'd be neat for you to see what all your posts have helped me do- thanks guys I came across some old knives at my local second-hand store. I'm not to keen on recognizing good stainless steel from bad, but they looked fairly old, and they passed the "bend test". So, I bought all four of them for only 40 cents. I wanted to make a duplicate of one of my favorite picks from my slimline set - deforester 1/2 ball. The template for this was obviously pretty easy. Then it's off to the bench grinder. This probably takes me longer than it should, but I'm always afraid of over-heating it. So I take it down very slowly, quenching it in ice water after every 2-3 light stokes. Leaving the handle on the blade for this initial phase made for easier work and more control. I'm left with a rough, but fairly precise shape. An assortment of hand files (+ some time) brings me closer yet. One more problem though before I can start sanding. As you can see, the width is perfect for the handle but way too wide for the pick. I was tempted to use the bench grinder, a belt sander, or a dremel to thin it out, but was too afraid by this point . Anyway, I'm glad I didn't. Some adhesive sandpaper on a piece of wood gave me a very controlled taper in much less time than I had expected. Now for the sanding phase. This could be exhausting if it weren't for the fact that I rather enjoy it (and I'm a little on the obsessive side ). Grits: 220, 400, 600, 800, 1000-wet, 2000-wet, and finally, a dremel and some toothpaste. Did someone say mirror finish? I've been using this pick for several days now and absolutely love it - hence, way too many pictures (sorry about that). The specs are nearly exact to that of my SouthOrd slimline, right down to the weight at exactly 3 ounces (unintentional). It's just as small but with far less flex, giving me alot more feedback. Thanks again to everyone here who help make this hobby so enjoyable for me.
-
maxmixer
-
- Posts: 4
- Joined: 24 Mar 2011 19:26
by Oldfast » 9 Apr 2011 0:43
@Maxmixer Nice to meet ya, and thanks for the compliment. Making your own picks can be quite addictive. Personally, I've only made a few, but if you look around the forum (as you've already done I see) you'll find some fantastic craftsman. Just a thought to throw out there: another medium you might want to try working with is the inserts from windshield wiper blades. ToolyMcgee has a wonderful video tutorial on this. Using inserts and a bench grinder to make a set of hooks. http://www.youtube.com/watch?feature=pl ... 7HnhM53PeU
-
Oldfast
-
- Posts: 81
- Joined: 29 Dec 2010 15:01
- Location: Michigan
Return to Lock Picks
Who is online
Users browsing this forum: No registered users and 23 guests
|


