|
When it comes down to it there is nothing better than manual tools for your Lock pick Set, whether they be retail, homebrew, macgyver style. DIY'ers look here.
 by Anavaree » 9 Sep 2011 20:59 by Anavaree » 9 Sep 2011 20:59
Making my(your) own lock picks. DIY I am sure there are a lot of threads out there similar to this one, I should know I’ve read several, but I wanted to write one of my own. I enjoy DIY threads. I am a member of several other forums and DIYs are always my favorite to read. I plan on a step by step process about how I came about making my own picks. I haven’t actually generated any decent useable picks yet but this is my journey to a hopefully successful end. Having downloaded many template from LP101, thanks everybody, I went about experimenting to determine if I should even try to make my own. I started out by printing out a 1:1 template of the king and queen picks. I haven’t found any of those to buy yet and everyone seems to agree that they are very useful picks. I then used Dye-chem blue to spray down a properly prepared high carbon steel hacksaw blade and very carefully stuck the cutout of the picks to the blade. I don’t have any pictures of this phase of the process since it was done at work while avoiding my manager. I had prepared the blade by removing the teeth, higher TPI count the better for this step, and removing all the powder coating on the blade. We should all know this part of the process. These are the blades I used. 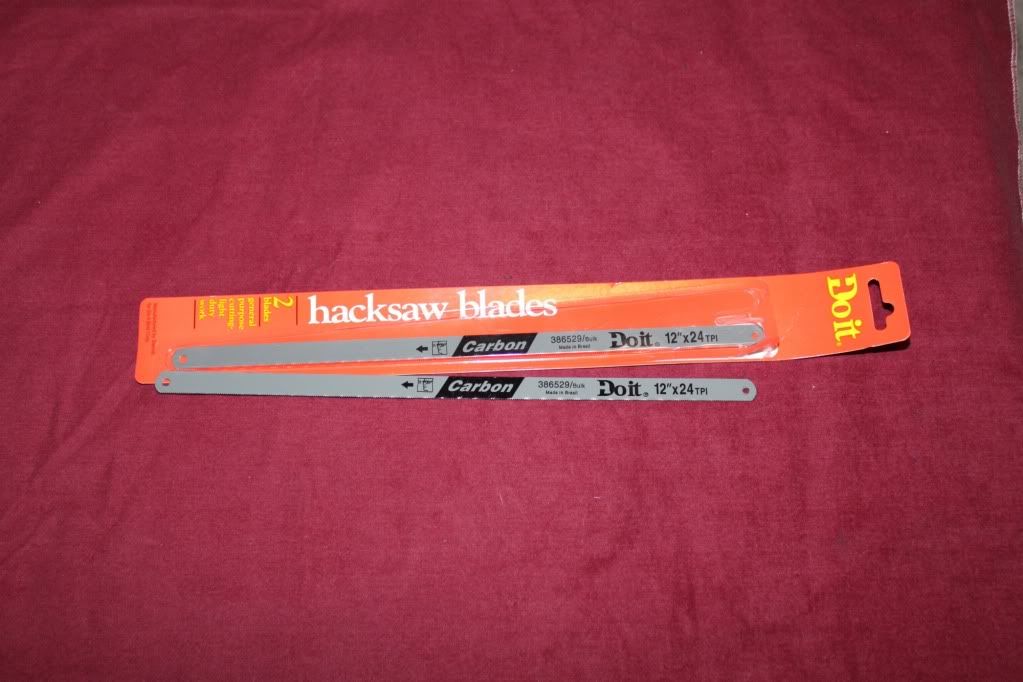 Next I used a high speed grinding wheel to rough out my pick. It is a proprietary grinding system my company uses, nothing special really but you couldn’t get your hands on one so no pics. Any bench grinder will work fine. Then I progressed to a miniature diamond wheel on a Dremel tool. I highly recommend one of these bad boys. http://www.dremel.com/en-us/Accessories ... px?pid=545After about 15 minutes of work I was left with this King pick and another 10 minutes yielded the Queen pick. I did a little final touch up with my set of Oberg needle files. Very nice files for the price. 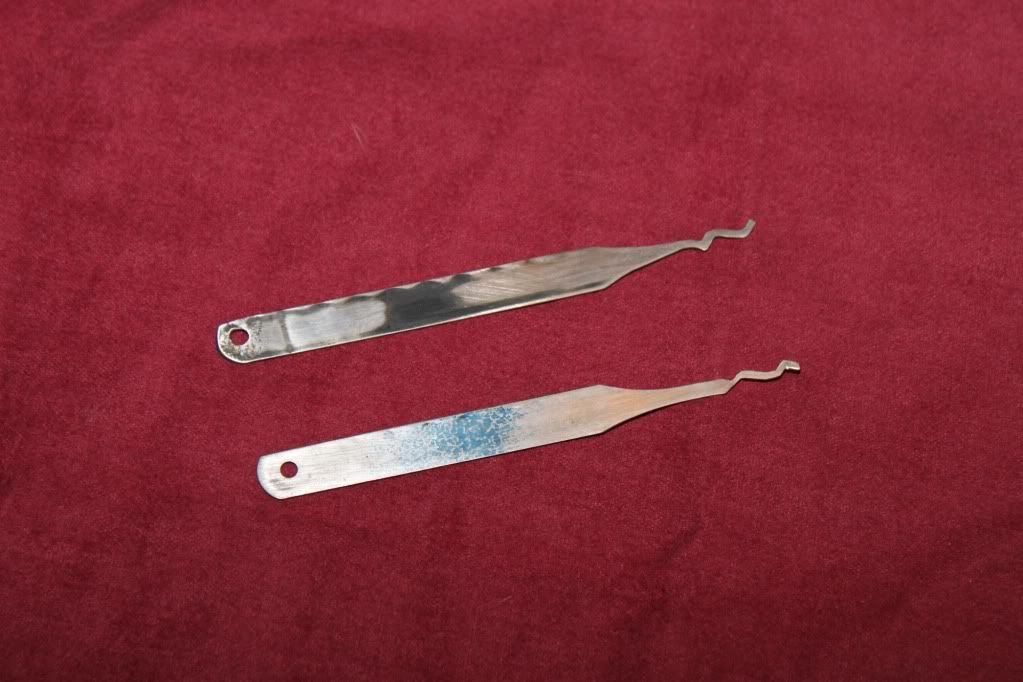 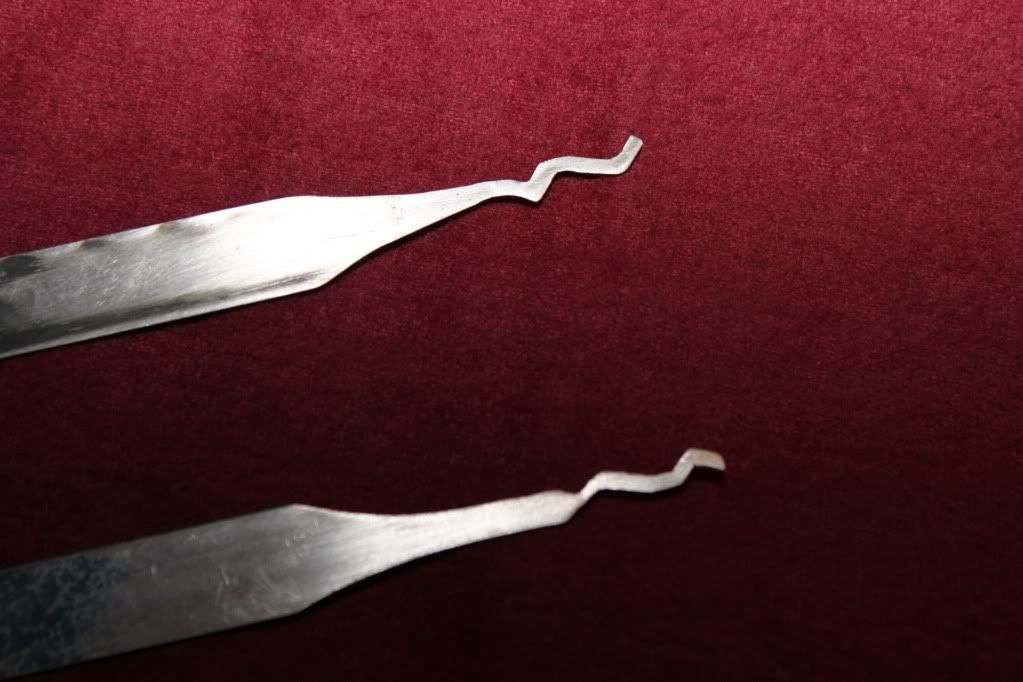 The King is still a little rough because I didn’t bother to finish it and the Queen had a little slip of the wheel which led to a VERY thin section. But I was sold on the idea. Less than 30 minutes, at work and hiding from my boss, and I still came out with a useable King pick. It’s rough but I still picked a couple of locks with it. So next post I will explain my process of accumulating the more advanced tools I am using to make picks. ~Jesse There is no such thing as impossible, just different degrees of awesome.
-
Anavaree
-
- Posts: 152
- Joined: 26 Jul 2011 8:53
- Location: Kentucky, USA
by Anavaree » 10 Sep 2011 15:54
So, it’s now time to start accumulating tools. I used the transfer instructions from Libris as a guideline. I have the templates now I needed a way to print them. I am assuming that most of us don’t have a laser printer at home. Considering a standard color ink jet from Wal-Mart costs about $25 and a color laser printer costs about $250 most people won’t bother to have one in the house. For the most part I print about 100 pages a year and half of the time I have gone to print only to find that my ink cartridge has dried up. Since laser toner cartridges are particulate plastic, except apparently for Brother according to fredd3039, they never dry up. So on to BestBuy… 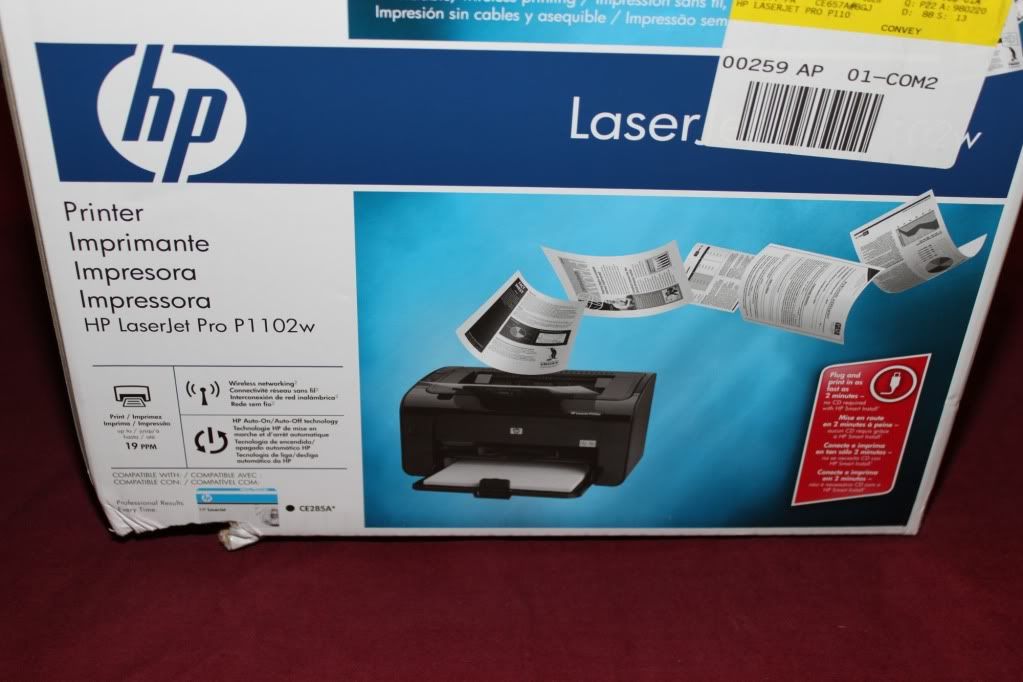 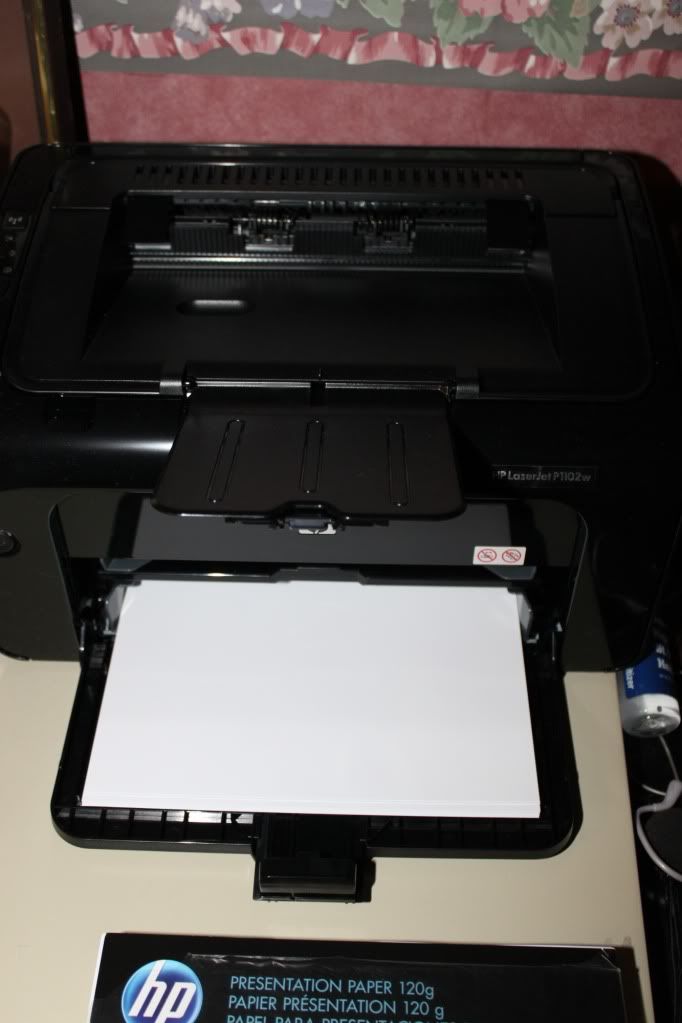 I found this HP B&W LaserPro with a full toner cartridge for only $100. Since I print mostly text documents and information pages, B&W was fine for me. It came with all the parts needed to hook it up. No paper at BestBuy… Oh look, OfficeMax next door. Vitti suggested HP Glossy Presentation Paper; this is what I found too.  Unfortunately you get 250 pages for $15. Unless you are making lots, and I mean lots, of picks then this will last forever. It’s really nice paper though. I looked for the little packs of 25ish, but no luck. I already had an iron, as I am sure most of you will too, so I was all sent there. So next I will be ready to locate materials for the picks themselves. Next post. ~Jesse There is no such thing as impossible, just different degrees of awesome.
-
Anavaree
-
- Posts: 152
- Joined: 26 Jul 2011 8:53
- Location: Kentucky, USA
by Anavaree » 10 Sep 2011 16:24
So now I have the templates printed out. I have my iron, miscellaneous hand tools and grinders. Now I need the pick material. Many people have been using feeler gauges for pick material. I measured my SouthOrd standard stainless picks and they are .020†thick. My hacksaw blades are .028†thick. I decided to go with something .019†thick. My company uses Grainger Industrial Supply a lot and I located these; 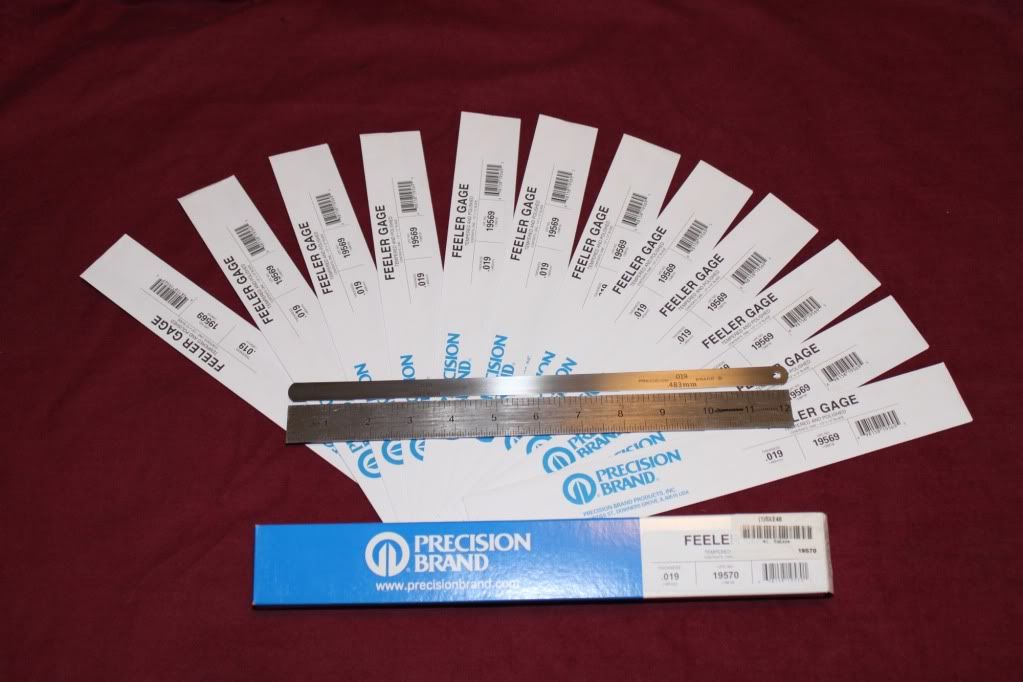 http://www.grainger.com/Grainger/wwg/se ... sst=subset http://www.grainger.com/Grainger/wwg/se ... sst=subsetThey are normally $22.98 at this time, but due to our companies’ volume discount I got them for $14.45. That’s 12 12†long high carbon steel feeler gauges for $14. They are high carbon so they will be more susceptible to rusting, but we should all take good care of our tools. I am now ready to transfer. Next post. ~Jesse There is no such thing as impossible, just different degrees of awesome.
-
Anavaree
-
- Posts: 152
- Joined: 26 Jul 2011 8:53
- Location: Kentucky, USA
by femurat » 12 Sep 2011 4:17
Hey Jesse, you're serious about the hobby! Can't wait to see how your project develops. Cheers 
-

femurat
- Site Admin
-
- Posts: 3770
- Joined: 22 Sep 2008 9:06
- Location: Italy
by Anavaree » 12 Sep 2011 7:15
Femurat, Well... It helps when you have an obsessive personality.  There is no such thing as impossible, just different degrees of awesome.
-
Anavaree
-
- Posts: 152
- Joined: 26 Jul 2011 8:53
- Location: Kentucky, USA
by Anavaree » 12 Sep 2011 8:16
Time to transfer. First I had to clean off my feelers. I used Trichlorotrifluoroethane. It worked really well and you can usually find something similar in electrical contact cleaner. My bottle is like 20 years old and the EPA would probably skin me alive if they knew I still had an original bottle. I didn’t bother to change the surface of the feeler gauge. It didn’t seem to be a problem with the bonding process in the end. Then I printed out the templates and cut them down to fit on my feelers. 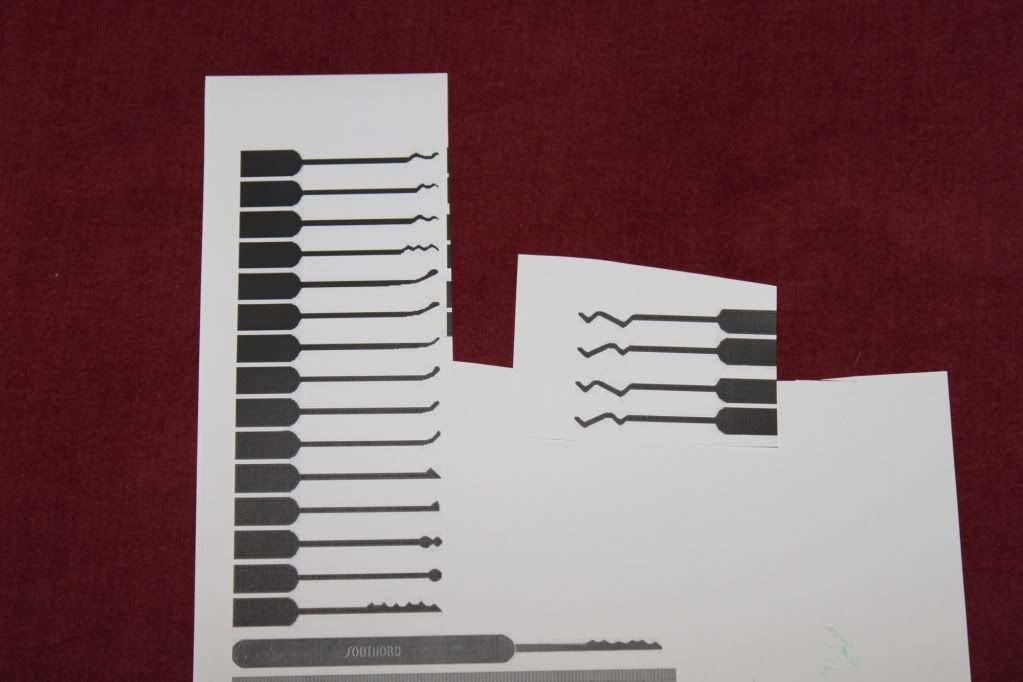 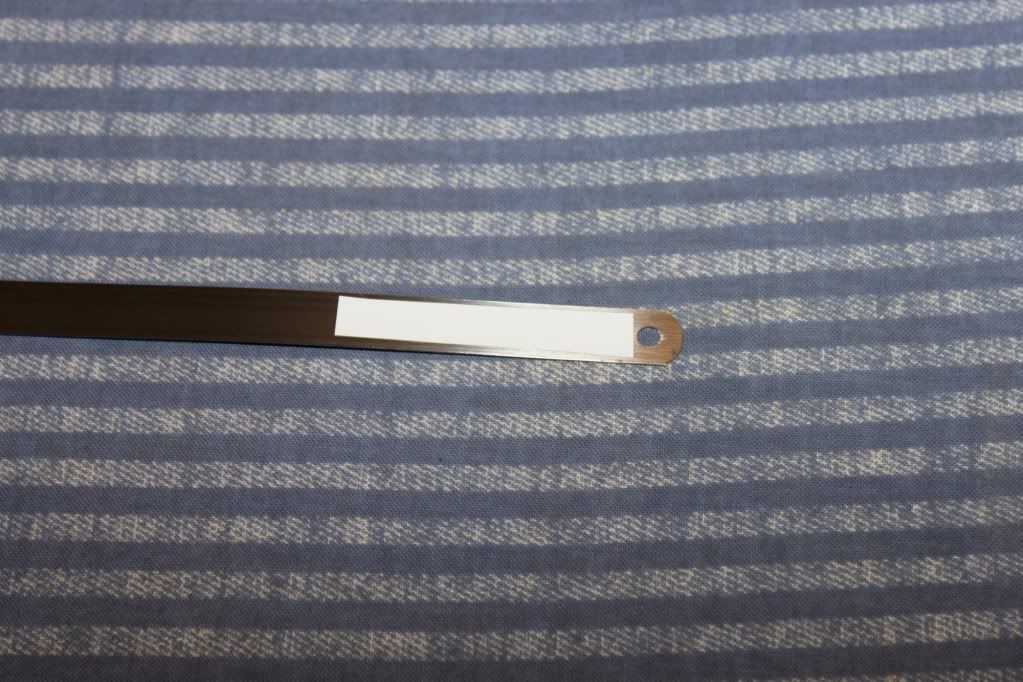 I used Parchment Paper, commonly used for baking, as a protective layer over the template. It is specifically heat resistant and also transparent so you can see where the template is sitting. 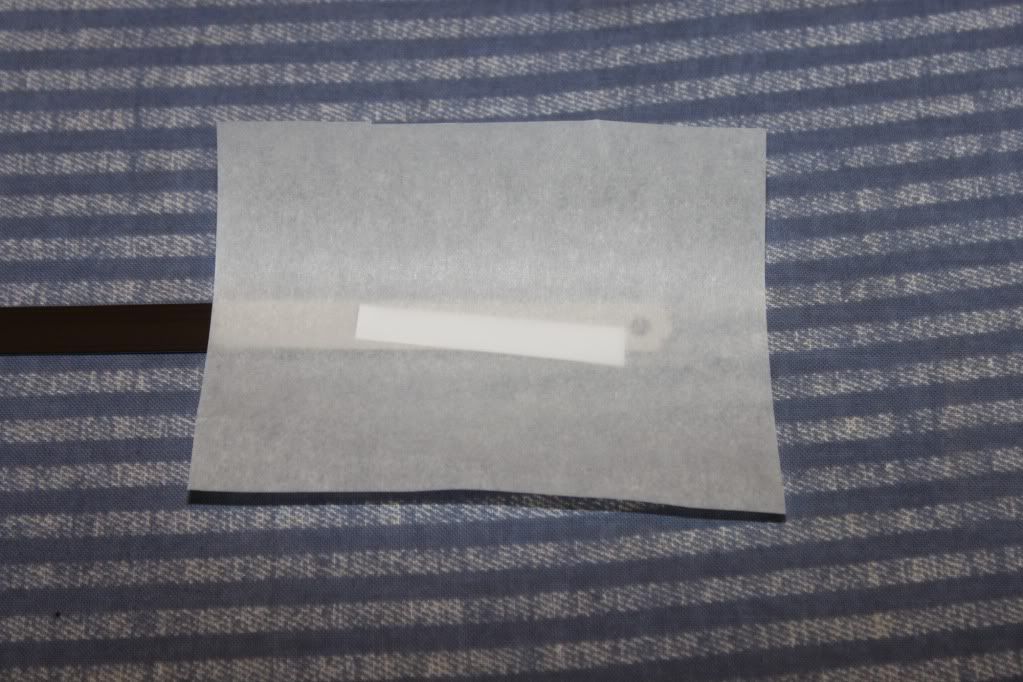 I fired up my iron to MAXIMUM POWER! I broke the steam option on it a couple of weeks ago so I didn’t have to worry about turning it off. Place the template/paper onto an ironing board. Real carefully press the iron down onto the parchment paper/template. I just used my finger to hold everything in place and slid the iron overtop of the template and just let it sit there. The parchment paper is really smooth so I gently slid the iron around just a little bit, I didn’t want to disturb the template and smudge the melting plastic. 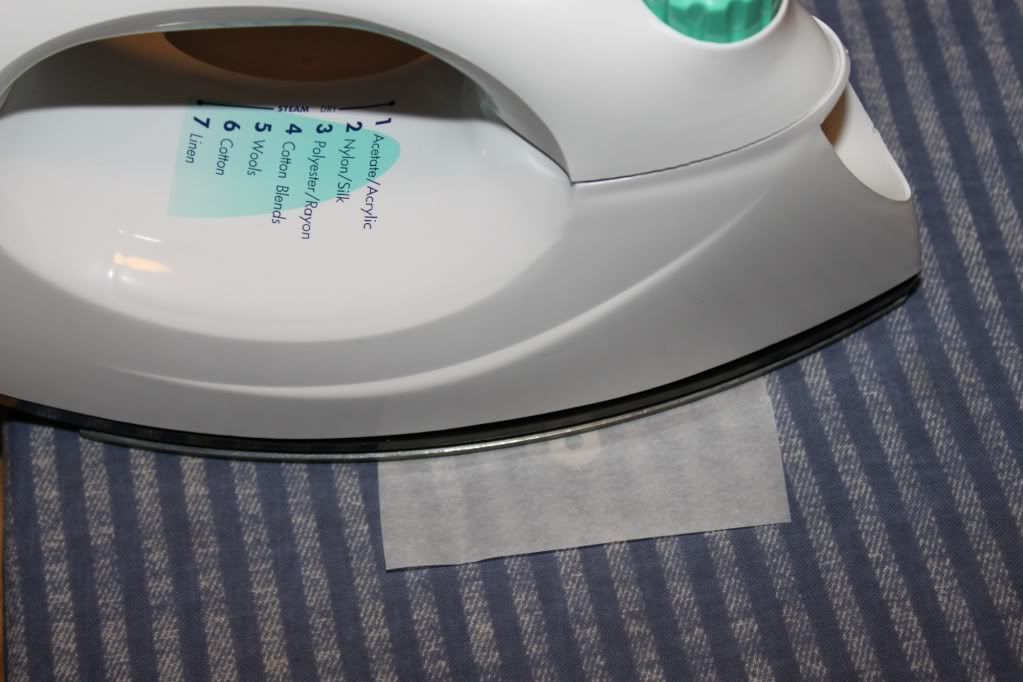 After 30-45 seconds the heat was starting to travel down the length of the feeler. Plenty hot enough. As Libris said you may have to play around with how long to heat the template but that was enough for me. Let it cool for a minute. I picked up the feeler and waved it around a bit. If the template is stuck to it you are looking good. I dumped it into a little cylinder under hot running water.  I have a darkroom so I have all sorts of little, and big, containers lying around. I let it soak for 10-20 minutes. I’m not sure how long but I made and ate a sandwich while I was waiting. I am not sure hot water is really necessary, I’ll try room temp water n my later attempts. After pulling it out it should look like this. 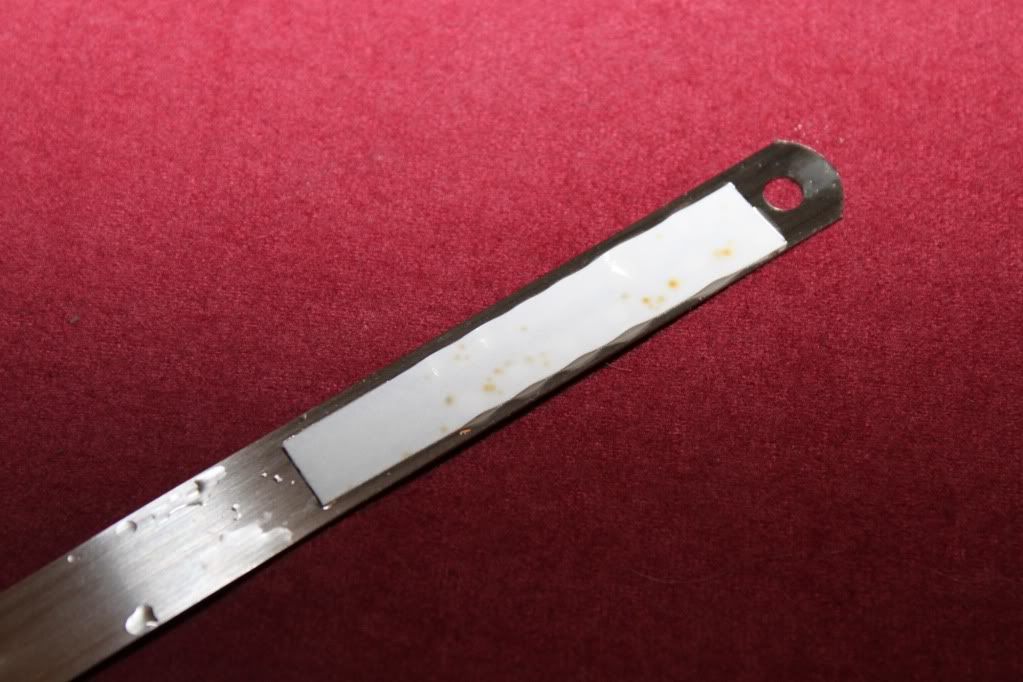 It’s hard to tell but the template is all wavy and pruny, looks like your fingers after a couple of hours in the tub. People suggest that this is a delicate part and to use a needle to delicately peel off the paper. I tried that the first time and it was fine. My second attempt I just used my thumb to scrub the paper off. The plastic template is REALLY stuck on there. Seriously, scrub away. And you should be left with this. 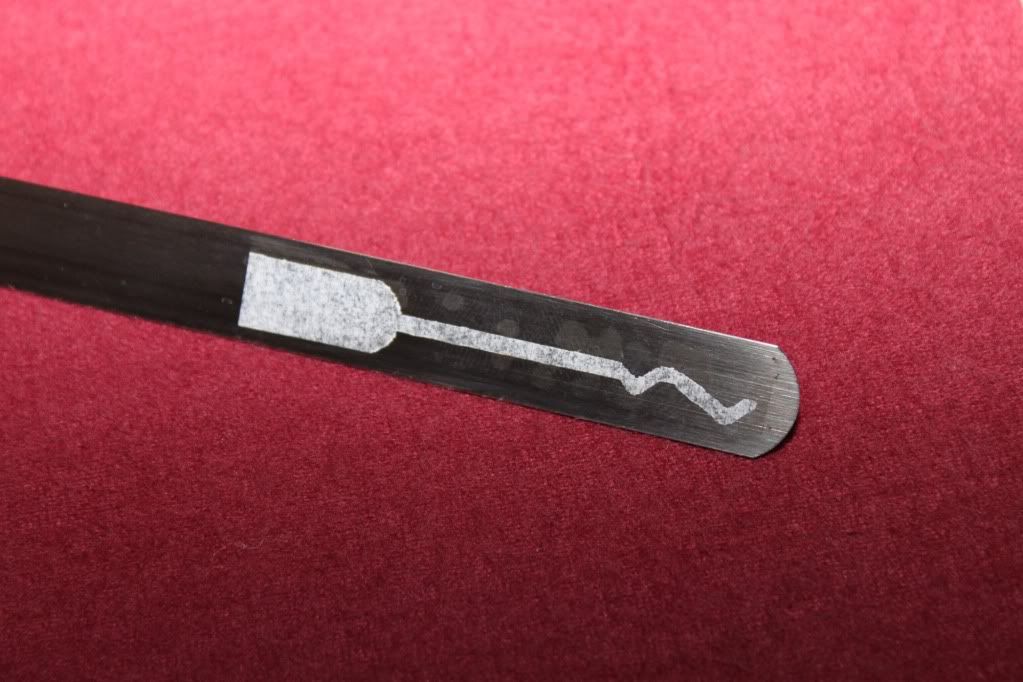 I think it looks pretty good. Clear well defined edges and very well bonded. So the next step will be to start the grinding. I have my dremel tool but I still need to go pick up my 545 diamond wheel. The last one I used was at work and I need one at home. I also want to get an ultra-fine high speed wheel for my bench grinder. See you in the next post. ~Jes There is no such thing as impossible, just different degrees of awesome.
-
Anavaree
-
- Posts: 152
- Joined: 26 Jul 2011 8:53
- Location: Kentucky, USA
by Anavaree » 13 Sep 2011 16:06
So, I have put together my tools and I should be ready to start work. I went to Lowes and HomeDepot to pick up that Dremel 545 diamond wheel and came up with a problem. Its $20 plus another $9 for the quick connect arbor. Well, I am not quite willing to spend that much now. While I was at Harbor Freight I came across a couple of other tools which may help though.  The little diamond wheels were only $5 so I don’t have much faith in them. The 20 piece diamond burr set was only $8 so… same feelings. I haven’t cut with them yet but we’ll find out in my next post. The Dremel 5 piece metal cutting set was on sale for $13 and came with the quick connect arbor. If these reinforced cutting disks don’t work out I’ll have to go get the diamond wheel. I highly recommend this setup. 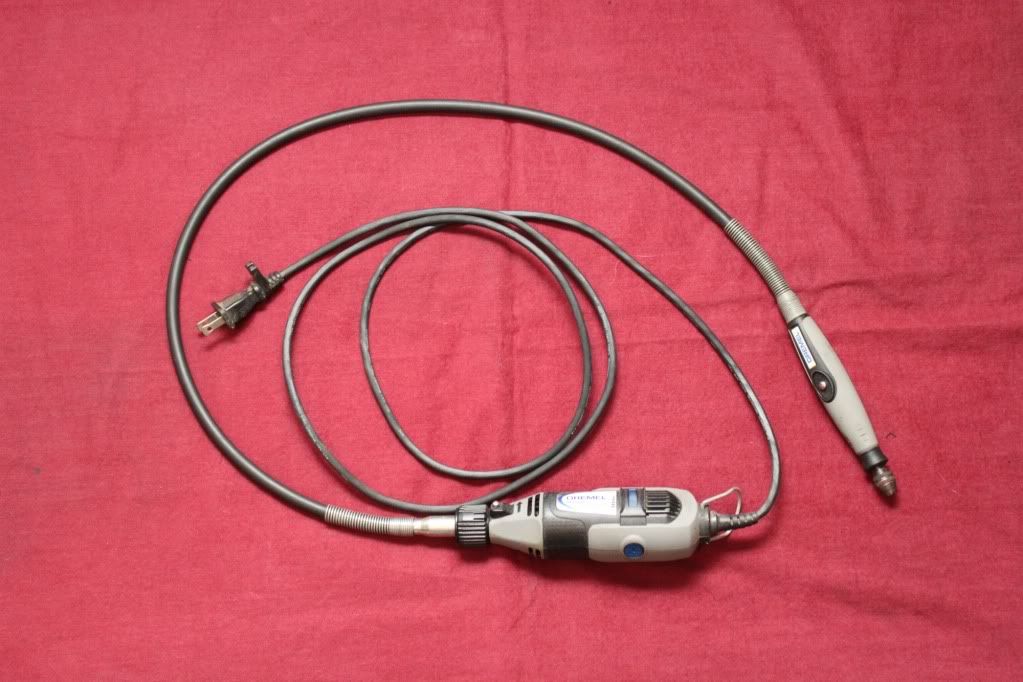 If you already have a Dremel then the flex attachment is only $30. It really makes handling and fine work much easier. I still haven’t dropped the cash for any pippin files as I haven’t started impressioning yet so I am using a simple needle file set. I have a nice set of Oberg files and they cut VERY smoothly. These were worth the money, not like $20 is much, so don’t get the $6 set from Harbor Freight. I like Harbor Freight but you really have to sort through the crap to find the peanut. 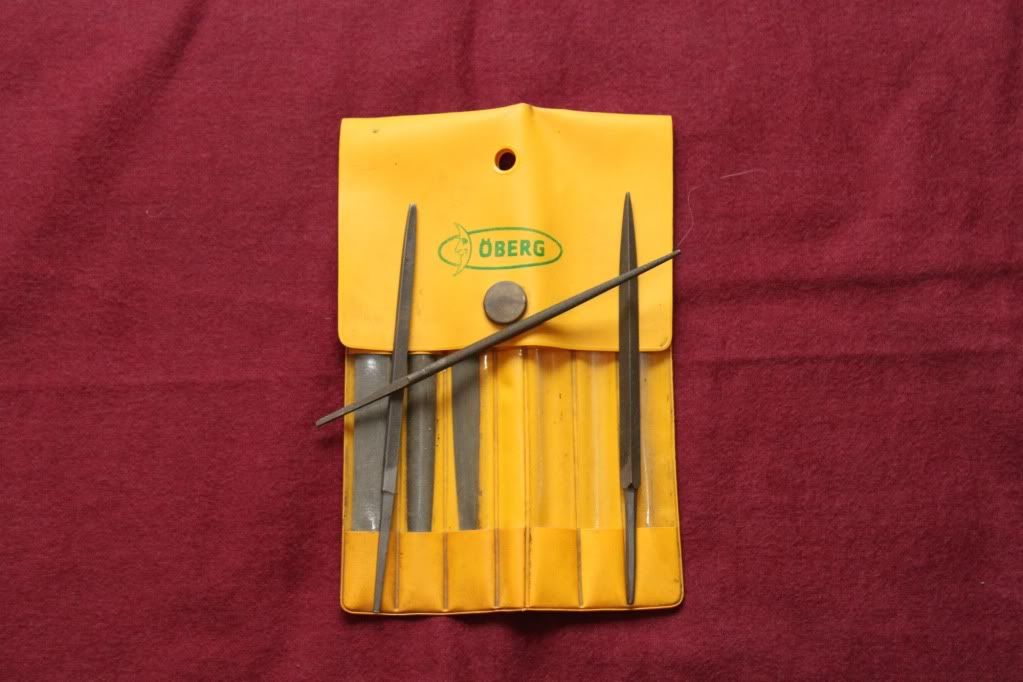 I have a 6†dual wheel craftsman bench grinder. I have a course wheel on one side and a fine wheel on the other. I couldn’t find a really fine wheel while I was out so I am going to work with 38/60 grit wheels for now. I plan on ordering a 120grit wheel from Grainger later. I removed the wheel guards to make them more accessible. This is of course quasi-dangerous; they are called guards for a reason. Don’t do something like this unless you are certain of your prowess with a grinder. 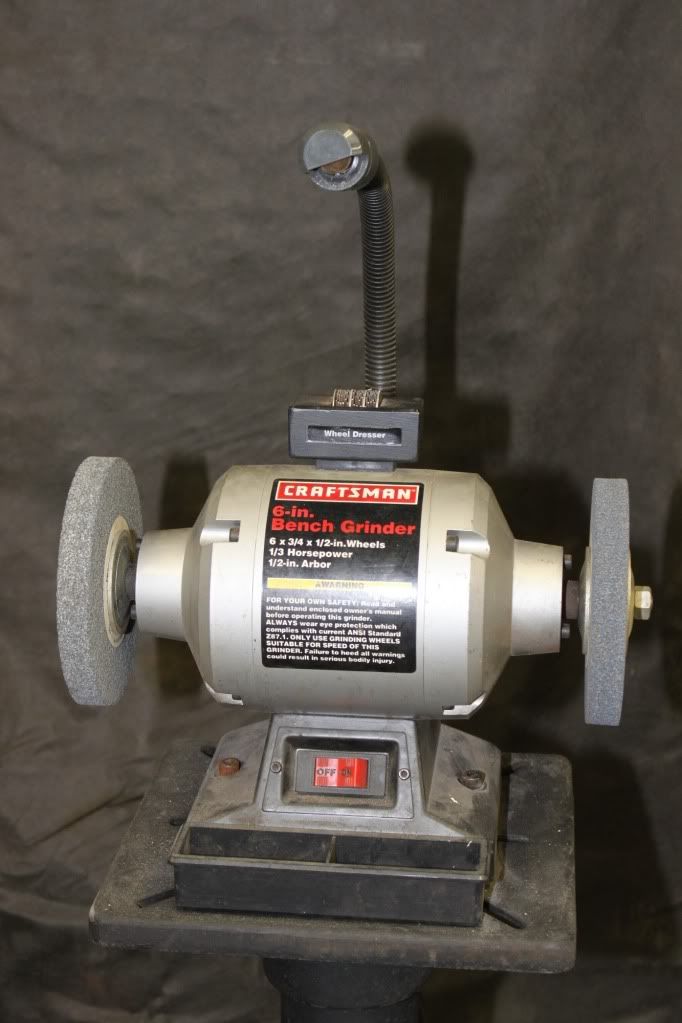 Finally a bucket of water, pliers, leather gloves, safety glasses and some POWER METAL blasting on the stereo and I am ready to begin. It may be a couple of days before I get around to heading out to the garage and actually doing any grinding but stand by for the next posts. Thanks for reading. I’ll be back… There is no such thing as impossible, just different degrees of awesome.
-
Anavaree
-
- Posts: 152
- Joined: 26 Jul 2011 8:53
- Location: Kentucky, USA
by Anavaree » 19 Sep 2011 15:39
So… Its been a couple of days but I finally got around to getting some time in the garage. Simple start so this post will be kinda short. I haven’t had time to do any fine work but it’s starting to shape up. 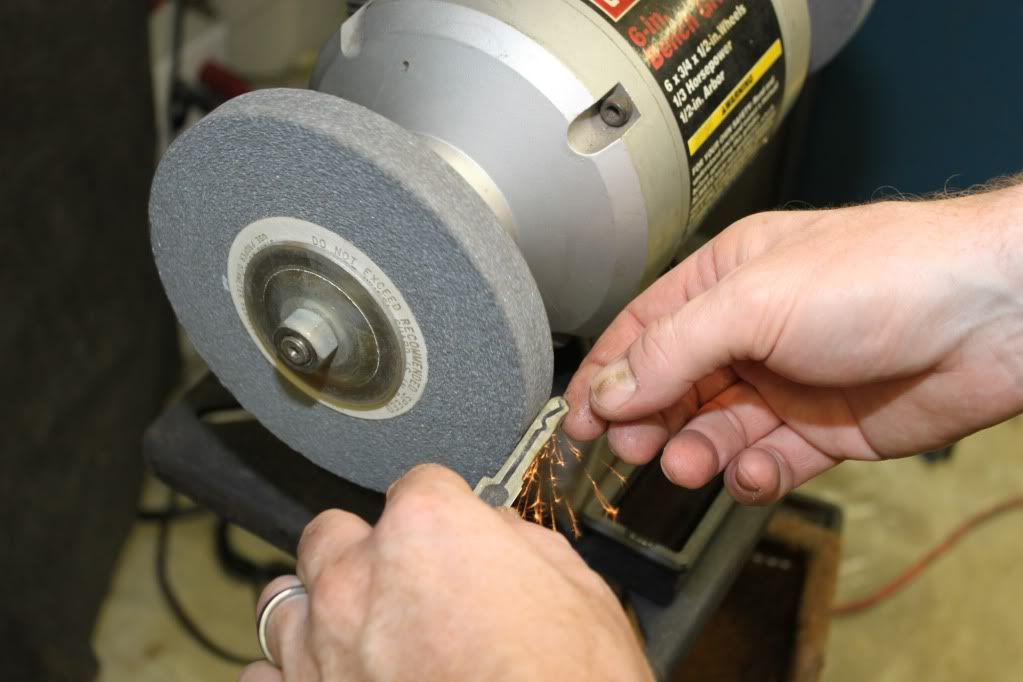 I used the course grinding wheel to start the heavy metal removal. As everyone says, make sure you quench a lot. The last thing you want to do is change the temper of your material. 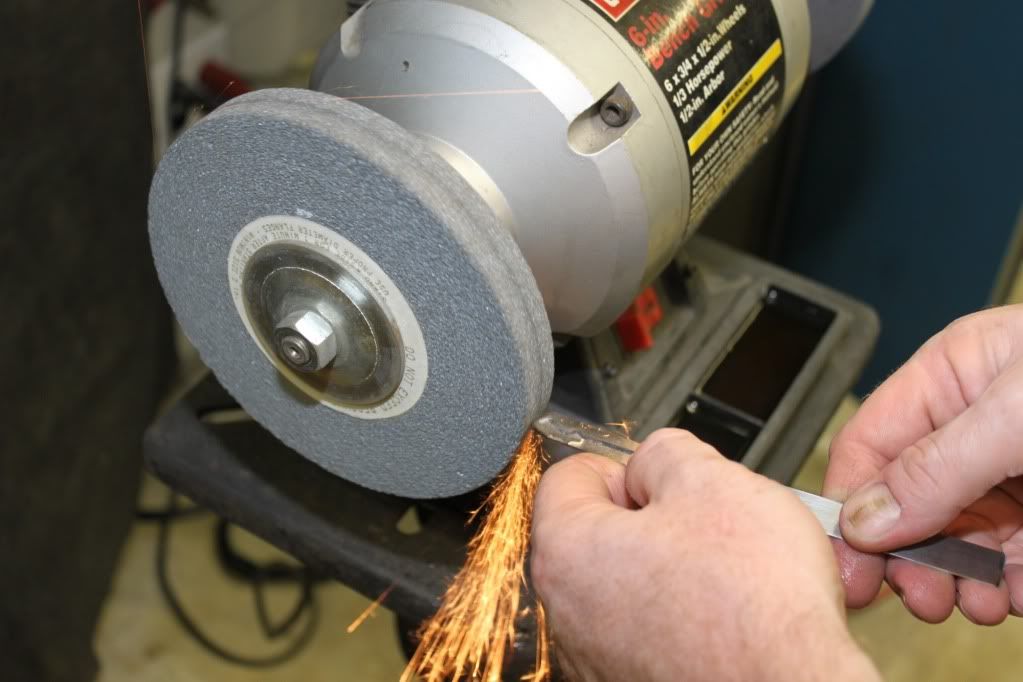 This part of the process is easy; remove all the waste metal while keeping the metal cool. Once I switched to the finer wheel it was time to start paying attention. One of the little things I noticed was to keep the metal as square as possible to the wheel. If you start rolling the stock you will get a sharp and therefore weak edge on the pick. You will also get a better profile. 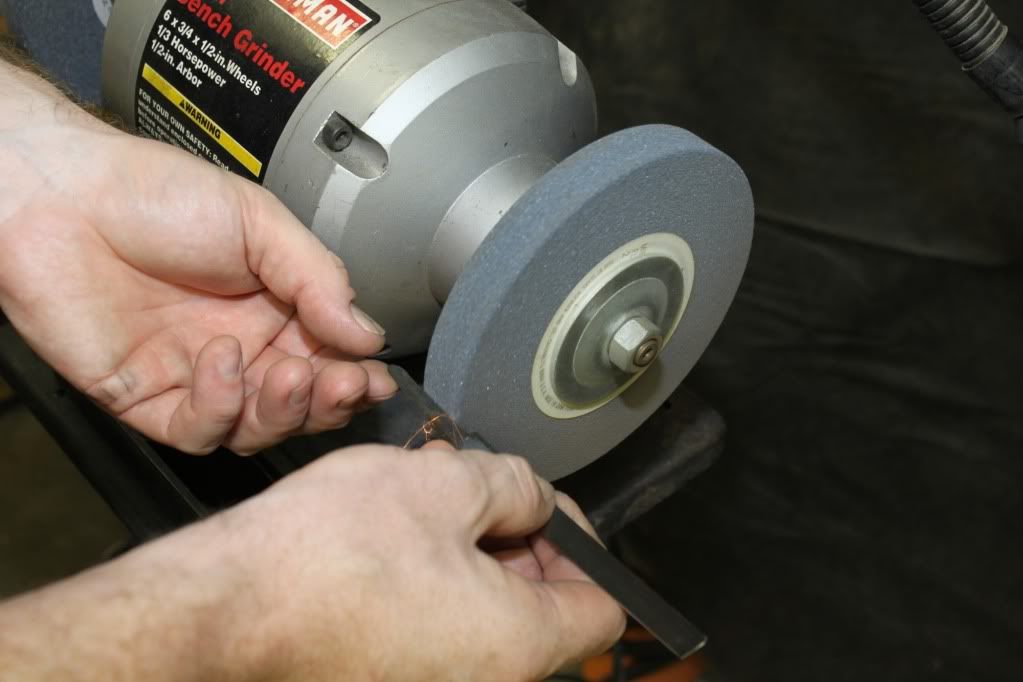 I have seen some videos that show grinder wheels with a large radius, I used a wheel dresser to make sure that my stone was square. Both the face and side of the wheel is usable for grinding. I was using the face of the wheel for the major metal removal and would use the edge/corner for getting into the nooks and crannies. 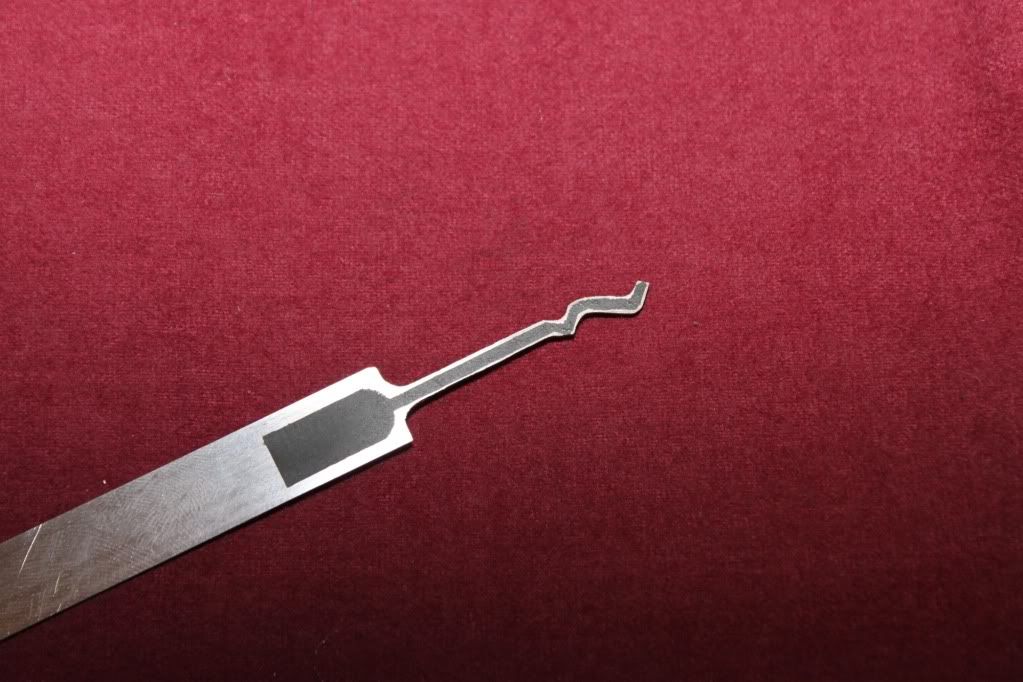 I left a nice border around the pick, about 1mm, so that I could ease my way in with my dremel. If you look closely you can see at the second depression that I took off a little too much. I did that with just the tiniest touch to my fine stone. So be gentle. Next I will fire up my dremel and finish the shaping. I have been sick with the plaque and building a workshop in my den, so it may be a couple of more days before I can continue. Thanks for reading, if you still are… ~Jesse There is no such thing as impossible, just different degrees of awesome.
-
Anavaree
-
- Posts: 152
- Joined: 26 Jul 2011 8:53
- Location: Kentucky, USA
by v12v12 » 21 Sep 2011 17:25
Wow I'm certainly impressed by the methodical approach to this project! Being that I have a background in engineering, this really makes me smile at the attempts and successful precision you've accomplished — great job! ... Now the practical side of me says... Why didn't he just use a black sharpie to make the rough-draft outline and then proceed to grinding it down? Answer: Sharpie is less precise lol... I really appreciate seeing people take their time to get things absolutely correct  I've made picks from hack saw blades and brick-strapping; I think I like the brick-strap the best bc it's very very durable, but it's coated with a very resilient epoxy like black finish and it rusts much more than chrome/nickel based steels blah blah... I just use mineral oil to coat them and that keeps them free of rust. Dremel.... ERRRR I HATE THEM! But I love mine! I've been using a dremel since they the 1st model came out; couldn't live with out it, BUT I sure could live with out that HUUUUUGE markup for the tools! My god the prices for these little things is outrageous! I've seen how they produce them on a science show, and factor in some kind of Chinese slave labor (or some poor souls) to make them and it just spells a huge ripoff imo! Esp the carbide/diamond tools, which I've seen and used other so-called "inferior" competitors that get the job done as well for usually 1/2 the price lol! E=Mc^2 = busted!
-
v12v12
-
- Posts: 138
- Joined: 12 Oct 2005 21:38
- Location: iLLadelph
by Anavaree » 21 Sep 2011 19:11
Well V12, about the sharpie. I did try my first time with a sharpie and I was not at all happy about the detail. Also, the ink was not durable enough and lost even more resolution the more I worked with it.
I am not too worried about rusting tools either. I agree with you, just keep them clean and lightly oiled, I use Kroil, and they will be fine.
And Dremel tools, I agree with you about that, thats why I am going to try using those cheap ones i got from Harbour Freight. I think they will be just fine.
I am running a garage sale friday and saturday but i should have time this weekend to do some more finishing work. More posts coming.
Thanks for the Positive words.
~Jes
There is no such thing as impossible, just different degrees of awesome.
-
Anavaree
-
- Posts: 152
- Joined: 26 Jul 2011 8:53
- Location: Kentucky, USA
by Anavaree » 27 Sep 2011 19:43
Getting close to the end, for now. Real projects are never really done, you should see my cars. I whipped out my Dremel and started working on the final shaping of the pick. 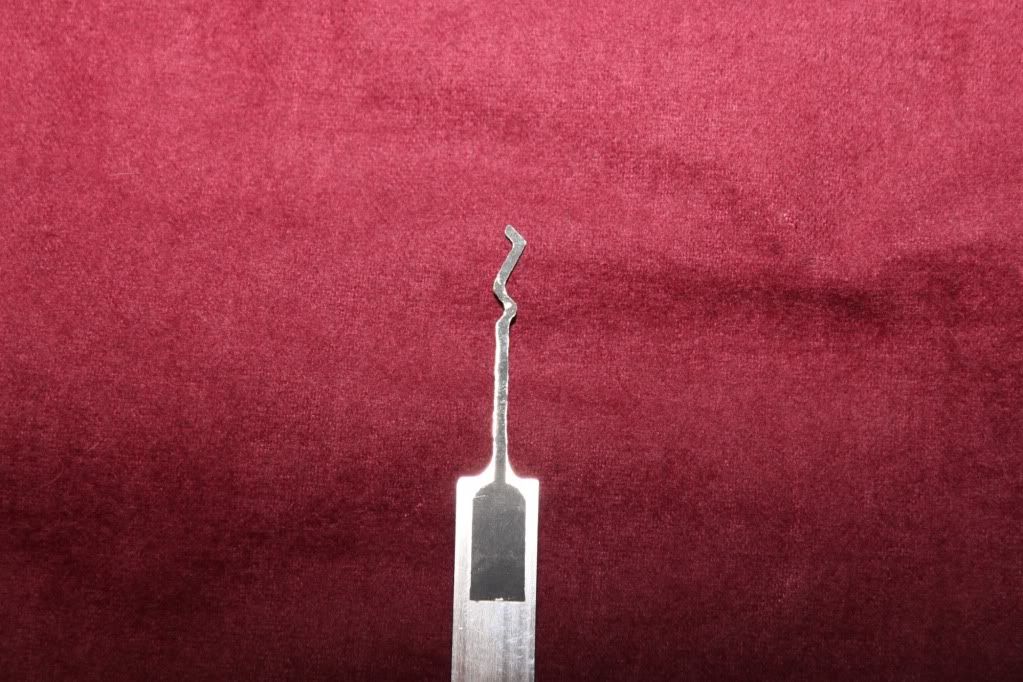 Being very careful not to intrude into the imprint of the pick shape, carefully remove all the shiny metal. I used those really cheap diamond burrs from Harbor Freight. They worked pretty well but didn’t cut as rapidly as I would have liked, for the price though, can’t beat it. I used several different sized and shaped burrs to contour the pick. 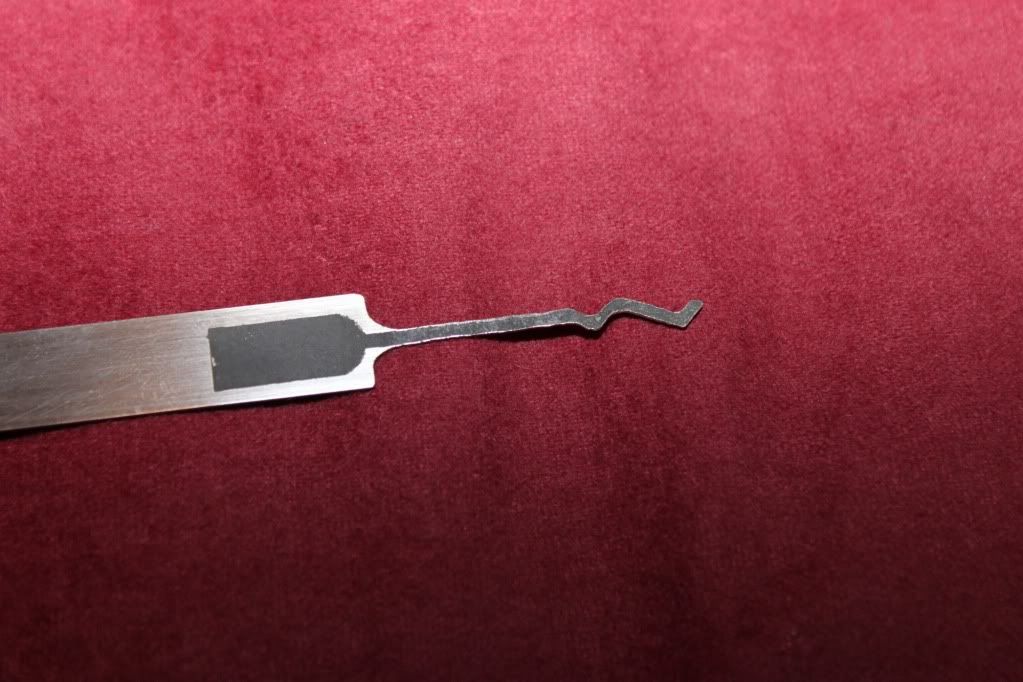 After finishing with the dremel there were still some irregularities in the curves. Thus far I have left them in place. I am not worried about them now. Polishing was next. All sandpapers I used were/are silicon carbide, this is the best type of sandpaper for the money, and tracking down chromium oxide would cost an arm and a leg. I used 220grit to start and worked my way up through until 1000grit. Wet sanding all the way, never let it dry out or you'll load up the paper. I then switched over and did some hand polishing with a cotton rag loaded up with Flitz. Flitz is one of the greatest polishing compounds out there.   So now the pick is pretty well polished. It has the proper curves and the working edges are properly square. I will use my files on the irregularities later, well actually probably on the next picks, my king works well. I opened a couple of master locks, no real challenge, and the doors on my house with it in just a couple of seconds. This would be a great kit to buy. http://pentooling.com/abrasives.html ITEM #PT3S0027V: MICROMESH VARIETY PACK This will allow you to get a seriously high polish. I have an aviation grade kit and I plan on using it on my next picks. It also goes up to 12,000grit, might be useless to get that fine a polish but might look nice. I will post pics of my upcoming projects as they happen. As always, thanks for reading. ~Jesse There is no such thing as impossible, just different degrees of awesome.
-
Anavaree
-
- Posts: 152
- Joined: 26 Jul 2011 8:53
- Location: Kentucky, USA
by phishtaco » 28 Sep 2011 0:15
Not a bad start. I'm hopeless when it comes to making my own.
-
phishtaco
-
- Posts: 15
- Joined: 17 Jun 2010 23:41
by Anavaree » 28 Sep 2011 9:55
This is nice, I have never had one of my threads made into a sticky before. Thanks.
I will be making a Queen next and hopefully refining my technique.
I'll keep posting new info and tech as I find it.
~Jesse
-
Anavaree
-
- Posts: 152
- Joined: 26 Jul 2011 8:53
- Location: Kentucky, USA
by jamesobrady » 3 Apr 2012 10:37
Very interesting thread-many thanks for the effort involved in writing it up !
-
jamesobrady
-
- Posts: 1
- Joined: 17 Mar 2012 18:10
by The Lock Artist » 7 Apr 2012 14:42
very nice thread. One thing that I have found is to make a tension wrench, get some old windshield wipers (I got mine from an old car place) and pull the rubber part off that comes in contact with the actual window. Underneath it there is a long strip of metal perfect for making torque wrenches. You just cut off a small part, and bend it 90 degrees. You can make about 5 wrenches from each wiper. They come out so good, that you cannot tell the difference between homemade and store-bought ones.
-
The Lock Artist
-
- Posts: 53
- Joined: 7 Apr 2012 14:16
Return to Lock Picks
Who is online
Users browsing this forum: No registered users and 20 guests
|


