Lock Picking 101 Forum
A community dedicated to the fun and ethical hobby of lock picking.
       

Lock Picking 101 Home
Login
Profile
Members
Forum Rules
Frequent Forum Questions
SEARCH
View New Posts
View Active Topics


Live Chat on Discord
LP101 Forum Chat
Keypicking Forum Chat
Reddit r/lockpicking Chat


Learn How to Pick Locks
FAQs & General Questions
Got Beginner Questions?
Pick-Fu [Intermediate Level]


Ask a Locksmith
This Old Lock
This Old Safe
What Lock Should I Buy?


Hardware
Locks
Lock Patents
Lock Picks
Lock Bumping
Lock Impressioning
Lock Pick Guns, Snappers
European Locks & Picks
The Machine Shop
The Open Source Lock
Handcuffs


Member Spotlight
Member Introductions
Member Lock Collections
Member Social Media


Off Topic
General Chatter
Other Puzzles


Locksmith Business Info
Training & Licensing
Running a Business
Keyways & Key Blanks
Key Machines
Master Keyed Systems
Closers and Crash Bars
Life Safety Compliance
Electronic Locks & Access
Locksmith Supplies
Locksmith Lounge


Buy Sell Trade
Buy - Sell - Trade
It came from Ebay!


Advanced Topics
Membership Information
Special Access Required:
High Security Locks
Vending Locks
Advanced Lock Pick Tools
Bypass Techniques
Safes & Safe Locks
Automotive Entry & Tools
Advanced Buy/Sell/Trade


Locksport Groups
Locksport Local
Chapter President's Office
Locksport Board Room
 

Tutorial: Wooden handle for a pick!(large pictures)

When it comes down to it there is nothing better than manual tools for your Lock pick Set, whether they be retail, homebrew, macgyver style. DIY'ers look here.

Tutorial: Wooden handle for a pick!(large pictures)

Postby atticRR » 16 Jul 2012 20:54

Hey all i wanted to add to the awesome collection of how to articles on lp101. I will be showing how to add a wooden handle to your picks. This works with picks that you make or purchase. The wood i'm using in the tutorial is teak and came from some bit of home decor i purchased for $ .50 in a thrift store. I dont have a pic of its original form and i dont know what it was, but it was about the size of a large salad plate. Starting with flat, rectangular pieces of wood would be ideal, but i was going for cheap!

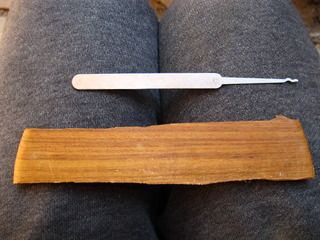
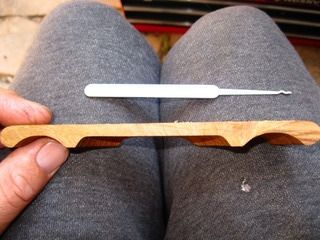
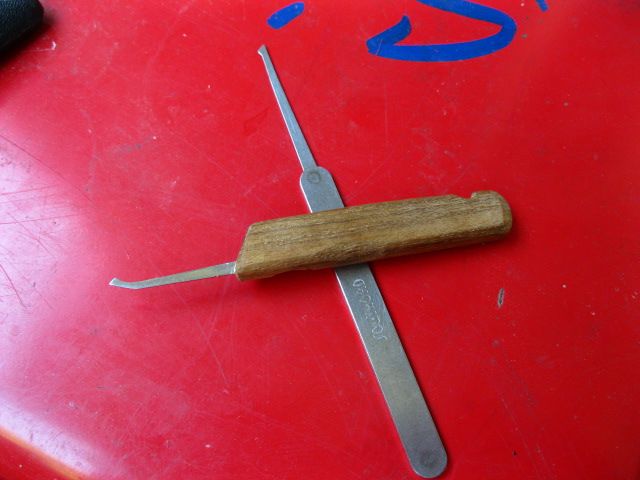
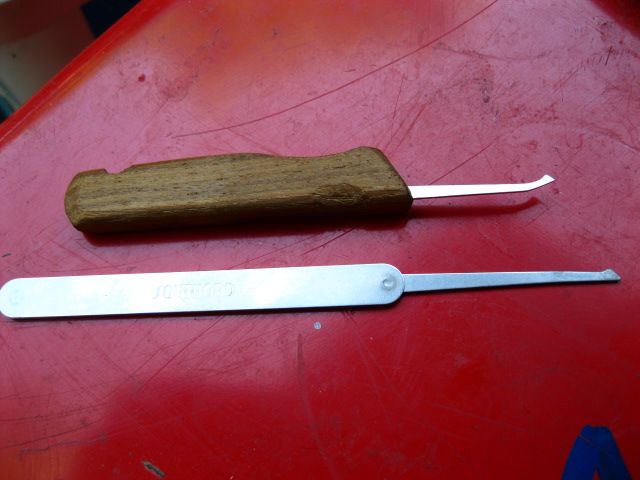
These first two pictures are showing what i was starting with, the picks are just there for scale purposes.
Image
Image

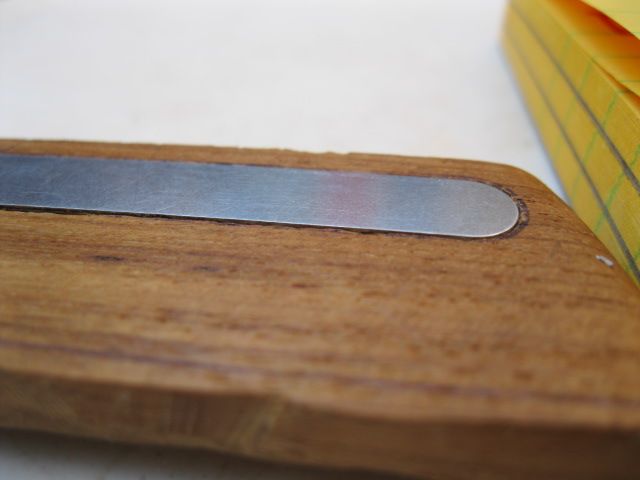
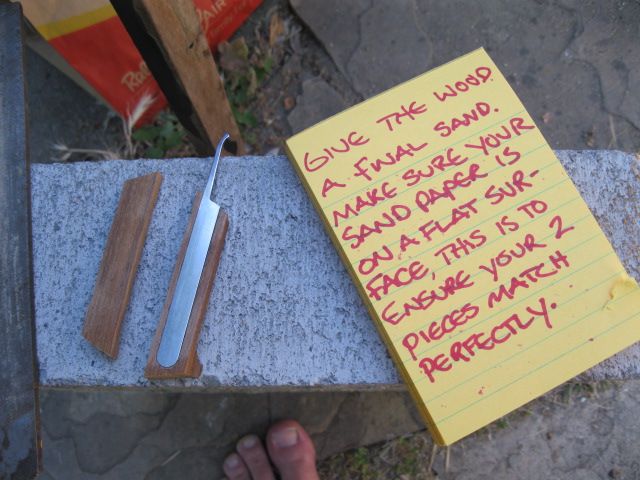
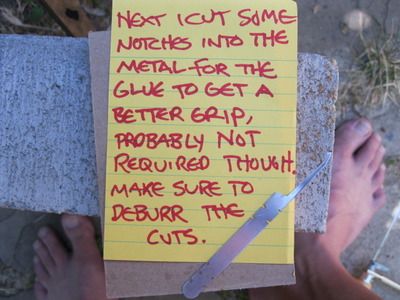
this is the pick i'm putting the handle on and the instructions:
Image

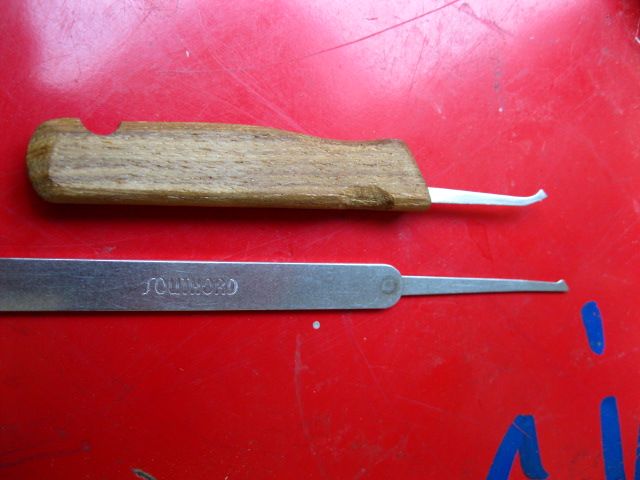
I tried using a dremel attachment to hollow out the handle area, eventually i just put a chisel edge on a flathead screwdriver and carved out the channel like that. Taking a little at a time and checking the fit often i ended with a tight, flush, fit between the original metal handle and the inside of the custom handle.
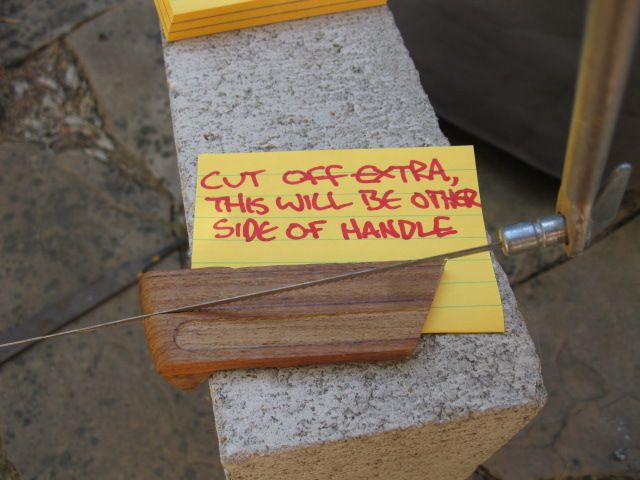
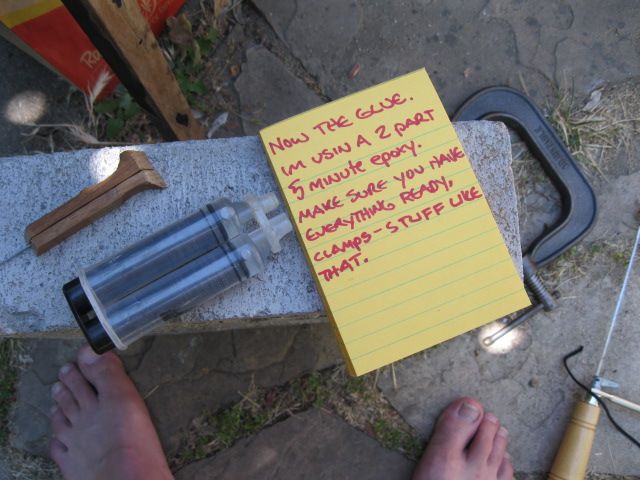
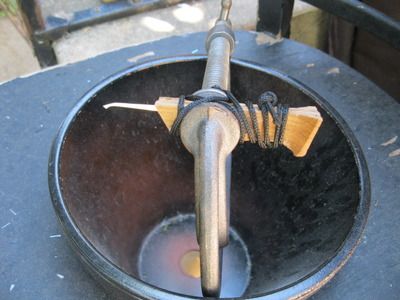
Image
Image
Image
Image
Image

and clamped:
http://i1249.photobucket.com/albums/hh5 ... 1342489722

as soon as i have the pick properly finished i will post some photos. I'm really not happy with how it turned out, actually. The pick i ground out of a broken key extractor and it turned out so free king AWESOME! (thanks to Romstar for the stencils) The finish is superb (thank you, Raimundo and others...) but the handle is sort of short and it reminds of a paring knife somehow :oops: . Structurally it is very good, the handle is so solid, good feedback and its never coming apart.

Give me a day or two and i'll show the finnished pick, i promise.

R
I punched punctuation right in the face!
atticRR
 
Posts: 312
Joined: 8 Jun 2012 22:56
Location: mother lode/Jackson, CA

mostly finished...

Postby atticRR » 16 Jul 2012 21:17

aaaight, here it is. it took A LOT of filing and carving to get the wood down to a reasonable size/ thickness. During the process, using files and razors, I screwed up what was a perfect finish on the metal of the pick. Pre-woodworking, that thing caressed its way into the lock, bumping softly over pins, sliding seductively along wards, until-POP! the lock opened. Now its like an average store bought, home polished pick-good, but not at all like before :cry: .

Suggestion: Cover the exposed part of the finished pick with something tough, like duct tape, prior to filing and sanding to protect it. (definately do all the metalwork before mounting IMHO)

Also: make sure your handle isnt all short like mine. This pick still works great, i sure wish the handle was longer though.

At long last here it is:
Image
Image
Image

I want to finish off the handle all the way, realistically i might not though. Its likely ill use this one as is and make a newer, hopefully better, one. Rest assured, if i make one and it has a wood handle using the technique above (which i think is a good one) i'll post it here.

Thanks for watching, any and all criticisms or comments are always appreciated.

R
I punched punctuation right in the face!
atticRR
 
Posts: 312
Joined: 8 Jun 2012 22:56
Location: mother lode/Jackson, CA

Re: Tutorial: Wooden handle for a pick!(large pictures)

Postby Legion303 » 16 Jul 2012 22:04

Very nice writeup. I would try to make the wood conform a little closer to the metal so it doesn't end up so wide, but I admit I've never tried larger handles like that, so they might work great as-is.

Stickied.

-steve
User avatar
Legion303
 
Posts: 2343
Joined: 6 May 2006 6:52
Location: Denver, CO

Re: Tutorial: Wooden handle for a pick!(large pictures)

Postby atticRR » 18 Jul 2012 8:41

wow, thanks legion! now that its stickied i'll have to reform this pick some more! i agree that it is a bit wide, its not too bad though.

Will definately be updating this section, recently got some pretty nice walnut thats begging to be made into a handle!
I punched punctuation right in the face!
atticRR
 
Posts: 312
Joined: 8 Jun 2012 22:56
Location: mother lode/Jackson, CA

Re: Tutorial: Wooden handle for a pick!(large pictures)

Postby .45cal » 9 Aug 2012 22:03

I have made a couple of picks all with wooden handles and I just want to add that the blanks sold commonly for pen turning are a great source for awesome looking handles.
Insert meaningful quote here!
.45cal
 
Posts: 33
Joined: 12 Mar 2008 15:16
Location: Eastern Canada

Re: Tutorial: Wooden handle for a pick!(large pictures)

Postby raimundo » 22 Sep 2012 8:35

Uuh...
blanks sold commonly for pen turning....

I think ya lost me there, what blanks?, sold commonly where? and what is pen turning?.
Wake up and smell the Kafka!!!
raimundo
 
Posts: 7130
Joined: 21 Apr 2004 9:02
Location: Minnneapolis

Re: Tutorial: Wooden handle for a pick!(large pictures)

Postby Josh66 » 22 Sep 2012 12:13

raimundo wrote:sold commonly where? and what is pen turning?.

Basically, making your own pens on a mini-lathe.

Blanks:
http://www.amazon.com/Woodcraft-Woodsho ... 737&sr=8-3
http://www.amazon.com/Diagonal-Cut-Zebr ... 737&sr=8-5
http://www.amazon.com/5lb-Pen-Blank-Gra ... 737&sr=8-1
Josh66
 
Posts: 205
Joined: 15 Jan 2012 20:31
Location: Columbus, Ohio

Re: Tutorial: Wooden handle for a pick!(large pictures)

Postby atticRR » 22 Sep 2012 13:10

Thanks for sharing those pen blank links. I stumbled across those pen blanks while searching for burlwood. The woods are amazing and the price is reasonable because of the small sizes.

Raimundo: these pen blanks ate used to make amazing looking custom pen bodies- usually for fountain pens.
I punched punctuation right in the face!
atticRR
 
Posts: 312
Joined: 8 Jun 2012 22:56
Location: mother lode/Jackson, CA

Re: Tutorial: Wooden handle for a pick!(large pictures)

Postby emptech1 » 24 Jan 2013 22:48

I know you are probably using a hard wood, but to save milling out the depression for the metal,
why not just put the metal and a layer of wood in a vise or press and just press the metal into
the wood? Once you do it with both halves of the wood, use some five minute epoxy and laminate
the assembly using a vise.

I've got a machine shop and all the fancy equipment, but simple is good.
emptech1
 
Posts: 21
Joined: 1 Feb 2010 0:58

Re: Tutorial: Wooden handle for a pick!(large pictures)

Postby Dogrocket » 6 Jul 2013 9:39

Thanks for the guide. I tried making something similar using a wiper insert pick inserted into a drilled recess in a solid wood core (pen blank, that was a great tip for getting quality wood in small readily used pieces). I was feeling froggy and added a brass hilt from some scrap from a previous project.

Image

Unfortunately, I went for a large diamond pick (probably should have gone with a rake). The result came out pretty well, but looks a bit too much like a shank so it doesn't leave the house. The feedback's not great (probably because of the drilled/epoxy filled core) - but I picked up some hardwood 1/16 ply that I'm going to try veneering around my next attempt to reduce the handle thickness and cavity size.
Dogrocket
 
Posts: 62
Joined: 2 Jul 2013 16:15
Location: Maryland

Re: Tutorial: Wooden handle for a pick!(large pictures)

Postby C locked » 25 Aug 2013 11:38

Nice job. Love to see it properly finished. Linseed Oil rub. Or laquered. but why not just simply cut a groove into the roughed out handle shape with a 32tooth hacksaw and insert the pick blade. And pin and glue in place. Why assemble from 2 parts?
C locked
 
Posts: 267
Joined: 6 Aug 2013 4:04
Location: Australia

Re: Tutorial: Wooden handle for a pick!(large pictures)

Postby vecchioni27 » 27 Oct 2013 16:11

That's a nifty DIY project! If it were me, I would want to slim it down as much as possible though. Kind of looks like a steak knife! :) Love the idea though and great handy work!
vecchioni27
 
Posts: 6
Joined: 27 Oct 2013 14:52

Re: mostly finished...

Postby lucysmith » 5 Nov 2013 22:39

atticRR wrote:At long last here it is:
Image
Image
Image


Perfect!

Thanks a lot for the turorial.
locksmith Toronto
lucysmith
 
Posts: 5
Joined: 30 Oct 2013 21:51


Return to Lock Picks

Who is online

Users browsing this forum: No registered users and 8 guests