|
Having read the FAQ's you are still unfulfilled and seek more enlightenment, so post your general lock picking questions here.
Forum rules
Do not post safe related questions in this sub forum! Post them in This Old Safe
The sub forum you are currently in is for asking Beginner Hobby Lock Picking questions only.
 by Squelchtone » 2 Sep 2012 13:44 by Squelchtone » 2 Sep 2012 13:44
BreezerFly wrote:Yeah, got it off now... Slightly deformed tho, but I guess I can just squeeze it back around when I'm done ^^ My problem now is repinning the lock. I'm using a AA battery, fits perfectly in to the plug-hole. My problem is that the back of the plug has cracks in it, and it's not 'smoothed' out, as you can see on the picture showing the back. So if I try to push it from the front and back, the pins will spring out and get stuck. I can't push it from the back to the front, because the face of the plug is slightly bigger than the plug-hole. Thanks a lot again!  Pictures incoming when I get home.
find wooden dowel/rod and cut the wood to fix/index into the back of the plug. or rotate the plug so that there is a continuous smooth surface from the end of the plug to the beginning of your plug follower (battery, wooden rod) Thanks for your quick updates! Squelchtone
-

Squelchtone
- Site Admin
-
- Posts: 11341
- Joined: 11 May 2006 0:41
- Location: right behind you.
by BreezerFly » 2 Sep 2012 14:23
Okay, just got home  I'm the one that should be thanking for all these quick replies! It seems dumb to ask a question and not be ready to give more information/try solutions pretty much immediately after Especially since you guys might be paying attention to my thread now. I'm just gonna give you a quick picture of the plug as I have it now. I think it'll be a pain to mix a wooden piece into this to make it smooth, but I might be wrong. Actually, will wait with the pictures a bit. I'm gonna try wrapping a piece of paper around the back of the plug
-
BreezerFly
-
- Posts: 25
- Joined: 2 Sep 2012 6:22
- Location: Denmark
by BreezerFly » 2 Sep 2012 14:47
Paper worked! Albeit with a bit difficulty, but it's in and in working order, awesome! Thanks for the help guys Now, I hope I can explain this without pictures, or I'll have to pull it apart again I have driver pins (The ones in the top of the lock holster, the ones that sit against the spring.) They didn't look as I guessed... First, I had 3 that was exactly the same. They remind me of a spool pin? But I thought that was the wrong placement for those? They look like a spool pin, but the 'gap' is very tiny, and it has a tiny top, and a massive 'body'. I decided to turn the tiny top part to the spring so I wouldn't have them give false sets? Then there was a shorter one of those. I guess that might be because one of the pins that touch the keys are longer than the others? Please do correct me on the naming of these pins Then there's an ordinary one. I just put them into the lock more or less randomly, which I'm sure is wrong. But the pins that touch the key are all in the correct order ofcourse
-
BreezerFly
-
- Posts: 25
- Joined: 2 Sep 2012 6:22
- Location: Denmark
by Squelchtone » 2 Sep 2012 16:03
I would not be flipping them over unless you are picking it for fun and are starting out easy then flipping them back for more difficulty. I wonder if your pins looked like this. 
-
Squelchtone
- Site Admin
-
- Posts: 11341
- Joined: 11 May 2006 0:41
- Location: right behind you.
by atticRR » 2 Sep 2012 16:12
so, after taking a picture of how i do it i realized that you had already posted the fact that you have already removed the clip  . Ill still post the pics so that anyone who reads this can see one method of removal. The clip on the right is basically removed, the one on the right is still fully clipped. All i do is align the tips of my tool as shown and press (in the picture i would be pressing 'down') and spread at the same time. I have bled doing this, so be careful! Im glad you have it all sorted out and i wouldnt worry about the clip being distorted, when you put it back on it will hold it just fine. 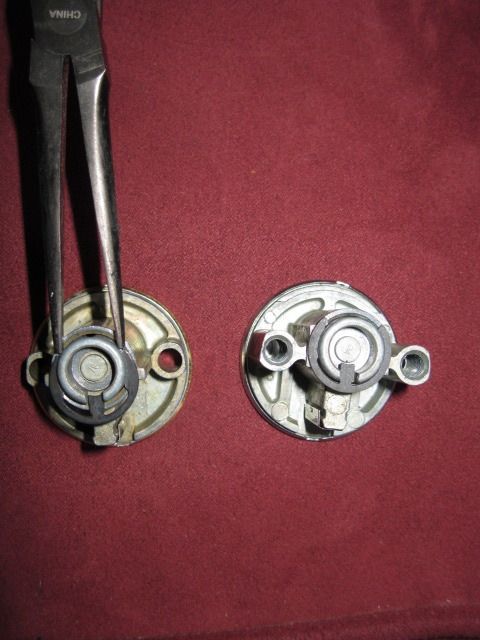 I punched punctuation right in the face!
-
atticRR
-
- Posts: 312
- Joined: 8 Jun 2012 22:56
- Location: mother lode/Jackson, CA
by atticRR » 2 Sep 2012 16:16
WOW Squelch, that lock is SICK! I love those crazy pins. note: my wife made me fix all punctuation in the above sentence. enjoy.  I punched punctuation right in the face!
-
atticRR
-
- Posts: 312
- Joined: 8 Jun 2012 22:56
- Location: mother lode/Jackson, CA
by BreezerFly » 3 Sep 2012 1:22
Yeah, I'm turning the pins over so that it's easier to pick the lock, since I'm starting out Meaning, it's my first lock  I might be getting padlocks first, as Wizer suggested earlier. For some reason I can't see the image Squelch And thanks Attic But yeah, if you look at my images above, the clip is pretty large and non-flexible, and it has a tiny gap, so was pretty hard to open the pliers enough to force the clip around the plug. Screwdrivers did the trick I'm guessing I might do a picture based guide on how to disassemble the Ruko lock, for easy overview, if someone else needs it, so they don't have to look through this whole thread? But dunno. I'll post a picture of the pins after I get home from school Though, something like this  _ | [] Everyone, thanks for solving the issue, and a quick reply.
-
BreezerFly
-
- Posts: 25
- Joined: 2 Sep 2012 6:22
- Location: Denmark
by BreezerFly » 3 Sep 2012 1:23
Woops, picture loaded in Squelch's post. And yeah, those are it, except there's no master-key combination ^^ It's 3 of those of the same length and 1 shorter one, I'm guessing it's for one of the longer pins.
-
BreezerFly
-
- Posts: 25
- Joined: 2 Sep 2012 6:22
- Location: Denmark
by BreezerFly » 3 Sep 2012 8:28
Here's a picture of: Springs Driver Pins Key Pins  In that order. I'm guessing it's a variation of spool pins... But I didn't know they were set as driver pins? I thought it was generally the key pins that was security pins XD Well, learn new stuff everyday. I see that Squelchtone's picture has security pins in both driver and key positions. So what I was doing was flipping the pins so that the tiny part of it was towards the spring (hope you understand XD), hopefully that should make it act as the regular pin that's on the leftmost side of the picture? Otherwise I guess I'll have to find a way to get some more ordinary ones...
-
BreezerFly
-
- Posts: 25
- Joined: 2 Sep 2012 6:22
- Location: Denmark
by atticRR » 3 Sep 2012 10:36
That should help, if that's still too difficult you can leave out all bit a few pin stacks. Let us know how it goes.
I punched punctuation right in the face!
-
atticRR
-
- Posts: 312
- Joined: 8 Jun 2012 22:56
- Location: mother lode/Jackson, CA
by BreezerFly » 3 Sep 2012 11:01
Yessah, I figure I'll start with one pin stack, the regular one, and go from there. Possibly just start with a padlock even, to not have to bother with security pins at all ^^ Updates will come as soon as I get my hands on the picks I ordered, lol They were finally sent with UPS today So it's a matter of 2 days I hope.
-
BreezerFly
-
- Posts: 25
- Joined: 2 Sep 2012 6:22
- Location: Denmark
by BreezerFly » 5 Sep 2012 5:56
Yo, so I got my southord pick set now Seems like there's no tension wrenches for the top of the key way Anyways, I've been picking the single pin for ~10 minutes now... and it's pretty easy Now... I don't have 2 non-safety pins, so that's a problem :/ I tried seeing if I could easily rake some of my padlocks open (I'm guessing they'd be quite easy if they have only regular pins...) but to no avail... I'm stuck trying to pick 1 of the safety pins I've shown in the picture above. It's a pain... I get a false set like 90% of the time, and have to start over... I tried releasing tension, even all tension, and pushing up on the pin. But it won't go back. So I have to pull the plug back into starting position and start over. Which seems stupid, since this lock normally has 4 of these pins, and you'd never get it open if you had to get all four in the first try? Maybe it's just because there's only 1 pin in there? Sadly, I have no non-security pins... :/
-
BreezerFly
-
- Posts: 25
- Joined: 2 Sep 2012 6:22
- Location: Denmark
by Wizer » 5 Sep 2012 7:05
I´ve seen Assas with similiar securitypins that have a counter milling in the pin column. The "lip" goes into the groove and gives you a false set. You have to turn the plug back a little to be able to set it. -not just release tension and push on the pin like in "normal" spooled locks.
Use one of the longer top pins and turn it around like you wrote earlier.
Even tho many cheap locks rake easily, its another skill to learn. Light tension is the key.
Keep at it!!
-

Wizer
-
- Posts: 687
- Joined: 13 Jun 2009 3:54
- Location: Finland
by BreezerFly » 5 Sep 2012 15:08
But if I do that, I'll lose all the pins I've set, won't I? >.o
I need some visual picture I guess :/ , just gonna keep practicing XD
-
BreezerFly
-
- Posts: 25
- Joined: 2 Sep 2012 6:22
- Location: Denmark
Return to Got Questions? - Ask Beginner Hobby Lockpicking Questions Here
Who is online
Users browsing this forum: No registered users and 40 guests
|


