Lock Picking 101 Forum
A community dedicated to the fun and ethical hobby of lock picking.
       

Lock Picking 101 Home
Login
Profile
Members
Forum Rules
Frequent Forum Questions
SEARCH
View New Posts
View Active Topics


Live Chat on Discord
LP101 Forum Chat
Keypicking Forum Chat
Reddit r/lockpicking Chat


Learn How to Pick Locks
FAQs & General Questions
Got Beginner Questions?
Pick-Fu [Intermediate Level]


Ask a Locksmith
This Old Lock
This Old Safe
What Lock Should I Buy?


Hardware
Locks
Lock Patents
Lock Picks
Lock Bumping
Lock Impressioning
Lock Pick Guns, Snappers
European Locks & Picks
The Machine Shop
The Open Source Lock
Handcuffs


Member Spotlight
Member Introductions
Member Lock Collections
Member Social Media


Off Topic
General Chatter
Other Puzzles


Locksmith Business Info
Training & Licensing
Running a Business
Keyways & Key Blanks
Key Machines
Master Keyed Systems
Closers and Crash Bars
Life Safety Compliance
Electronic Locks & Access
Locksmith Supplies
Locksmith Lounge


Buy Sell Trade
Buy - Sell - Trade
It came from Ebay!


Advanced Topics
Membership Information
Special Access Required:
High Security Locks
Vending Locks
Advanced Lock Pick Tools
Bypass Techniques
Safes & Safe Locks
Automotive Entry & Tools
Advanced Buy/Sell/Trade


Locksport Groups
Locksport Local
Chapter President's Office
Locksport Board Room
 

Key Created for Yale Push Key Padlock

Information about locks themselves. Questions, tips and lock diagram information should be posted here.

Key Created for Yale Push Key Padlock

Postby GWiens2001 » 30 Sep 2012 20:45

Recieved a challenge from a locksmith friend. I was challenged to make a key for this Yale Push Key padlock:
Image
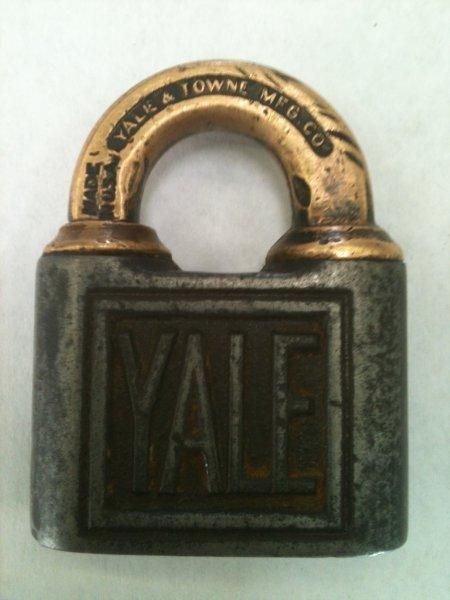
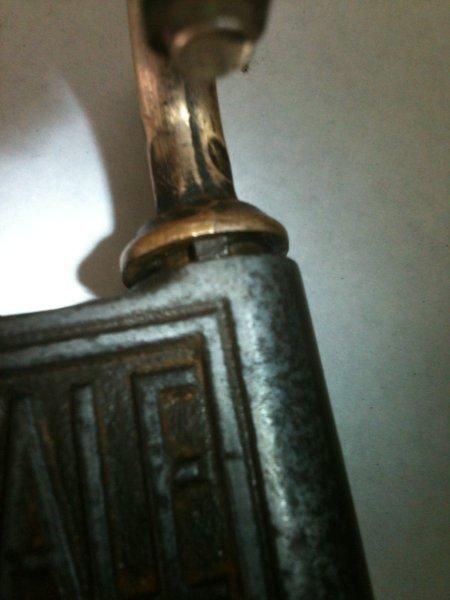
Notice the warding... or lack thereof...
Image
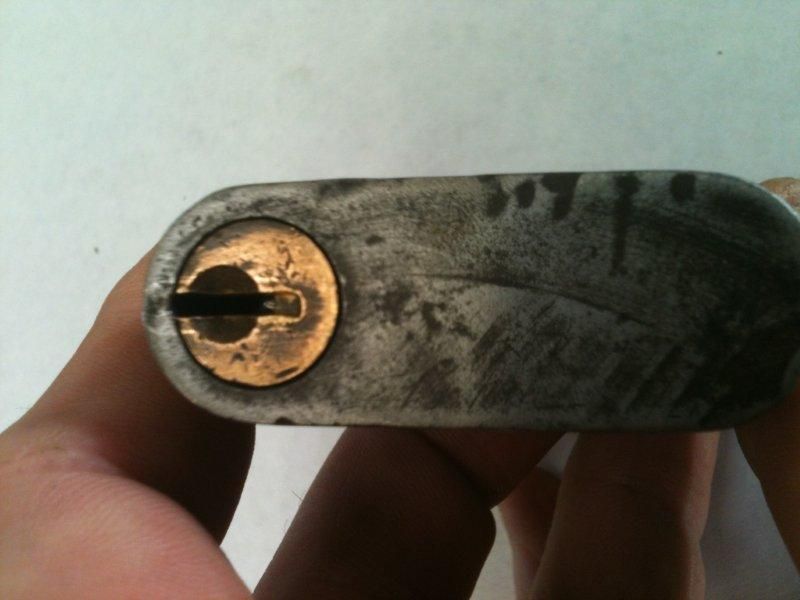
You can see how the pins were origionally inserted below:
Image
I had never seen a push key lock before, so it fascinated me to try. First, I used a shim and a hook to find the shear line. Note: I was warned that the plug would NOT turn until the key was correct and the shackle was lifted up high enough to clear the lock body.
Image
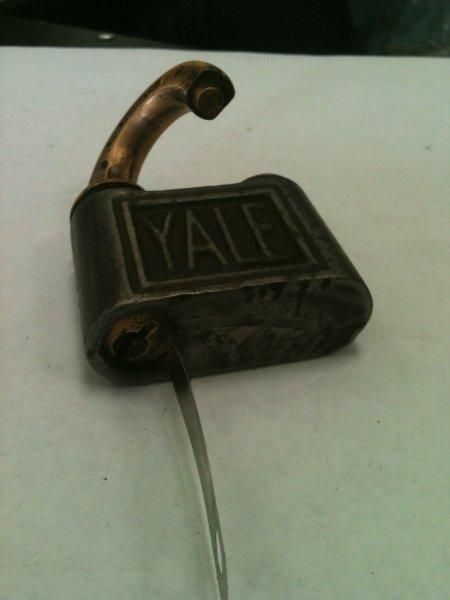
Once shimmed, I used a screwdriver (with a rag to protect the lock) to lift the body from the shackle. This is when I found out that the shackle and plug were ONE PIECE. That is why it would not turn until lifted.
Image
Image
Image
Image
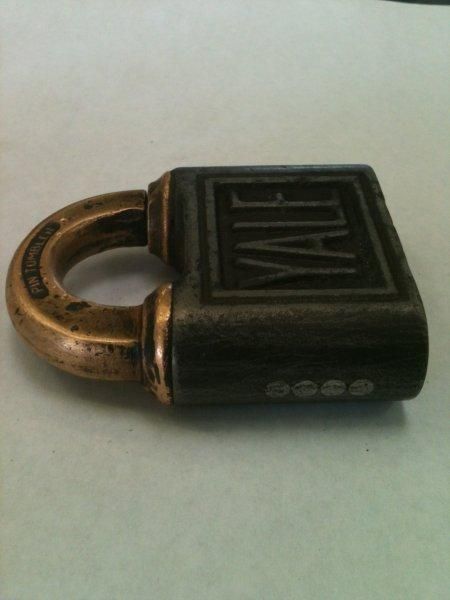
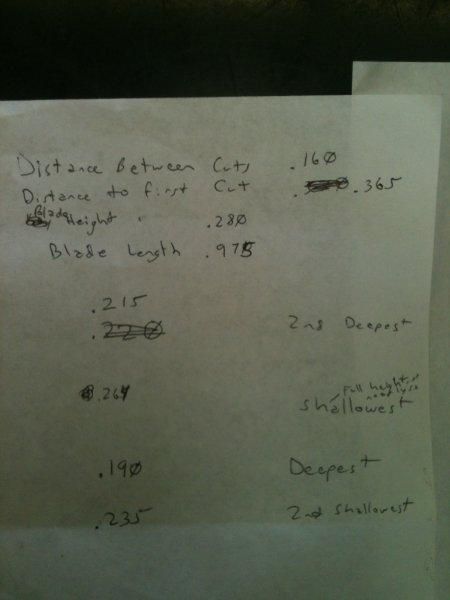
Once the plug was lifted and turned, the pins could not be lifted higher, of course. This gave me the oportunity to figure out the key bitting. Used a flat key, already marked to show where the pins would be (got the spacing from the side of the lock, seen in the third picture.) Looking into the keyway with the plug turned, I could see that the first bitting was the second deepest cut of the four, and the third bitting had the deepest. By feelng with a hook, I could feel that the second bitting was at, or nearly at, the highest point possible in the keyway, and that the fourth bitting was at about the middle.

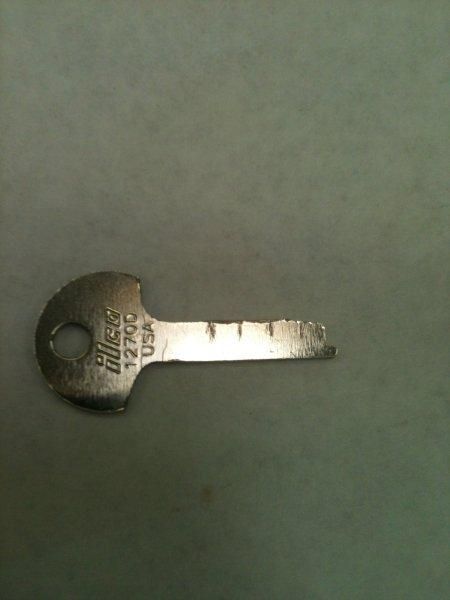
I filed down the flat key gradually, until it barely fit under the first pin, giving me that bitting depth. Then I filed down the front of the flat key until it barely fit under the third pin, giving me the depths of two of the four cuts. The blade height of the flat key was too low for the second pin. I had no brass stock, so I took a brass key, hammered and filed it down until it was thin enough to fit into the keyway, flattened the bottom, and cut the top of the blade to just short of the keyway height (roughly the second pin height). Then I started to file down the 4th bitting, testing it every few filings by using a screwdriver with a cloth to protect the lock, to lever the lock body up lightly, to test the key. This also began showing impressioning marks once I got it cut about a third of the way down the blank.
Image
This shows the math and measurements I made as I went.
Image
Once the light levering opened the lock with the key, it made great impressioning marks, allowing me to fine tune the key.
Image
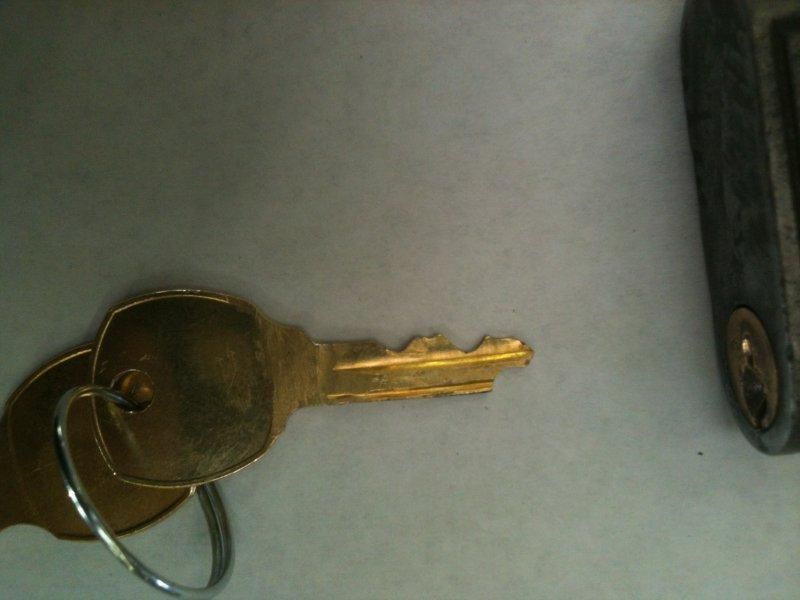
And now the finale... The lock opened with the key.
Image
Just when you finally think you have learned it all, that is when you learn that you don't know anything yet.
User avatar
GWiens2001
Site Admin
 
Posts: 7550
Joined: 3 Sep 2012 16:24
Location: Arizona, United States

Re: Key Created for Yale Push Key Padlock

Postby MBI » 30 Sep 2012 21:42

Congratulations!

That's pretty cool, thanks for the writeup.
MBI
Moderator Emeritus
 
Posts: 1346
Joined: 9 Oct 2007 2:29
Location: Utah, USA

Re: Key Created for Yale Push Key Padlock

Postby femurat » 1 Oct 2012 2:32

I like the way you studied the pins and prepared the key before "impressioning" the last thousands of an inch.

Cheers :)
User avatar
femurat
Site Admin
 
Posts: 3745
Joined: 22 Sep 2008 9:06
Location: Italy

Re: Key Created for Yale Push Key Padlock

Postby jeffmoss26 » 1 Oct 2012 10:18

That is cool! I have one of those locks in my collection also. Now I know what the key looks like!
"I tried smoking a blank once. I was never able to keep the tip lit long enough to inhale." - ltdbjd
jeffmoss26
 
Posts: 1090
Joined: 13 Jan 2012 15:01
Location: Cleveland, OH

Re: Key Created for Yale Push Key Padlock

Postby MrWizard » 15 Oct 2012 0:52

Very good job for first time you ever seen one of these type lock. You did it the way it should be done by shimming it opened and sight reading the pins as best you can and using your hook pick to feel the pattern of the ones you can't see. And obtaining the spacing by the location of the pin plugs on the outside of the case. And getting the pin depths by filing a blank down until it will just pass the pins that you can while in the opened position is a good idea. But you can guess on the depths you can see with the lock in the vise keyway facing up so gravity doesn't let the pins fall down. Then lifting them with your hook pick all the way up then holding the blank sideways against the keyway with bottom of blank equal to the bottom of the keyway and eyeball that cut to the pin you want to gauge it to. Just don't go too deep. This will only work on pin depth that are higher in the front and deeper in the back. So usually this will only work on the first or second pins if the third is deeper than the second one you are lucky. :)

You can impression these locks by putting the shackle in the vise protecting it with something as you did gripping the blank with vise grips then inserting a blank that has been prepared with a flat file to make the top edge smooth to be able to see marks that appear or a key you have already gotten some of the cuts on you have determined to be close. Either use your hand to pull up on the body of the lock or use something to put between the body of the lock and the top of the vise to apply shackle pressure then bumping the blank against the pins to leave impression marks on it. Using an impressioning file only file the ones that are prominently marking which might be only a couple or all of them. Each time before you bump the blank against the pins be sure to release the shackle pressure and reapply it then bump the blank against the pins.

The closer you get to the right depth the more obvious the marks become. To get marks on the the pins that are closer to the bottom of the lock before you apply shackle pressure angle the blank low as possible in the back which will make it high in the front so when you bump it you will be levering the blank up against the bottom pins this will give you the best chance to obtain a mark you can easily see. And obviously you would angle it low in the front and high in the back then bind the pins again and bump up to get clear marks on the pins closer to the front of the lock.

This how you impression any lock with the only difference being on standard cylinders that turn rather than push down you apply turning pressure then bind and bump. Very important to note is when you get to right depth the marks will stop marking as well or not mark at all. But if you go too deep the top pins will then be binding and it will start marking again or even make a more obvious mark and fool you into thinking you are getting closer when you have in fact gone too deep. :(

If you think you have gone too deep on one or more cuts you can copy the ones that are right on your duplicating machine leaving the ones that are too deep high and start over. If you get a key that finally works but hangs when turned or has to be wiggled to work shim that key up with a folded strip of paper in your sample vise on your machine and copy it and impression the ones that are making big time marks this will give you a smooth working key. :mrgreen:

Richard
"Those who believe in telekinesis, raise my hand."
User avatar
MrWizard
In Memoriam
 
Posts: 252
Joined: 11 Oct 2012 12:21
Location: Phoenix Arizona USA Planet Earth

Re: Key Created for Yale Push Key Padlock

Postby GWiens2001 » 15 Oct 2012 1:16

Richard,

You have some very good advice. Thank you. I especially like your idea of shimming up the key in the key cutter as you cut another just a little higher. My other trick if I know which pin I cut too deep is to use a round punch and peen the deeply cut bitting a little on each side, effectively raising the metal where it is too low, then retesting.

Thank you,

Gordon
Just when you finally think you have learned it all, that is when you learn that you don't know anything yet.
User avatar
GWiens2001
Site Admin
 
Posts: 7550
Joined: 3 Sep 2012 16:24
Location: Arizona, United States

Re: Key Created for Yale Push Key Padlock

Postby Raymond » 15 Oct 2012 15:24

In case anyone is interested, this padlock can be taken apart. Pick it open. The collar under the open end of the shackle will unscrew. Inside is a flat steel spring that fits into a retaining groove on the plug. With the collar off, the spring will slide over and release the plug and shackle. Everything will slide out the top. Use a plug follower or let the top pins and springs drop to inspect and replace if needed. Please try not to use sharp pointed pliars that will mark the collar.
Nothing is foolproof to a talented fool. Wisdom is not just in determining how to do something, but also includes determining whether it should be done at all.
Raymond
 
Posts: 1357
Joined: 18 Jan 2004 23:34
Location: Far West Texas

Re: Key Created for Yale Push Key Padlock

Postby GWiens2001 » 15 Oct 2012 16:23

Cool! I was wondering about that.

Gordon
Just when you finally think you have learned it all, that is when you learn that you don't know anything yet.
User avatar
GWiens2001
Site Admin
 
Posts: 7550
Joined: 3 Sep 2012 16:24
Location: Arizona, United States

Re: Key Created for Yale Push Key Padlock

Postby Lauren » 25 Oct 2012 11:21

If impression is your game....try someting a little harder -decoding the lock in the picked position. I tried the procedure using small shims. I had some mild success, but it certainly is do-able.
LOCKSMITHS LOVE TO PICK BRAINS
Lauren
 
Posts: 437
Joined: 20 Oct 2006 22:58

Re: Key Created for Yale Push Key Padlock

Postby GWiens2001 » 25 Oct 2012 11:39

Lauren,

They say great minds think alike. I am currently trying to do exactly that. :-) I have a lock that is being a real donkey for impressioning, so it is currently picked open. It has a spring that wants to relock it when the tensioner is removed, so made a clip to hold it in the unlocked position. Now just trying to decode.

Gordon
Just when you finally think you have learned it all, that is when you learn that you don't know anything yet.
User avatar
GWiens2001
Site Admin
 
Posts: 7550
Joined: 3 Sep 2012 16:24
Location: Arizona, United States

Re: Key Created for Yale Push Key Padlock

Postby MrWizard » 25 Oct 2012 23:16

I just got one of these without a key coming in the mail. I am going to order the proper nickle silver blanks for it so it will be while before a finished key will be made. May use a substitute to get a working key before then though. 8)

Richard

It's An Illusion. Unless I Can't Fix It, Then It's A Reality.
"Those who believe in telekinesis, raise my hand."
User avatar
MrWizard
In Memoriam
 
Posts: 252
Joined: 11 Oct 2012 12:21
Location: Phoenix Arizona USA Planet Earth

Re: Key Created for Yale Push Key Padlock

Postby GWiens2001 » 25 Oct 2012 23:20

I will probably make brass keys for the ones I'm getting at first, then copy the correct key to a proper blank when it is working properly. Then the final keys won't be marred.

Gordon
Just when you finally think you have learned it all, that is when you learn that you don't know anything yet.
User avatar
GWiens2001
Site Admin
 
Posts: 7550
Joined: 3 Sep 2012 16:24
Location: Arizona, United States

Re: Key Created for Yale Push Key Padlock

Postby MrWizard » 30 Oct 2012 3:52

Gordon

I received my Yale today it is nice condition. I was hoping it wouldn't have some unexpected problem like stuck pins, clasped springs and it was just fine. I shimmed it open used a hook pick to feel the length of the pins and lucky the last fat pin was very shallow cut so blank went in no problem. This was an easy one cuts look to be 2242. Filed down the sides of the National 4 pin blank moved the shoulder and bottom of key head to allow the blank to be long enough, scribed the side to mark pin location, hand filed the cuts to what I eye balled the pin levels to be when opened. Worked the first time I inserted it. Pins left some nice mark because 2 of them wasn't yet deep as should be finished it off with very little correction nice a smooth. I will order the proper blanks tomorrow. So all I have to do is copy this key to the right blanks and maybe clean the lock a little. These are fun locks to do. Been a long while since I did one but seeing you and Lauren doing these made me want to get one without a key to make sure I haven't lost my touch. :D

Image
"Those who believe in telekinesis, raise my hand."
User avatar
MrWizard
In Memoriam
 
Posts: 252
Joined: 11 Oct 2012 12:21
Location: Phoenix Arizona USA Planet Earth

Re: Key Created for Yale Push Key Padlock

Postby MrWizard » 30 Oct 2012 4:26

Whoops forgot to add the picture with key in it that shows it really works. I could have laid any key next to the lock and said looky here I made this key to this Yale. So here it is open. Hope others will be inspired to get one and try it. The first one you do can be very challenging but you get a great feeling of accomplishment when you get it to work for sure. :wink:

Image

Richard

"let's continue on with this carnival-like atmosphere"
"Those who believe in telekinesis, raise my hand."
User avatar
MrWizard
In Memoriam
 
Posts: 252
Joined: 11 Oct 2012 12:21
Location: Phoenix Arizona USA Planet Earth

Re: Key Created for Yale Push Key Padlock

Postby GWiens2001 » 30 Oct 2012 7:11

I like your comment about just laying any key next to the lock. Can picture that easily: "Yeah, I made this key for this lock. It sure as heck doesn't work, it won't even fit in the keyway, but I made it for this lock." :lol:
Just when you finally think you have learned it all, that is when you learn that you don't know anything yet.
User avatar
GWiens2001
Site Admin
 
Posts: 7550
Joined: 3 Sep 2012 16:24
Location: Arizona, United States

Next

Return to Locks

Who is online

Users browsing this forum: No registered users and 2 guests