|
Information about locks themselves. Questions, tips and lock diagram information should be posted here.
 by Scajaquada87 » 5 Aug 2012 17:45 by Scajaquada87 » 5 Aug 2012 17:45
Greetings! A few weeks ago I acquired an old Corbin mortise lockset. Over the past few months I've been picking my fair share of mortise cylinders so I wanted to learn more about the assembly that they hook up to. Upon disassembling the lock, I noticed that most of the parts have "1349 1/2" stamped on them, so I would assume that is the model number. I then cleaned up the brass with some steel wool and lubricated the insides with some WD-40. I also flipped the latchbolt around to suit my door handing preferences. I also was missing a set screw, so I tracked down a brass bolt with the same threading and diameter at a local hardware store and filed the bolt head until it fit nicely. This lockset accepts standard 1 1/8" diameter mortise cylinders on both sides (or a threaded thumbturn of the same diameter could be substituted for a cylinder on the inside of the door). I have a Sargent and a Fenestra cylinder that are keyed alike, so I threaded one into each side of the door and the cam on both cylinders throws the bolt and retracts the latch perfectly! I've tried threading my Kawneer cylinders into this lockset, but the cam doesn't appear to be long enough to throw the deadbolt. It appears as though the Kawneer cylinders are better suited for a different type of mortise lock such as that on a commercial storefront. It looks like this type of mortise works with either a knob or a thumblatch (I hope that's the right term), however the stopworks only appear to disable the part that interfaces with the thumblatch. This would lead me to assume that this particular mortise lock was designed for the entry door to a residence where there would be a thumblatch on the outside and a doorknob on the inside. Also, I thought I would point out that this latch does not appear to have a deadlocking pin, so if one were to only engage the stopworks and not the deadbolt, there is the possibility that it would be vulnerable to shimming (depending on the trim of the doorframe of course). I am currently working on hollowing out a block of wood to place the lockset in. Once I do this, I can then go about looking for a matching doorknob and faceplate assembly and then use it to hold some of the mortise cylinders I have when I practice picking them. That said, here is a photo of the entire assembly with the cover removed. Two flat-head screws hold the cover in place and there are also a few posts that this cover rests on as to prevent things from shifting around when installed in the door. 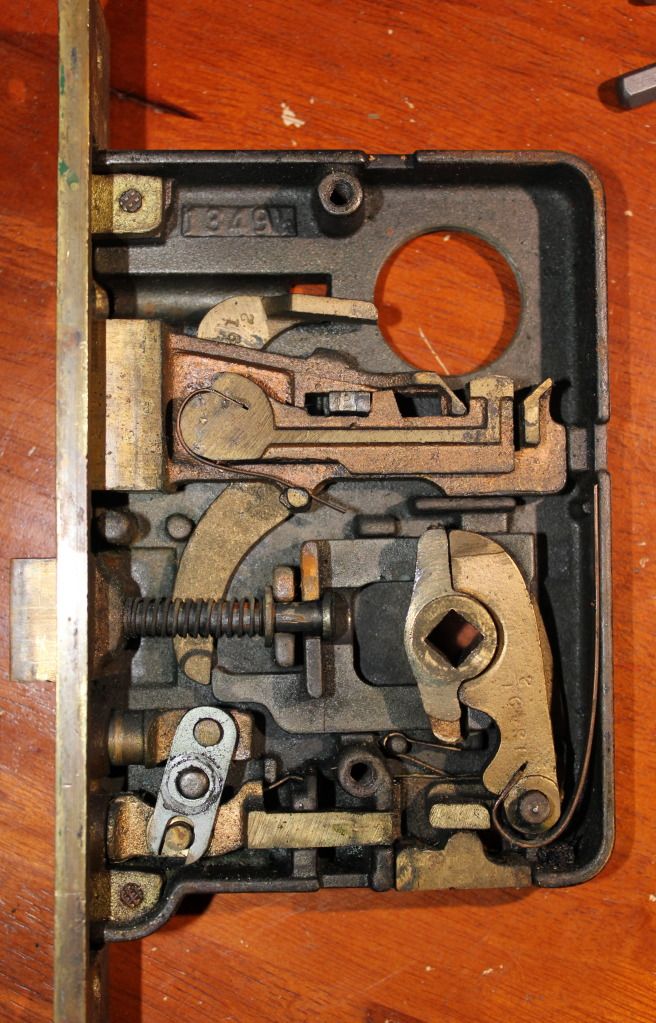
-
Scajaquada87
-
- Posts: 23
- Joined: 22 Apr 2012 10:22
by Altashot » 24 Aug 2012 23:35
Nice lock.
WD-40, IMO is not a lubricant.
Lithium grease should be used on a few areas to prevent wear.
I prefer lithium grease because it is white and not too messy.
Other good quality grease can also be used.
Many times I have seen locks too worn for repairs.
A black and brassy dust can be found in them, then you know it has been neglected.
Several institutions I work for use mortise locks.
Heavily used locks require to be serviced at least once a year.
Some of the locks I service have been in use for more than 60 years.
I don't believe a wd-40'd lock will last that long.
Your kahneer cylinder is likely a cheap construction cylinder.
It was likely used with an Adams Rite mortise lock on a glass/aluminum commercial door
and has an AR cam. You can fit the proper cam on it, but to me, it's just not worth it.
I also service Folger Adams lock at our local jail. Pretty cool to work on them.
The mortise locks and cylinders and pins and springs are all like double the size.
Max
-
Altashot
-
- Posts: 240
- Joined: 18 Aug 2012 20:43
- Location: Western Canada
by cledry » 25 Aug 2012 13:19
Remember when changing the hand to not only rotate the latch to face the proper way but to also reverse the hub so the inside spindle hub is on the proper side of the case. Otherwise when you install it you will find the lock will open by turning the outside knob. Obviously not what you want. The lock of course uses a split spindle.
Jim
-

cledry
-
- Posts: 2836
- Joined: 7 Mar 2009 23:29
- Location: Orlando
-
by Scajaquada87 » 26 Aug 2012 14:05
Thanks for the replies! I'll have to pick up some lithium grease, wipe down the WD-40 I spritzed in earlier and give it a good servicing. To be honest I'm very new to working with any sort of locking hardware beyond your run-of-the-mill residential Schlage deadbolt.
For the cylinder, I picked up a used cylinder with a Schlage C Keyway. I re-keyed it to a key that I had lying around and the cam works great with this lockset (It's much longer and thicker than your Adams Rite-style cam). The Kawneer cylinder was just a practice one I have lying around--I have no need or desire to use it in anything.
As for the handing of the lockset, this particular one is designed to accommodate a thumblatch on the outside of the door and a knob on the inside. The thumblatch interfaces with the brass plate pictured at the bottom of the lockset, while the knob's spindle goes through the square hole in the lower center of the lockset. Therefore, regardless of the handing of the door, the thumblatch will always be regulated by the stopworks, while the doorknob will always retract the latchbolt.
-
Scajaquada87
-
- Posts: 23
- Joined: 22 Apr 2012 10:22
by cledry » 28 Aug 2012 6:03
Does this use the spindle with the dogleg on one half? The one that looks like this?  Jim
-
cledry
-
- Posts: 2836
- Joined: 7 Mar 2009 23:29
- Location: Orlando
-
by Squelchtone » 23 Sep 2012 8:46
cledry wrote:Remember when changing the hand to not only rotate the latch to face the proper way but to also reverse the hub so the inside spindle hub is on the proper side of the case. Otherwise when you install it you will find the lock will open by turning the outside knob. Obviously not what you want. The lock of course uses a split spindle.
I'm glad you wrote this because I recently had to change a lock at work (handle was on top, cylinder under it - that's how they installed it 75 years ago) So I took it apart, and from this post knew enough of what to do but the kicker was that my 2 hub pieces wouldn't change places, they would not mate together, or press together, as if they were not meant to be differently handed. I went to the old basement lock shop and found another lock with the same number on the case, took it apart and it was the same thing. I then found another one and to my surprise the hub pieces could be rearranged and they fit into each other either way. I took those upstairs, removed the one handed one from the lock I was working on, installed the one that would allow me to properly mount this lock in the door and I also learned about adjusting the distance on the split spindle so that both sides worked smoothly. Lock works great and is using a Medeco mortise cylinder. And my boss is happy that the door lock is mounted properly, especially after the maintenance dept told us it would be impossible to flip that lock. I did have to carve/mortise out 2 rounds in the door because the 2 set screw tunnels cast into the lock case needed more room in order to insert the case into the door, and had to of course drill new holes for the mortise cylinders but got to reuse the old mortise cylinder holes for the spindle. Thank you, Squelchtone 
-

Squelchtone
- Site Admin
-
- Posts: 11336
- Joined: 11 May 2006 0:41
- Location: right behind you.
by cledry » 23 Sep 2012 22:25
A common mistake with mortise locks with split spindles is turning the two halves until they touch. They need to be backed out 1 turn. This allows free movement of each handle independent of each other, plus allows for some slight misalignment. Adjusting them for proper lock operation is done usually on the lever. There is some range of adjustment but if the door is an unusual thickness then a custom spindle is required.
Jim
-
cledry
-
- Posts: 2836
- Joined: 7 Mar 2009 23:29
- Location: Orlando
-
by Scajaquada87 » 2 Oct 2012 0:22
Update!  Well, I finally hollowed out the inside of a wooden block...took me awhile between drilling and chiseling, but the Corbin is now installed in something! Pictured is a no-name 7-pin cylinder (currently pinned 6 chambers) with a Schlage "C" keyway. I recently gave it a go with my 6-pin Best with an "E" keyway and it was quite a bit more challenging and a much better simulation for real-world conditions compared to having the lock mounted snugly in my vice. Granted, I still didn't have to account for a door frame or doorjamb, but it's still a step up. Later this week I plan to search for face plates that will work with this lockset. I also plan to track down a doorknob. As of now I'm primarily concerned with developing a good training aide and not as much concerned with producing a historical reproduction.
-
Scajaquada87
-
- Posts: 23
- Joined: 22 Apr 2012 10:22
by Altashot » 2 Oct 2012 23:35
Cool!  I have installed a few with the old spade bit and chisel too... I know mounting one of those in a wood door is quite a bit of work and time consuming. Try in a 1 3/8" door... Good job! Nice rig! M.
-
Altashot
-
- Posts: 240
- Joined: 18 Aug 2012 20:43
- Location: Western Canada
by cledry » 4 Oct 2012 22:35
Scajaquada87 wrote:Update!
Well, I finally hollowed out the inside of a wooden block...took me awhile between drilling and chiseling, but the Corbin is now installed in something! Pictured is a no-name 7-pin cylinder (currently pinned 6 chambers) with a Schlage "C" keyway. I recently gave it a go with my 6-pin Best with an "E" keyway and it was quite a bit more challenging and a much better simulation for real-world conditions compared to having the lock mounted snugly in my vice. Granted, I still didn't have to account for a door frame or doorjamb, but it's still a step up.
Later this week I plan to search for face plates that will work with this lockset. I also plan to track down a doorknob. As of now I'm primarily concerned with developing a good training aide and not as much concerned with producing a historical reproduction.
When you say faceplate are you referring to the armor front? If so this lock doesn't use one. Jim
-
cledry
-
- Posts: 2836
- Joined: 7 Mar 2009 23:29
- Location: Orlando
-
by Scajaquada87 » 5 Oct 2012 16:56
cledry wrote:When you say faceplate are you referring to the armor front? If so this lock doesn't use one.
Thanks for letting me know. This explains why I couldn't find a front plate that was 2.5 inches between the cylinder and the spindle (the best I could do was 3"). I realize that normally this lockset would utilize a door pull with a thumblatch on the outside, but I was thinking that maybe I could track down a used part from some other lockset. Anyway, I ended up stopping by Historic House Parts, where I picked up a pair of brass doorknobs with a solid spindle and escutcheons. I was able to track down a cylinder collar and thumbturn in my basement amongst all the lock parts I inherited from my grandpa. Today I took apart the entire lockset, cleaned off the WD-40 (fixing my old mistake) and applied lithium grease to the parts. I then reassembled the lockset, placed it back in the mortise and bolted everything into place! 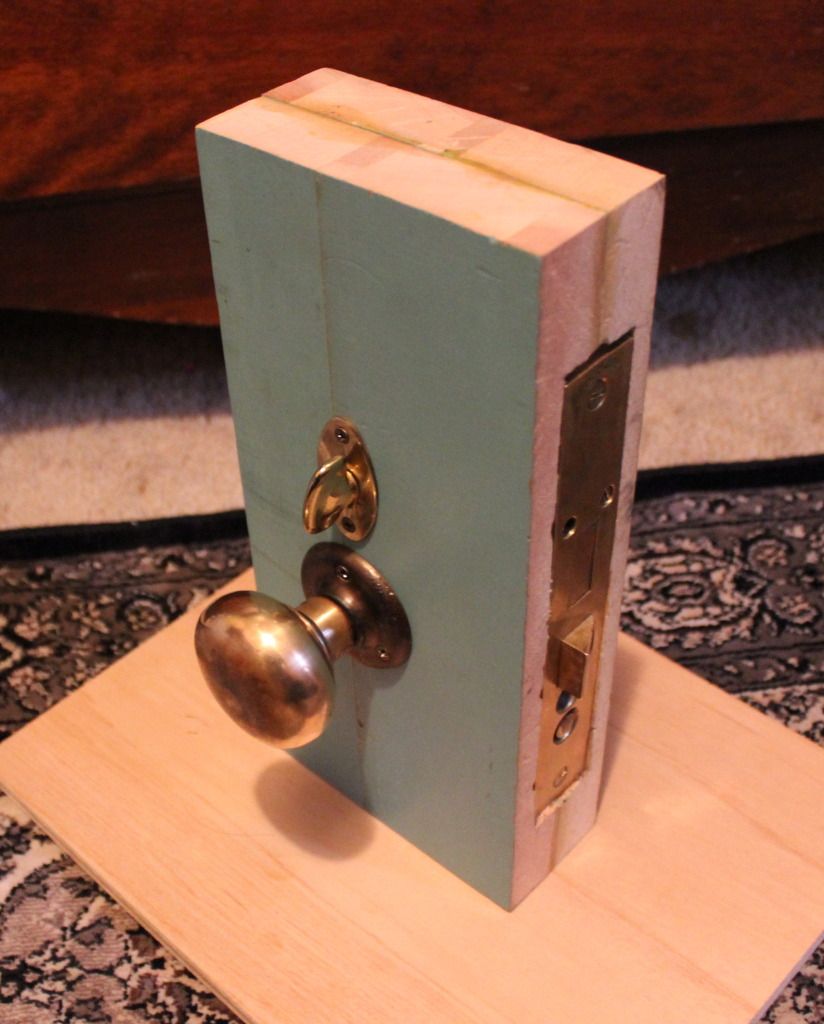 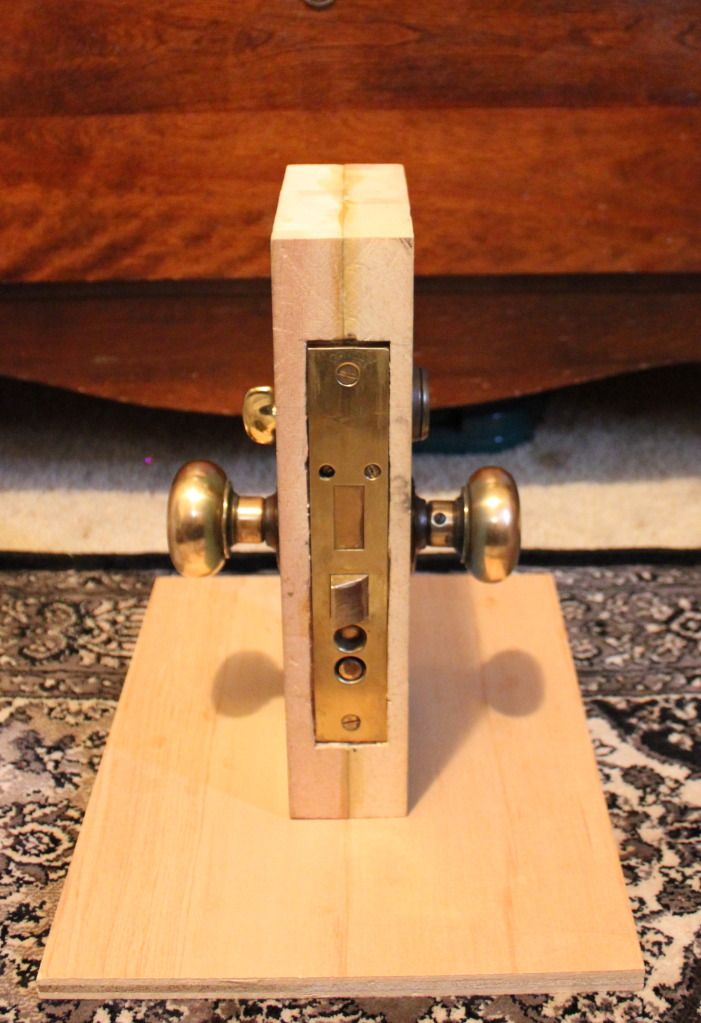 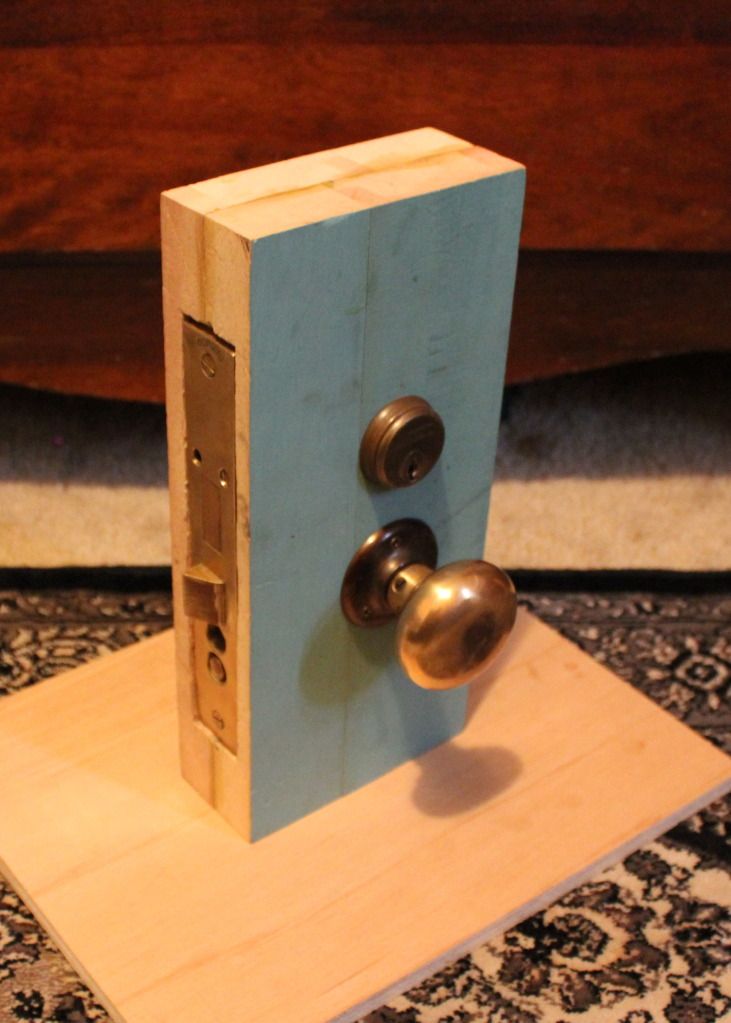 I decided to go with my Sargent cylinder, as the cam on it seems to throw the bolt nicely without getting in the way of things. Also, I mounted it on a stand so now I can practice picking it without having to hold the block. Picking cylinders in this thing is much more difficult due to the angle and the doorknob. However, I find that it creates more of a "real-world" experience and I feel that at this phase of my training that something like this wouldn't be as frustrating as it might have been a few months ago.
-
Scajaquada87
-
- Posts: 23
- Joined: 22 Apr 2012 10:22
by cledry » 5 Oct 2012 20:15
The part you are calling the faceplate is actually called the escutcheon. The armor front faceplate fits on the edge of the lock where the bolt and latch comes out. Modern mortise locks use this piece but older ones didn't. Your lock may have had an escutcheon or not.
The old Sargent cam was similar to the old Corbin and modern Yale cam, so probably any of these would work in a lock of this vintage.
You have done a nice job with it.
Jim
-
cledry
-
- Posts: 2836
- Joined: 7 Mar 2009 23:29
- Location: Orlando
-
by Altashot » 6 Oct 2012 0:46
Looks really good!  Good choice on knobs and cylinder too. I always liked to look of bronze finish. it develops a beautiful patina as it wears and polishes from use. How does it feel with the lithium grease now? M.
-
Altashot
-
- Posts: 240
- Joined: 18 Aug 2012 20:43
- Location: Western Canada
Return to Locks
Who is online
Users browsing this forum: No registered users and 10 guests
|


