Lock Picking 101 Forum
A community dedicated to the fun and ethical hobby of lock picking.
       

Lock Picking 101 Home
Login
Profile
Members
Forum Rules
Frequent Forum Questions
SEARCH
View New Posts
View Active Topics


Live Chat on Discord
LP101 Forum Chat
Keypicking Forum Chat
Reddit r/lockpicking Chat


Learn How to Pick Locks
FAQs & General Questions
Got Beginner Questions?
Pick-Fu [Intermediate Level]


Ask a Locksmith
This Old Lock
This Old Safe
What Lock Should I Buy?


Hardware
Locks
Lock Patents
Lock Picks
Lock Bumping
Lock Impressioning
Lock Pick Guns, Snappers
European Locks & Picks
The Machine Shop
The Open Source Lock
Handcuffs


Member Spotlight
Member Introductions
Member Lock Collections
Member Social Media


Off Topic
General Chatter
Other Puzzles


Locksmith Business Info
Training & Licensing
Running a Business
Keyways & Key Blanks
Key Machines
Master Keyed Systems
Closers and Crash Bars
Life Safety Compliance
Electronic Locks & Access
Locksmith Supplies
Locksmith Lounge


Buy Sell Trade
Buy - Sell - Trade
It came from Ebay!


Advanced Topics
Membership Information
Special Access Required:
High Security Locks
Vending Locks
Advanced Lock Pick Tools
Bypass Techniques
Safes & Safe Locks
Automotive Entry & Tools
Advanced Buy/Sell/Trade


Locksport Groups
Locksport Local
Chapter President's Office
Locksport Board Room
 

Making Homemade Cutaways with an End Mill

Information about locks themselves. Questions, tips and lock diagram information should be posted here.

Making Homemade Cutaways with an End Mill

Postby xylac » 3 Aug 2013 1:02

I want to start by sharing my experiences making my own cutaway locks. I know some members here have had luck with a dremel and hand files, but I wasn't able to get that to work. Fortunately I had access to an end mill, so I started with that.

I began with the cheapest deadbolt I could find and took out the plug, pins, and springs. I clamped it down with a vise so the side of the bible was facing upward, toward the bit of the mill. I started with a small drill bit and just plunged down Into the bible, but not all the way through. Without moving the lock horizontally, I switched to the smallest end mill bit I could find (1/4" dia) and brought it down until it started cutting the surface of the bible (plunging with the tip of the end mill bit could damage it, which is why I plunged with the drill bit).

Since the material I was going through was tough, I went slowly and used a lot of cutting fluid. I'd do one pass, return, raise up the lock a small bit, and repeat. When I cut deep enough to see into the five places where the springs rest, I took out the lock and cleaned it off.

When I tried to load the pins back in, many of them got stuck, so I smoothed down the cuts I made with a dremel until the pins fit in. I then reassembled the lock, and I finally had my own cutaway.

With my first attempt, the side of the bible was not perfectly flat, leading to uneven cuts and the holes allowing me to see the springs and driver pins being too large. Some springs kept popping out, so I used epoxy to affix a small piece of acrylic to the bible.

Image
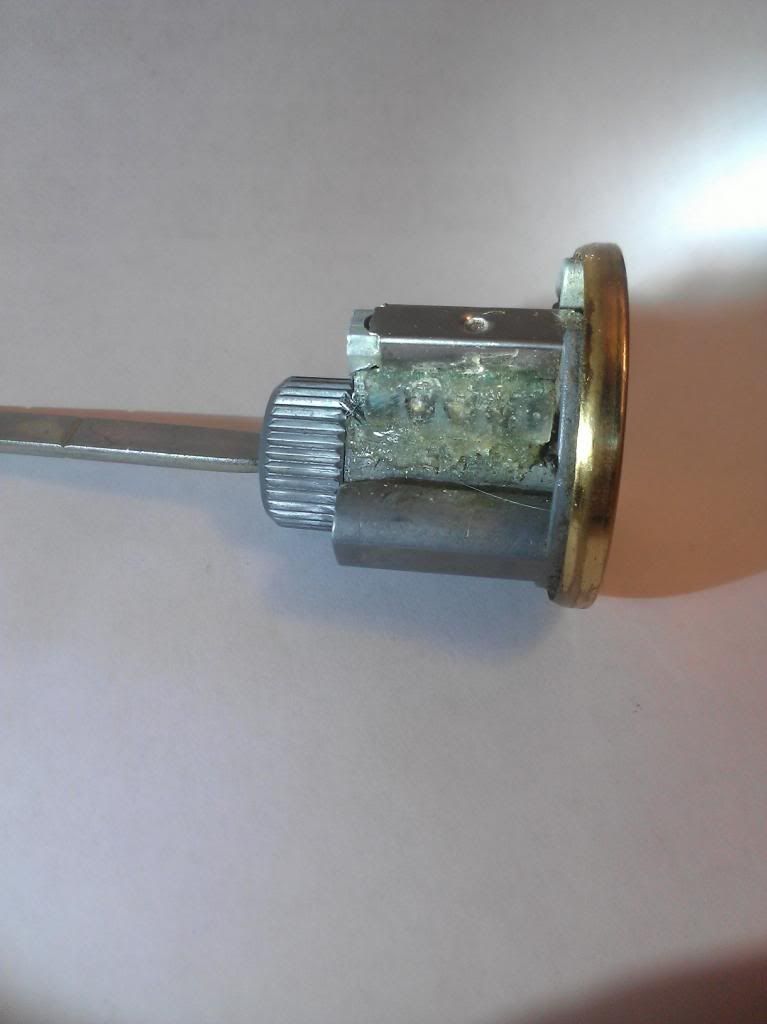
Ugly, but it does the job.

I tried the same method again, but this time I used a 5 pin Schlage deadbolt and was more careful to keep it level. I also stopped cutting with the mill earlier this time, since cutting creates a thin foil over the top of the cavities that is easily removed with a dremel. Basically, stop as soon as you can see into the pin cavities, since the holes will only get larger from here.
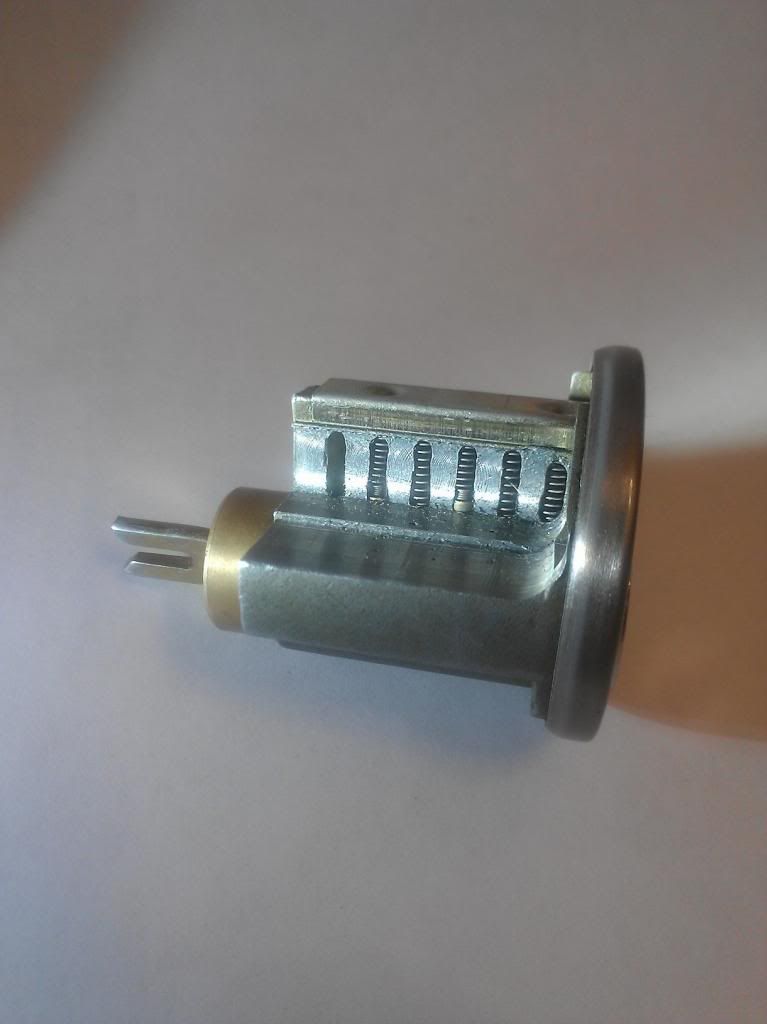
Image
Much prettier!

Image
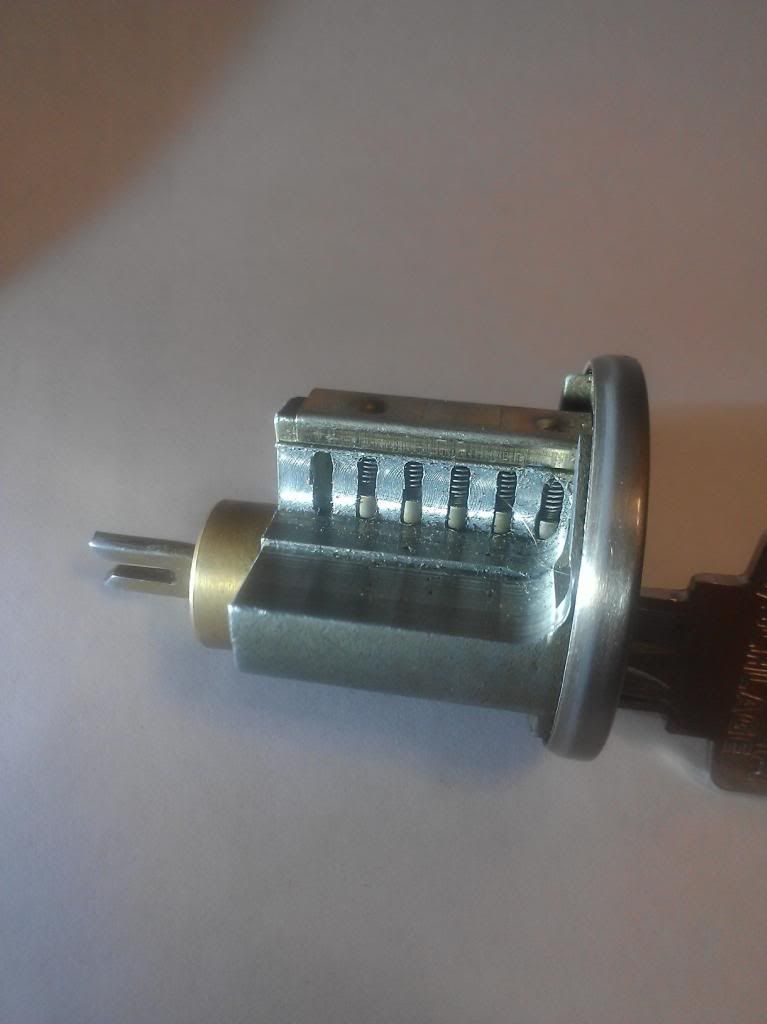
With the key. Very useful for showing how pin tumbler locks work.

Making cutaways this way was pretty simple. All it requires is access to a machine shop and basic knowledge of tools. I'm pleased with how the second one came out, and it's helped me improve my picking skills a lot, since I'm able to double check if the pin I'm feeling is set, not set, or overset. I am curious to know how other people made theirs, especially ones where you can see the plug and key pins. Also, the next time I make a cutaway, I'll be sure to get pictures of the process. Hope this helps, and I'd love to hear your tips!
xylac
 
Posts: 40
Joined: 25 Feb 2013 22:27

Re: Making Homemade Cutaways with an End Mill

Postby CarsonReidDavis » 6 Aug 2013 20:46

Welcome to the forums xylac!

Great job with that cutaway, it looks awesome. I've been meaning to make one of my own for a while now but have just never gotten around to it. How much time did you spend making yours?
CarsonReidDavis
 
Posts: 13
Joined: 9 Jun 2013 2:45
Location: Alabama

Re: Making Homemade Cutaways with an End Mill

Postby xylac » 6 Aug 2013 22:21

Thanks!

I was able to do this in under a couple of hours from deciding to make one to being finished. Once everything is set up, actually cutting it takes less than fifteen minutes. After that, it's just a little bit of dremeling and filing to get rid of loose or sharp edges. Not too difficult, especially for someone with limited machining experience.
xylac
 
Posts: 40
Joined: 25 Feb 2013 22:27

Re: Making Homemade Cutaways with an End Mill

Postby luckey » 8 Nov 2023 15:49

That was made to look very easy. But I wouldn't have know where to find an end mill, or ven how to turn one on!!;thanks for though!!
luckey
 
Posts: 25
Joined: 27 Dec 2012 18:43
Location: Bournemouth, UK

Re: Making Homemade Cutaways with an End Mill

Postby Squelchtone » 8 Nov 2023 18:27

luckey wrote:That was made to look very easy. But I wouldn't have know where to find an end mill, or ven how to turn one on!!;thanks for though!!


Just a heads up but you are replying to 10 to 15 year old year old threads to people who may no longer even be members here. If a thread is older than I donno, a year or two old, please let it lay dormant.

Thank you,
Squelchtone
Image
User avatar
Squelchtone
Site Admin
 
Posts: 11307
Joined: 11 May 2006 0:41
Location: right behind you.


Return to Locks

Who is online

Users browsing this forum: Google Adsense [Bot] and 4 guests