|
Having read the FAQ's you are still unfulfilled and seek more enlightenment, so post your general lock picking questions here.
Forum rules
Do not post safe related questions in this sub forum! Post them in This Old Safe
The sub forum you are currently in is for asking Beginner Hobby Lock Picking questions only.
 by ckc123 » 29 Nov 2013 10:01 by ckc123 » 29 Nov 2013 10:01
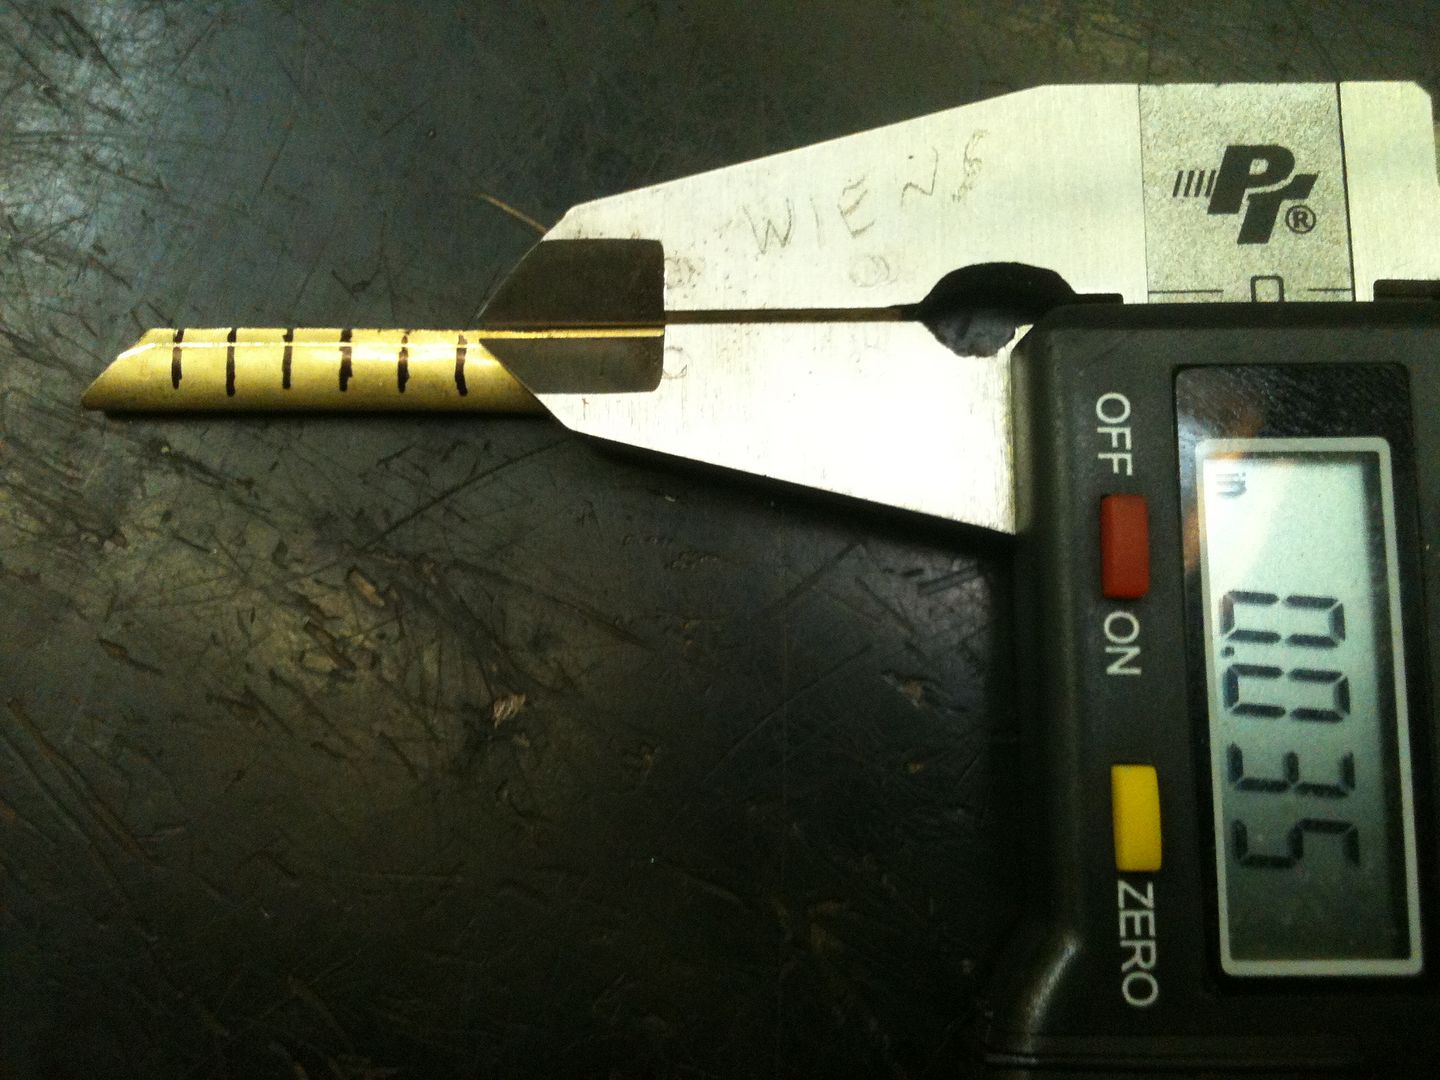
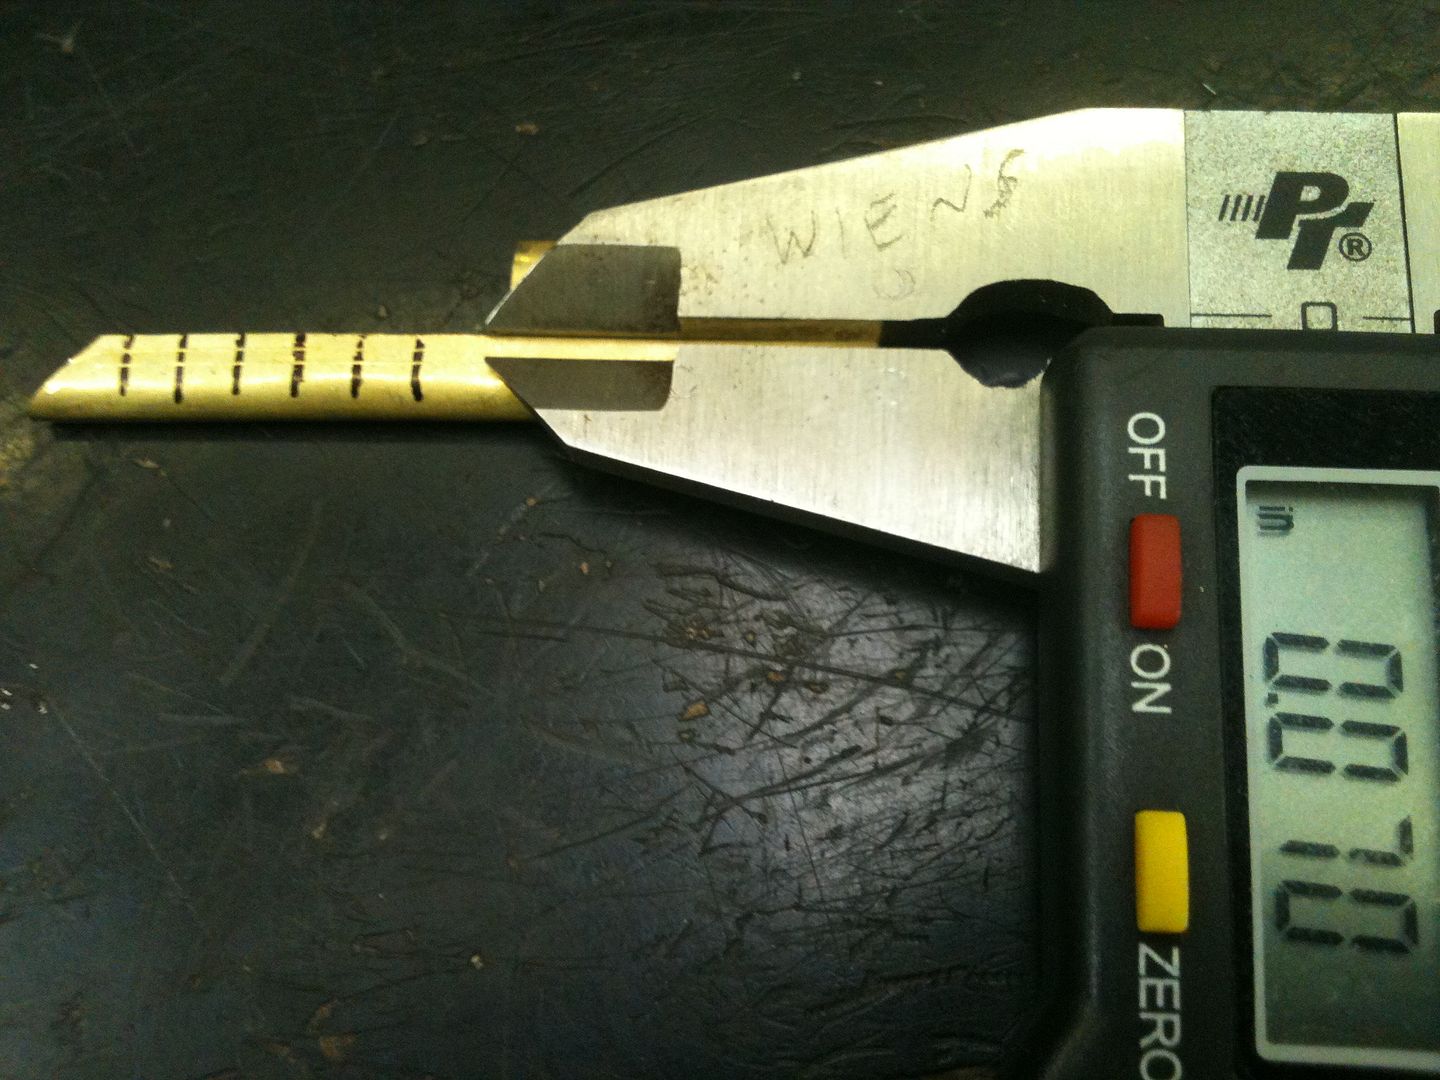
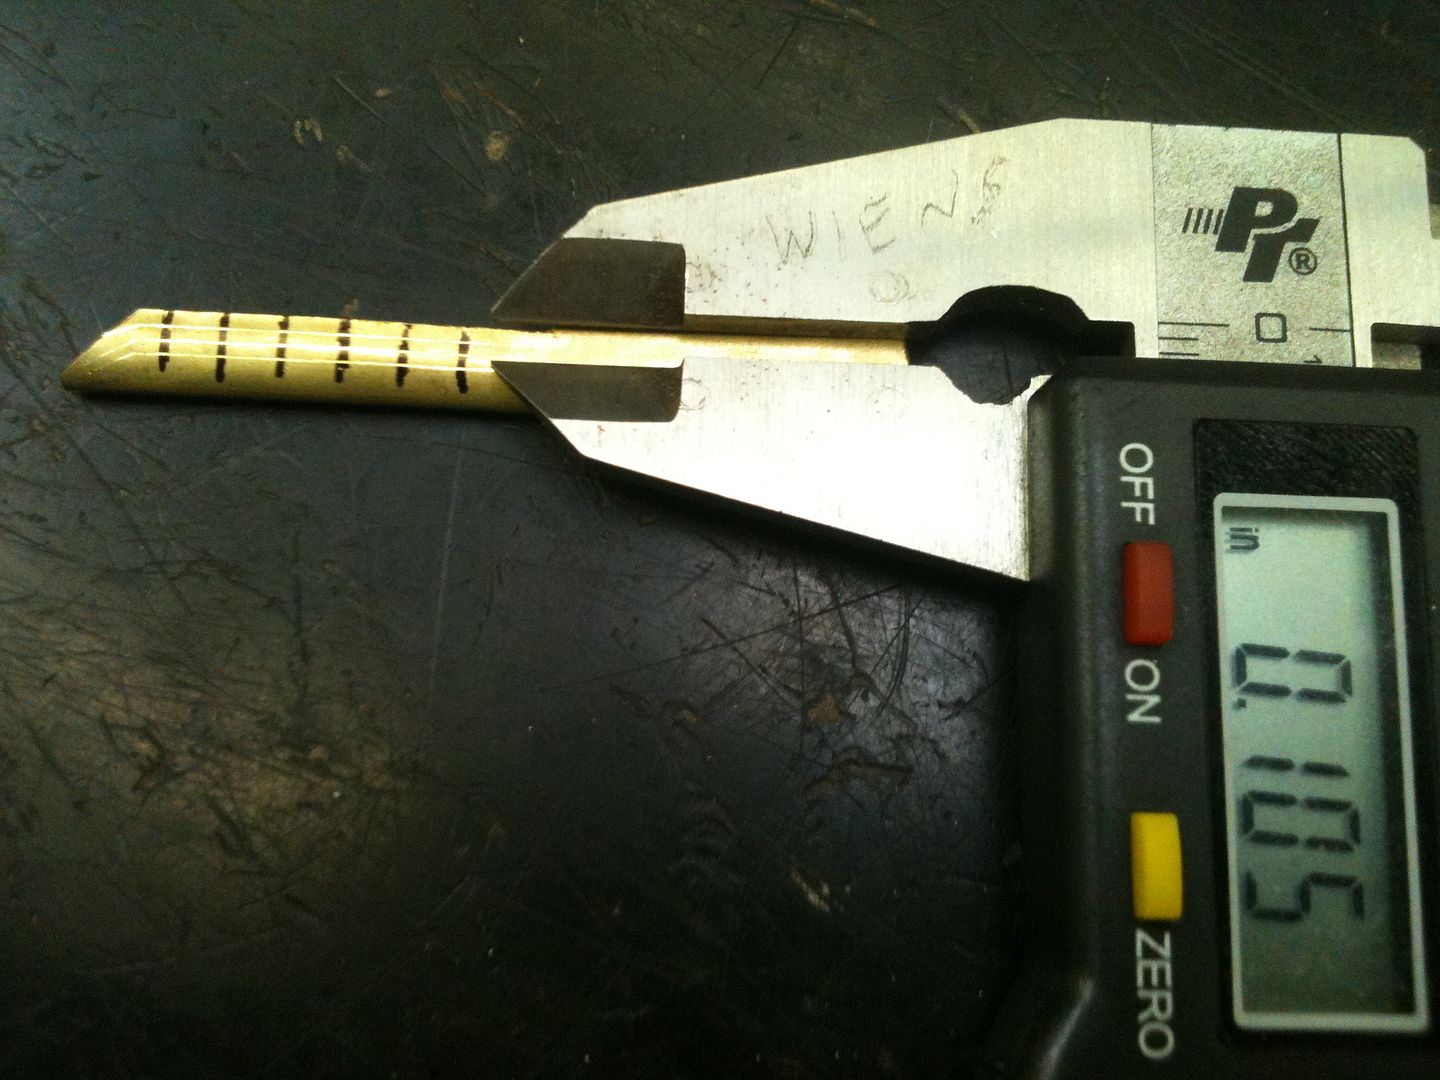
I was thinking of trying out some impressioning, and the first thought that came to mind was "How do you know how far down to file with each progression".. so I decided to come up with this.. it took about 2 mins for 1 blank (take a lot less if you do several at a time). has anyone done/seen anything like this?? 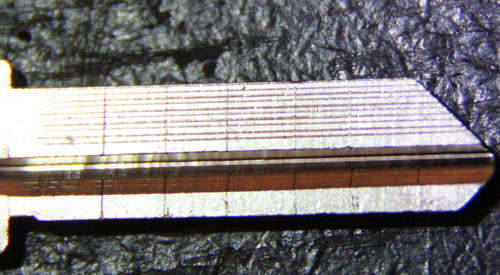
-
ckc123
-
- Posts: 195
- Joined: 2 Jan 2011 21:49
- Location: North of the GTA
by DennisK » 29 Nov 2013 12:56
I don't understand what you're trying to show here.
-
DennisK
-
- Posts: 96
- Joined: 28 Nov 2013 20:10
- Location: Pickle City,IL.
by ckc123 » 29 Nov 2013 12:58
as you go through each progression on the impression, you have a reference for each pin spacing (thats easy due to where the pin marks are on the key..) but it also shows you the exact depth of each cut (should be).. so if it shows on one progression, you can file "Down" to the next "mark". so you can go down "full steps" from one pin height to the next.
-
ckc123
-
- Posts: 195
- Joined: 2 Jan 2011 21:49
- Location: North of the GTA
by fgarci03 » 29 Nov 2013 13:46
Beautiful! You say you took 2 mins to do it? How do you do it with such precision? It's a very fast time! Nice!  Go ahead, keep plugging away, picking on me! You will end up on bypass or with rigor mortise.
- GWiens2001
-
fgarci03
-
- Posts: 1009
- Joined: 18 Dec 2012 21:38
- Location: Porto/Portugal
-
by ckc123 » 29 Nov 2013 14:06
Just use a standard set of calipers (one which has the lock knob on it..).. the edge of the calipers is sharp (and hard enough) to lightly mark the side of the key blank.. use one edge along the bottom of the key blank, and the other tip on the side of the key.. then drag it along.. the longest part if setting the width for each cut (10-15 seconds).. to mark the key is about 1 second per mark. so the more keys you do at once the faster it is.. 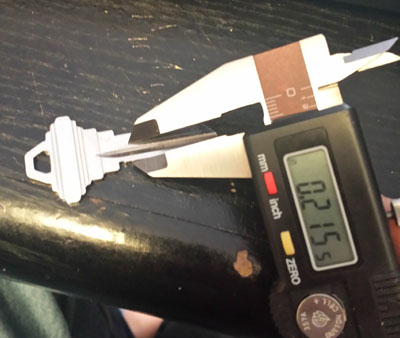
-
ckc123
-
- Posts: 195
- Joined: 2 Jan 2011 21:49
- Location: North of the GTA
by fgarci03 » 29 Nov 2013 14:13
Thanks for the tips mate!
Never would have thought about that!
Go ahead, keep plugging away, picking on me! You will end up on bypass or with rigor mortise.
- GWiens2001
-
fgarci03
-
- Posts: 1009
- Joined: 18 Dec 2012 21:38
- Location: Porto/Portugal
-
by cledry » 29 Nov 2013 19:58
Not a bad idea for learning but once you have impressioned a few locks you get a feel for it. I think for anyone that does this for a living it might be more trouble than it is worth. You would need to look up the depths and transfer them to the blank in which time most keys would already be impressioned.
Jim
-

cledry
-
- Posts: 2836
- Joined: 7 Mar 2009 23:29
- Location: Orlando
-
by GWiens2001 » 29 Nov 2013 21:09
Did this one along the same lines a while back while working out a key for a BiLock. The brass tubing I was using was too flimsy for a BiLock key, but the theory works well. 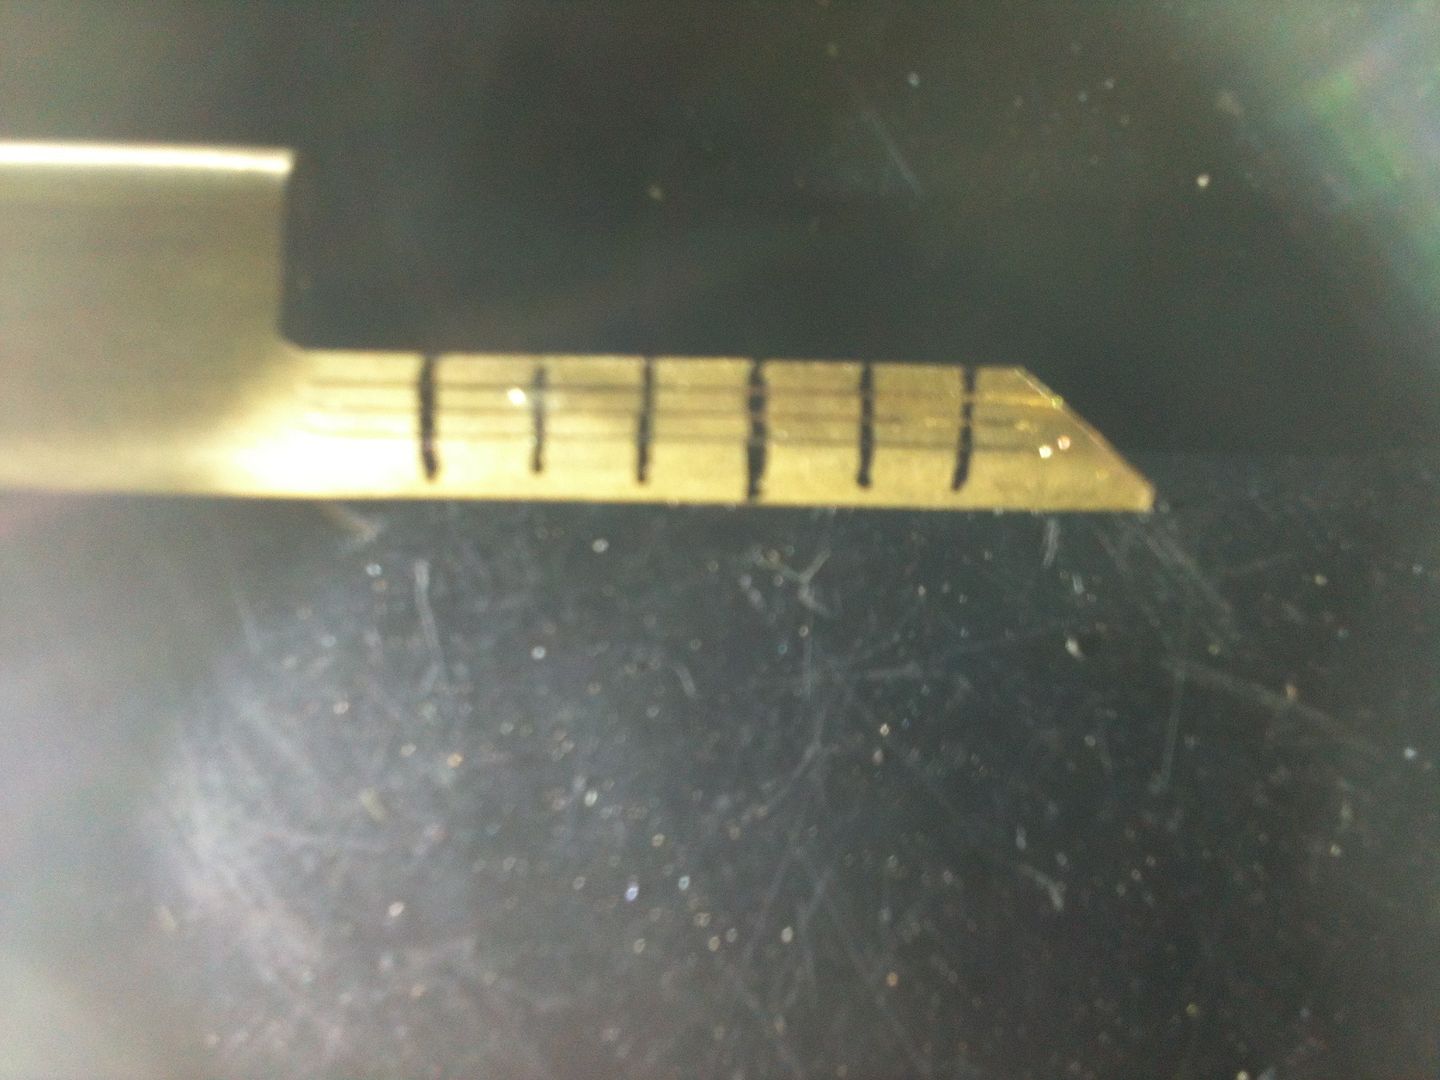 Gordon Just when you finally think you have learned it all, that is when you learn that you don't know anything yet.
-

GWiens2001
- Site Admin
-
- Posts: 7659
- Joined: 3 Sep 2012 16:24
- Location: Arizona, United States
by fgarci03 » 29 Nov 2013 21:11
I was think about when you would show this pic How did you make the marks Gordon? Go ahead, keep plugging away, picking on me! You will end up on bypass or with rigor mortise.
- GWiens2001
-
fgarci03
-
- Posts: 1009
- Joined: 18 Dec 2012 21:38
- Location: Porto/Portugal
-
by GWiens2001 » 29 Nov 2013 21:13
Just when you finally think you have learned it all, that is when you learn that you don't know anything yet.
-
GWiens2001
- Site Admin
-
- Posts: 7659
- Joined: 3 Sep 2012 16:24
- Location: Arizona, United States
by GWiens2001 » 29 Nov 2013 21:17
Working out the idea, used simpler material. A business card. Mitch's from Security Snobs, to be exact. 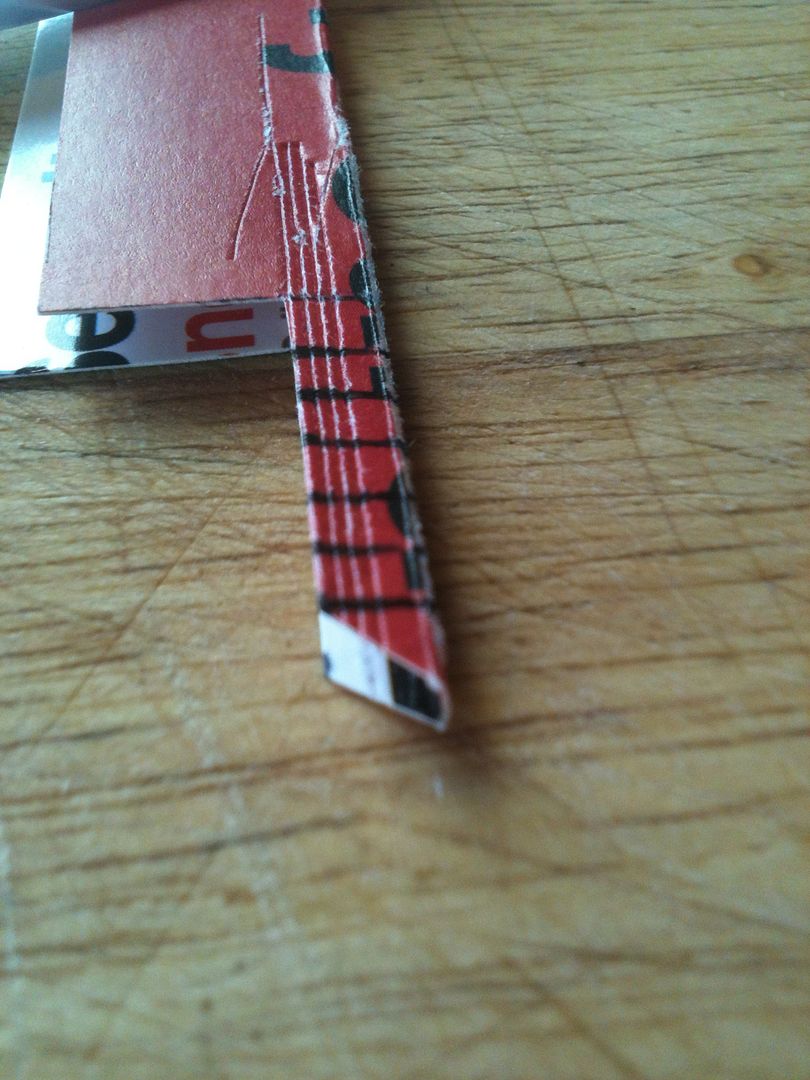 Just when you finally think you have learned it all, that is when you learn that you don't know anything yet.
-
GWiens2001
- Site Admin
-
- Posts: 7659
- Joined: 3 Sep 2012 16:24
- Location: Arizona, United States
by YouLuckyFox » 29 Nov 2013 21:23
Question for the forum: How do you prepare your blanks to read initial impressions? Do you hold the file at 45 degrees and progressively file along the blank to make a uniform surface as it details in LSS/Bill Phillips' Books? @Gordon: I look forward to seeing the progress with the BiLock! @ckc123: Great precision on marking that blank  ! I agree with Cledry, after awhile you file off the same amount of material with each stroke and get a feel for how many strokes till the next depth, but when you start out OR if you're working with a previously unfamiliar pin depth set-up (is there better terminology for this?) I think this is a great setup; as far as impressioning templates go, I think you did a great thing in marking the spacing on the blank as well. I create templates by filing down .5 - 1 depth down at each spacing (oftentimes on a nickel-plated brass blank) it really helps out when I am impressioning a wild lock and not just practicing. It really helps to minimize errors when you begin impressioning. Also, it can help to use a key gauge: 
-
YouLuckyFox
-
- Posts: 630
- Joined: 10 Aug 2012 19:25
by fgarci03 » 29 Nov 2013 21:51
You guys can't stop amazing me! Very nice, all of you! Gordon, I love how you marked your name on the caliper. Like: "IT'S MINE! NO ONE TOUCHES IT  " @YouLuckyFox: I just sand the blade a little to make it shinnier. But I suck at impressioning, so maybe someone will give you a better tip Go ahead, keep plugging away, picking on me! You will end up on bypass or with rigor mortise.
- GWiens2001
-
fgarci03
-
- Posts: 1009
- Joined: 18 Dec 2012 21:38
- Location: Porto/Portugal
-
by GWiens2001 » 29 Nov 2013 22:18
fgarci03 wrote:You guys can't stop amazing me! Very nice, all of you! Gordon, I love how you marked your name on the caliper. Like: "IT'S MINE! NO ONE TOUCHES IT "
Was doing that project at work, and with people coming and going all the time, tools without names are at risk of being stolen. Also many mechanics borrow tools with the full intention of returning, but forget who they borrowed the tool from. It helps me get my tools back. fgarci03 wrote:@YouLuckyFox: I just sand the blade a little to make it shinnier. But I suck at impressioning, so maybe someone will give you a better tip
Use several methods of preparing, depending on how I am feeling at the time. Sanding the top edge, using my pippin file to prepare a flat smooth surface, using a marker. Do not often sharpen the edge (blade the edge) except when impressioning lever locks, and not often then. For extremely rounded key pins that leave practically no mark, have leaded the edge - used solder to make a very soft surface to take the impressions. Gordon Just when you finally think you have learned it all, that is when you learn that you don't know anything yet.
-
GWiens2001
- Site Admin
-
- Posts: 7659
- Joined: 3 Sep 2012 16:24
- Location: Arizona, United States
by fgarci03 » 29 Nov 2013 22:34
GWiens2001 wrote:Use several methods of preparing, depending on how I am feeling at the time.
When I feel sad, I use the lead. When I feel happy I sand the top edge. WHEN I'M ANGRY I DON'T PREPARE IT AND BRUTE FORCE IT! Nice techniques. I'm yet to try the keyblank leading. Should work nicely for me! Go ahead, keep plugging away, picking on me! You will end up on bypass or with rigor mortise.
- GWiens2001
-
fgarci03
-
- Posts: 1009
- Joined: 18 Dec 2012 21:38
- Location: Porto/Portugal
-
Return to Got Questions? - Ask Beginner Hobby Lockpicking Questions Here
Who is online
Users browsing this forum: Google [Bot] and 20 guests
|