Lock Picking 101 Forum
A community dedicated to the fun and ethical hobby of lock picking.
       

Lock Picking 101 Home
Login
Profile
Members
Forum Rules
Frequent Forum Questions
SEARCH
View New Posts
View Active Topics


Live Chat on Discord
LP101 Forum Chat
Keypicking Forum Chat
Reddit r/lockpicking Chat


Learn How to Pick Locks
FAQs & General Questions
Got Beginner Questions?
Pick-Fu [Intermediate Level]


Ask a Locksmith
This Old Lock
This Old Safe
What Lock Should I Buy?


Hardware
Locks
Lock Patents
Lock Picks
Lock Bumping
Lock Impressioning
Lock Pick Guns, Snappers
European Locks & Picks
The Machine Shop
The Open Source Lock
Handcuffs


Member Spotlight
Member Introductions
Member Lock Collections
Member Social Media


Off Topic
General Chatter
Other Puzzles


Locksmith Business Info
Training & Licensing
Running a Business
Keyways & Key Blanks
Key Machines
Master Keyed Systems
Closers and Crash Bars
Life Safety Compliance
Electronic Locks & Access
Locksmith Supplies
Locksmith Lounge


Buy Sell Trade
Buy - Sell - Trade
It came from Ebay!


Advanced Topics
Membership Information
Special Access Required:
High Security Locks
Vending Locks
Advanced Lock Pick Tools
Bypass Techniques
Safes & Safe Locks
Automotive Entry & Tools
Advanced Buy/Sell/Trade


Locksport Groups
Locksport Local
Chapter President's Office
Locksport Board Room
 

Kwikset Smartkey Disassembly

Information about locks themselves. Questions, tips and lock diagram information should be posted here.

Kwikset Smartkey Disassembly

Postby GWiens2001 » 20 May 2014 19:03

Thought I had posted this a while back, but can't seem to find it. So here we go again... :?

Got a couple of used Kwikset Smartkey locks (one a SmartCode keypad lock) and thought some of you might like to see some gutshots. While I would never use one of these locks on my home, the engineering is pretty cool. Lots of pictures in this, so hopefully a newbie who takes one apart can get it back together. Keep in mind, this is NOT a pin tumbler lock!
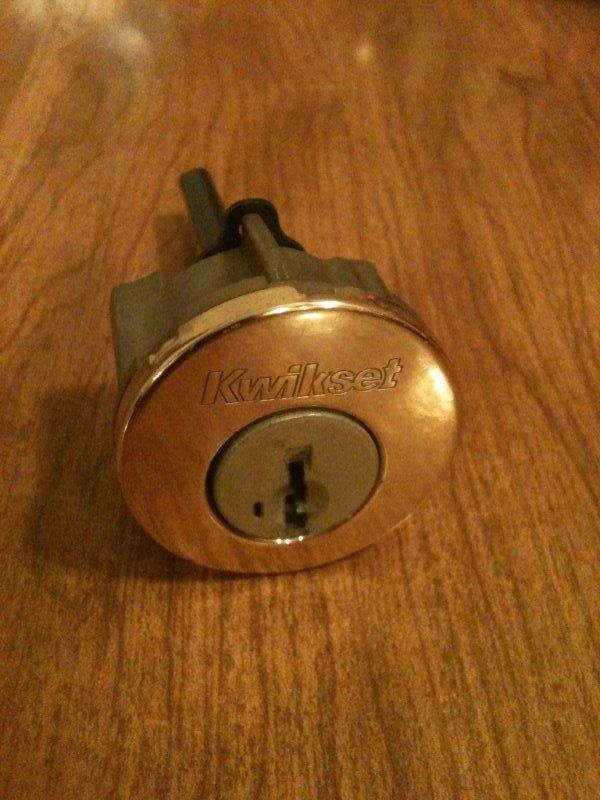
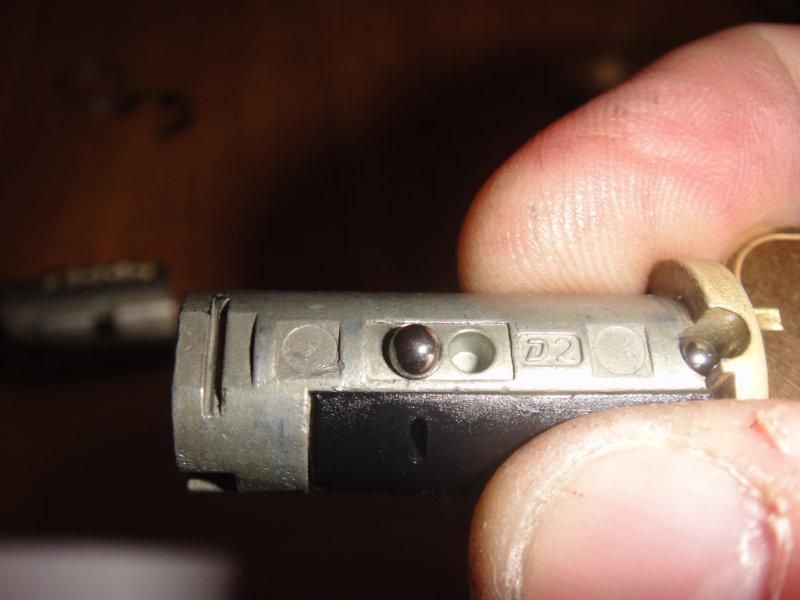
Front of lock body
Image

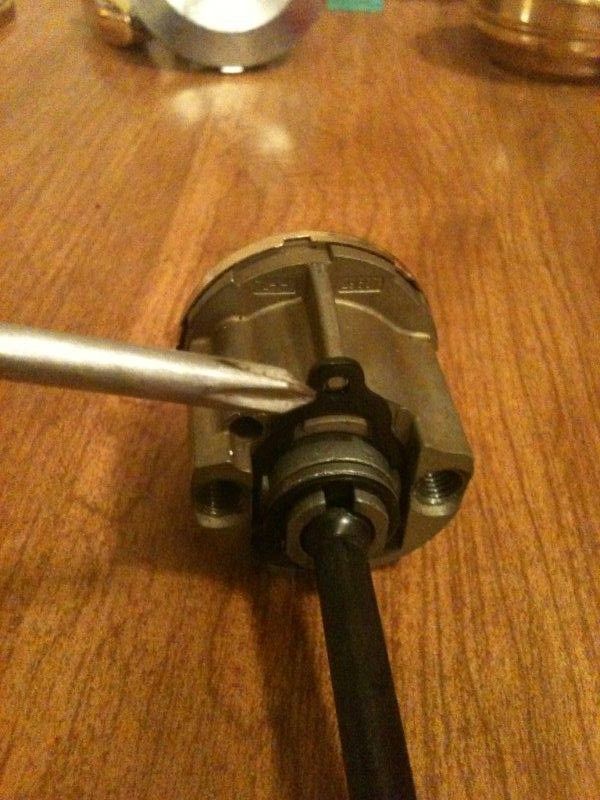
To pull the cylinder from the lock body, remove this clip. Pull the top of the clip towards you so the small peg behind that hole at the top clears the clip, then it pulls up just fine.
Image

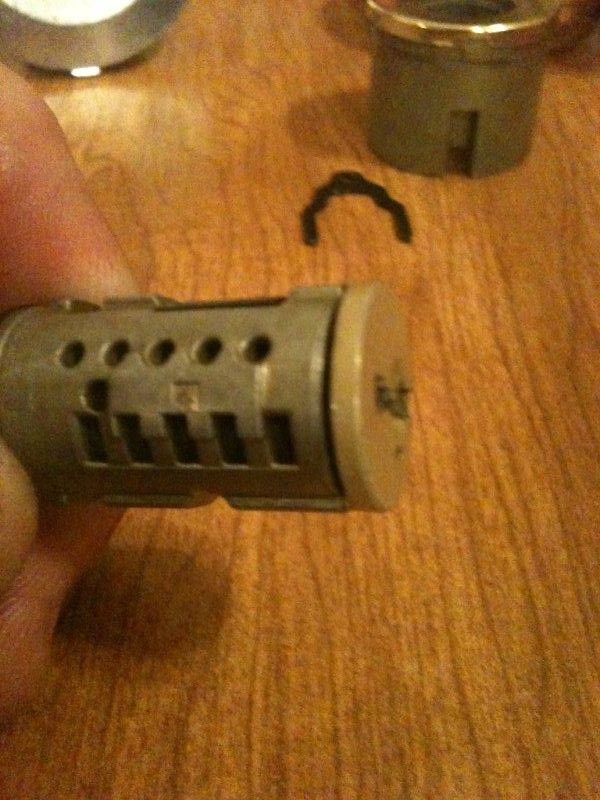
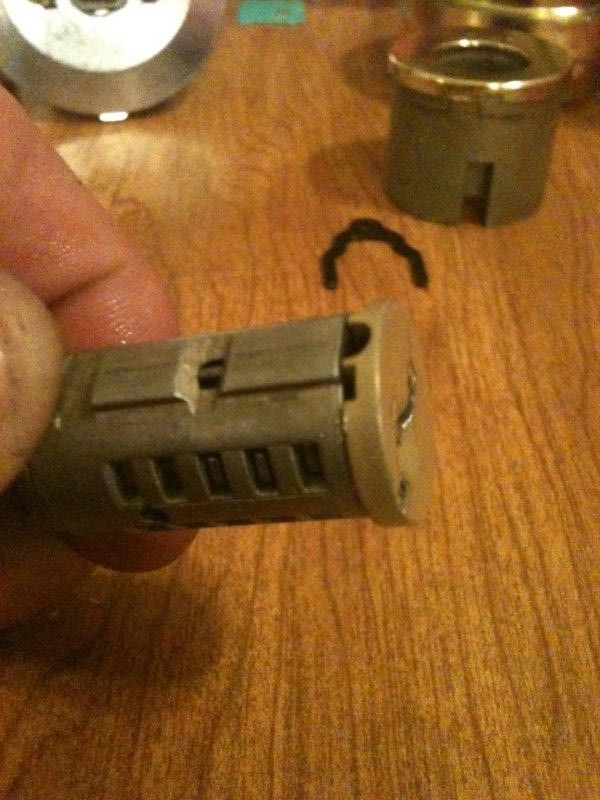
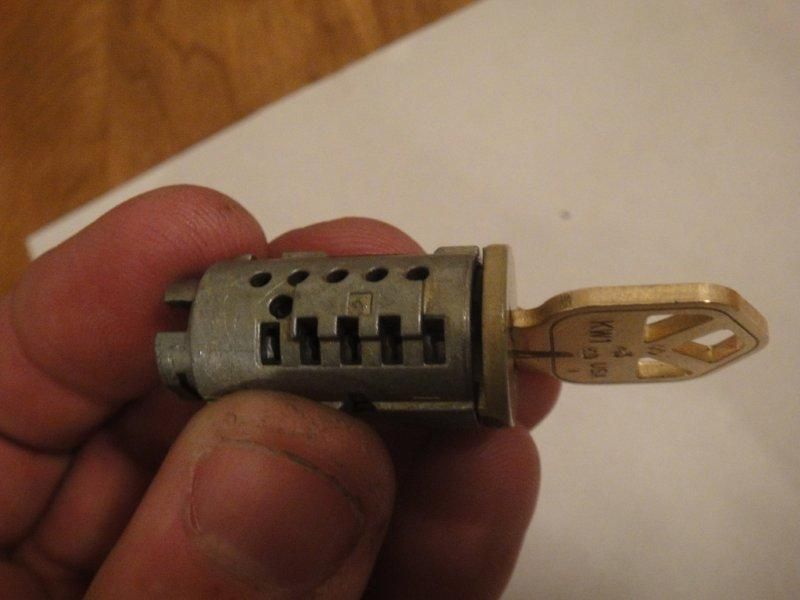
Then the cylinder comes out.
Image

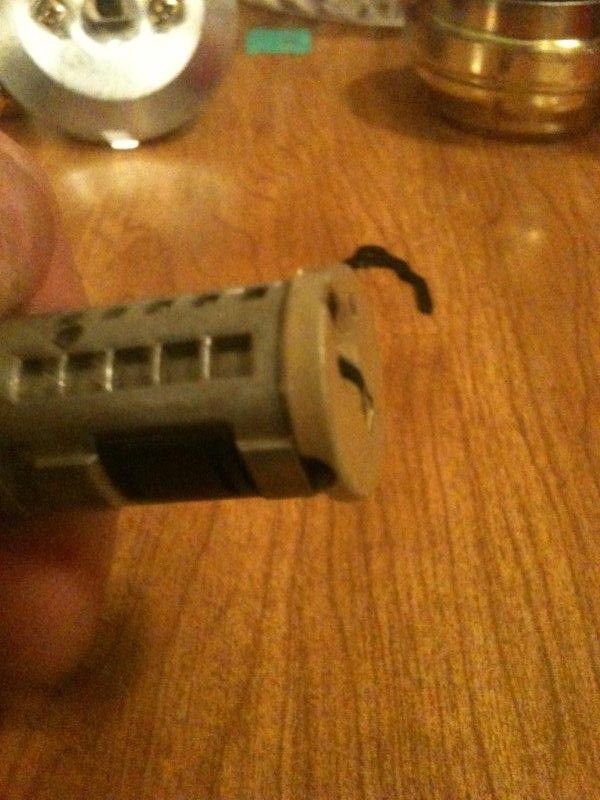
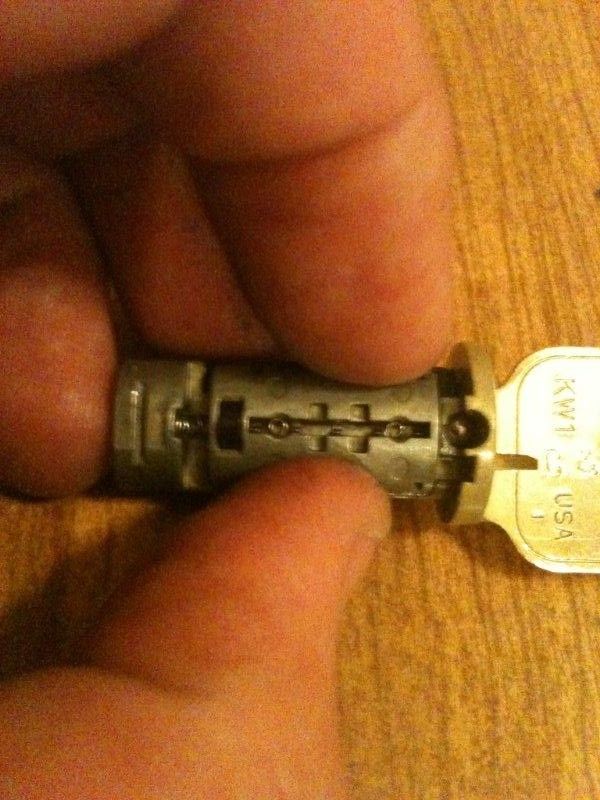
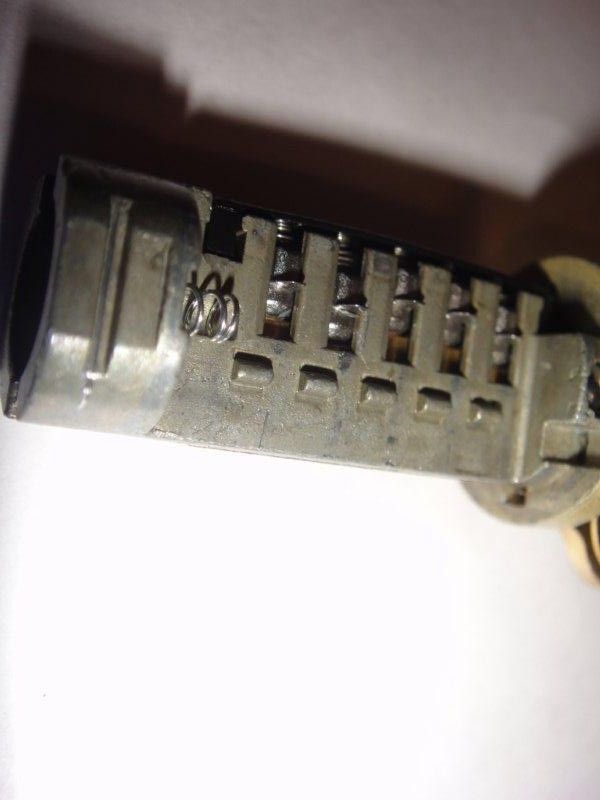
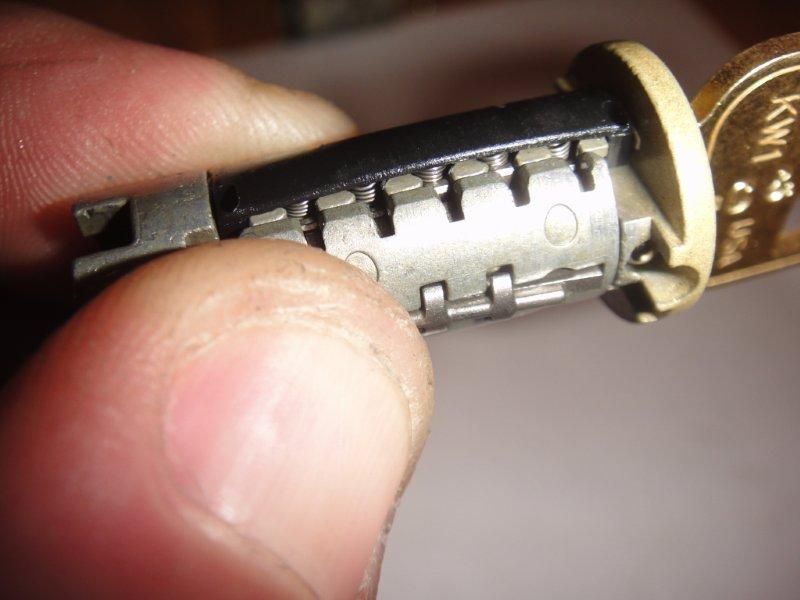
The top of the cylinder, then turned 1/3 and 2/3 of the way around, to show all sides. Here you can see a strong resemblence to a car lock with a sidewinder key. Still, it is quite different from the car door lock once you get inside.
Image

Image

Image

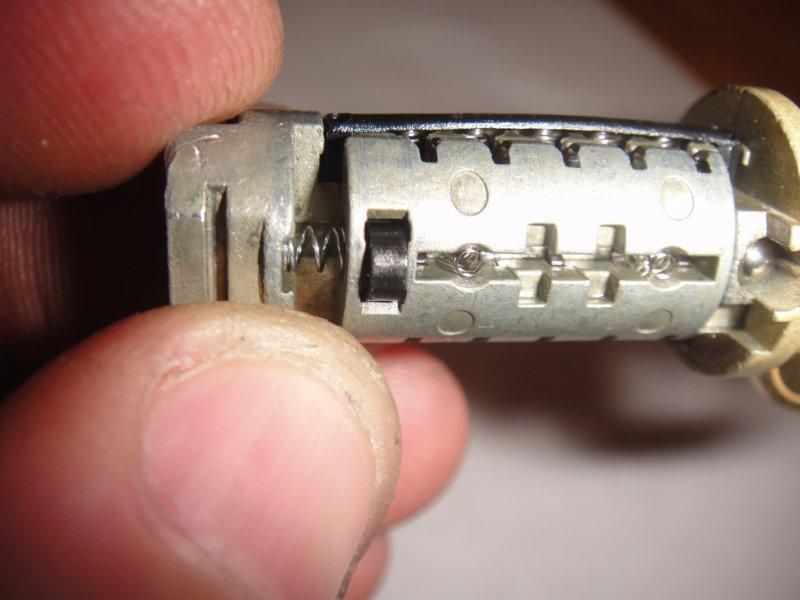
Pry the plug retaining clip upwards to free the plug parts. Behind the clip is a spacer/washer, too. (Yes, the plug has two main parts. More on that later.)
Image

Press your thumb into the hole with the sidebar. It can help you to align the wafers, making removal of the cylinder easier.
Image

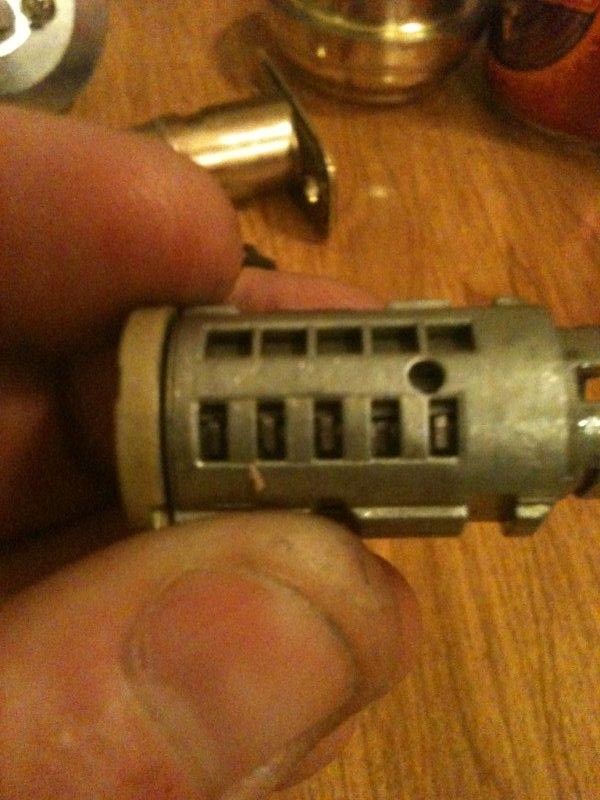
Sometimes, but only sometimes, it helps to put a key into the lock. Like some other wafer locks, the wafers must be at the correct height for the plug to be removed. Push up or down on the wafers from above or below as needed (there are holes on both ends of the wafers) to remove the plug.
Image

You will find that as you remove the plug, there is a bearing that falls out the other side, and a spring that usually does not. When reassembling, push the bearing back onto that spring as you insert the plug.
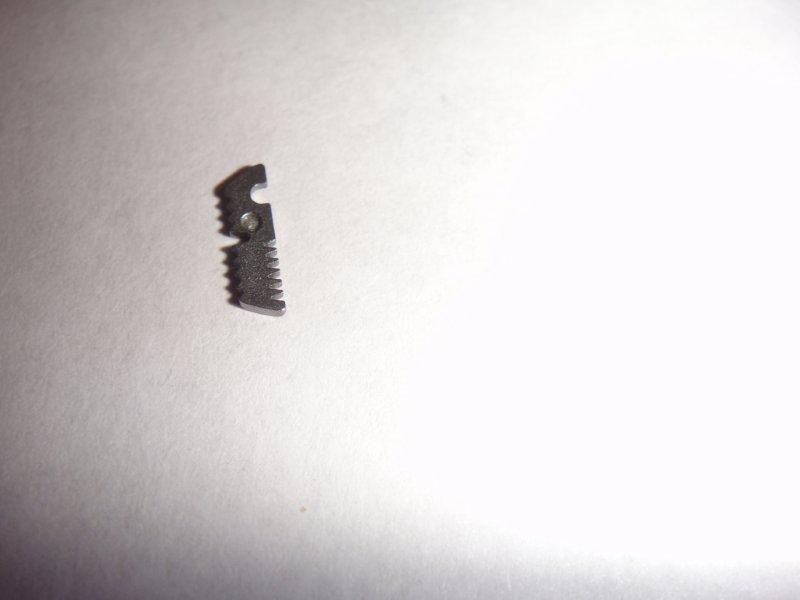
Image

And the sidebar...
Image

Here I am holding the part of the plug that gets removed for disassembly. This is also the part of the plug that gets moved by the rekeying tool to disengage the wafer carriers (that look like key pins if you are looking into the keyway) from the wafers in order to rekey the lock without disassembly. Notice the spring on the left side.
Image

And here I am pulling that part towards the rear of the lock. Notice that the spring on the left is now compressed. This part can now be lifted off the main body of the plug.
Image

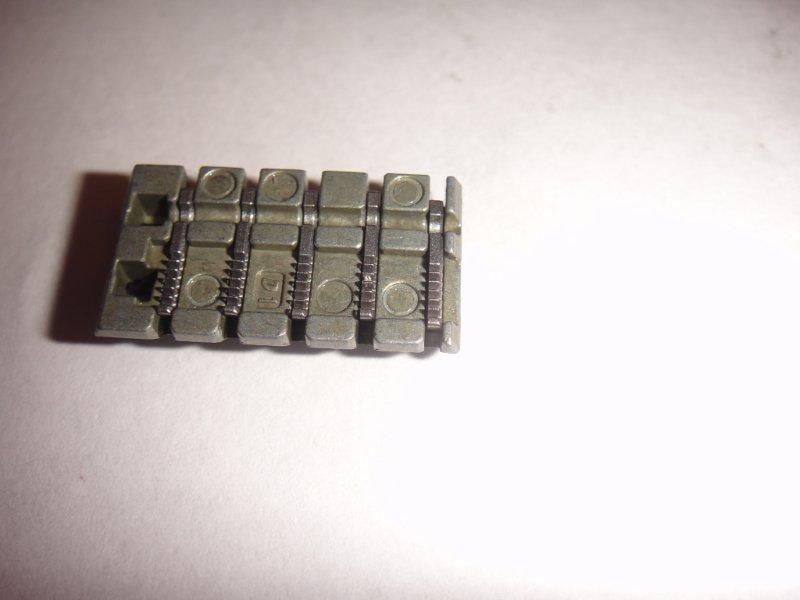
And the two main parts of the plug. The part I removed has been flipped over as I put it below. The teeth on the wafers at the bottom of the removed part are normally upwards, engaging the wafer carriers.
Image

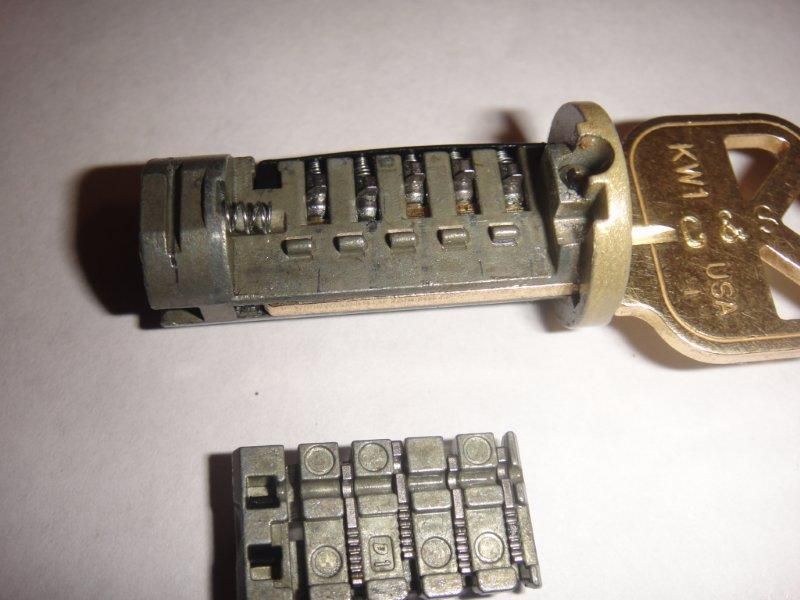
Here is the removed part of the plug. I have moved the wafers so that the openings in them line up. This also lines up the gaps for the sidebar on the reverse side of the wafers. When put back onto the main part of the plug, you want these lined up so the sidebar fits in the outer edge of the plug, or it won't fit back into the cylinder.
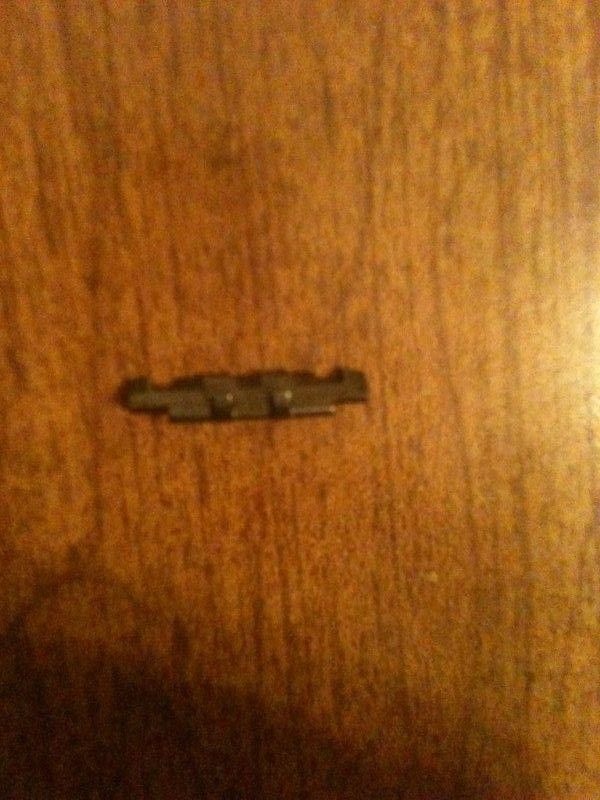
Image

And a wafer...
Image

Without a key, the wafer carriers all line up at the full-down position.
Image

With a key partly inserted, you can see a wafer carrier at full up position.
Image

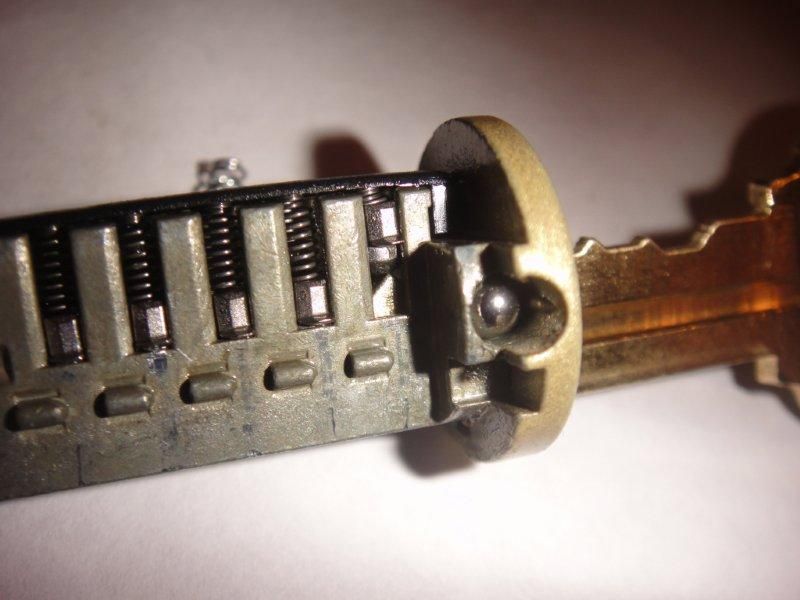
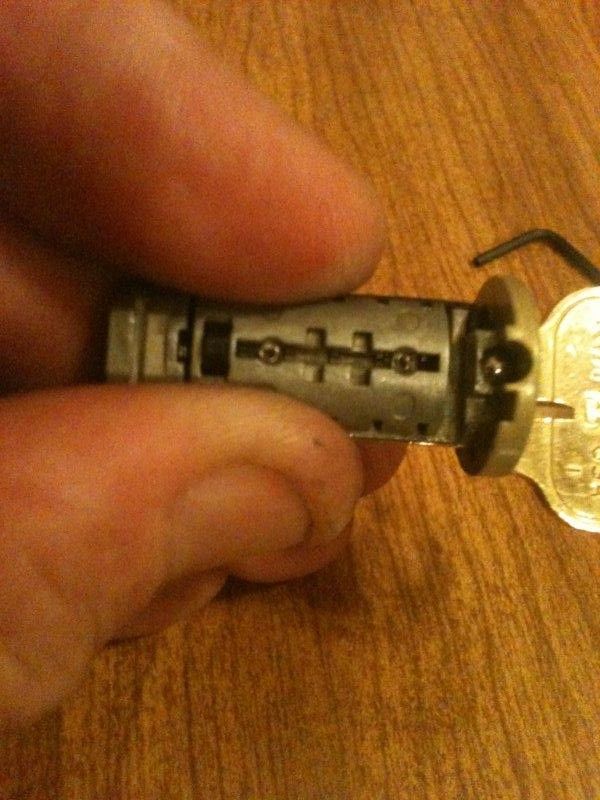
I am inserting the key fully for reassembly, so the lock will be keyed to the key used. This is optional, but I recommend it strongly. This angle also shows the arm on the wafer carriers very clearly.
Image

Put the plug parts back together.
Image

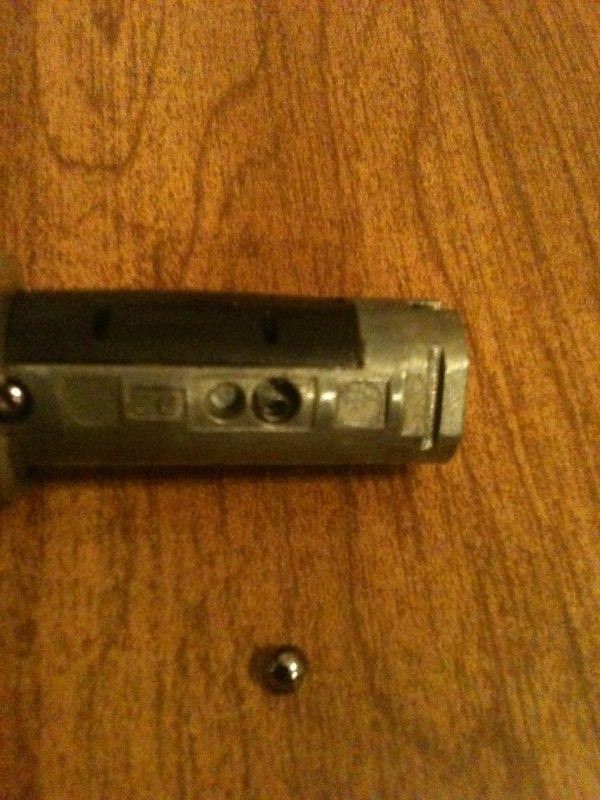
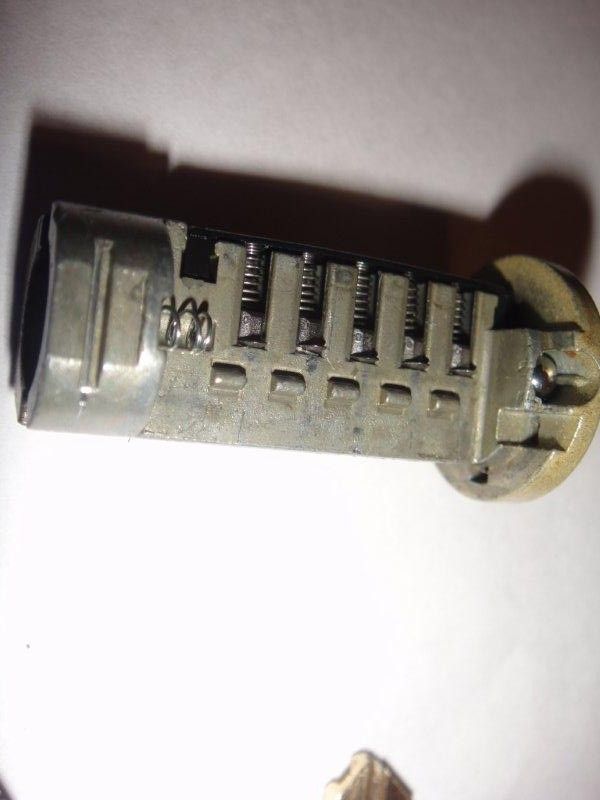
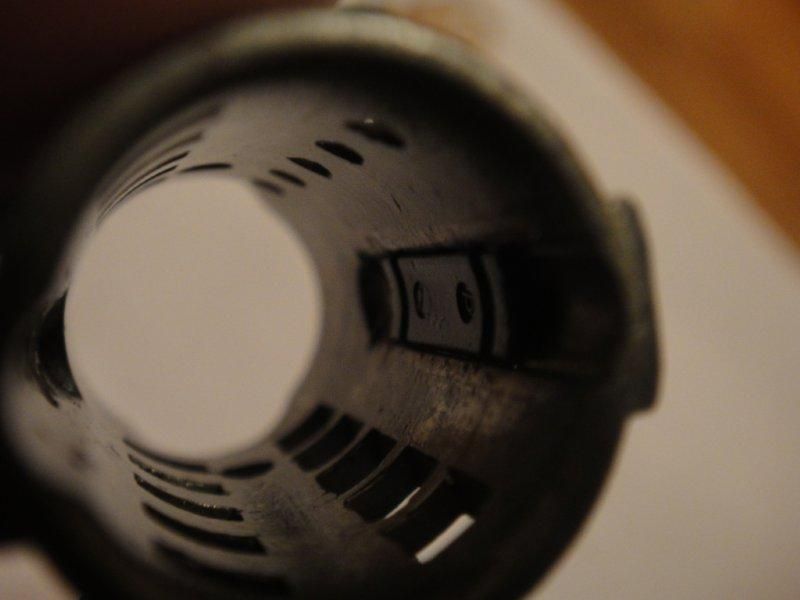
Inside the cylinder. On the left is the long groove for the sidebar. At the far end of the right side you can see where that ball bearing will fit. I think the bearing is to provide a positive stop for key removal, but am not sure. It is not strong, but there.
Image

Put that bearing back onto the spring on the side of the plug opposite the sidebar.
Image

Put in the sidebar and press it down. This also makes sure that everything is lined up properly. If it is not, slide the removable portion of the plug to the rear, disengaging the wafer carriers from the wafers, and press the sidebar down. This should do the trick if you had the wafers lined up correctly before reassembly. Allow the plug part to return forward and continue reassembly.
Image

Plug is reinstalled into the shell. Put the clips back in, and you are set!
Image

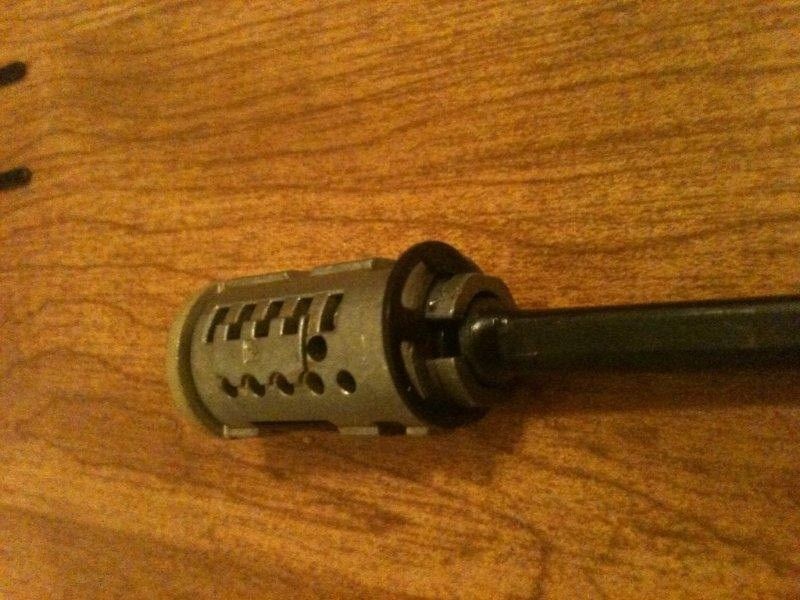
If you need to rekey the lock later, put in the key and turn it 90 degrees clockwise. Use this tool:
Image

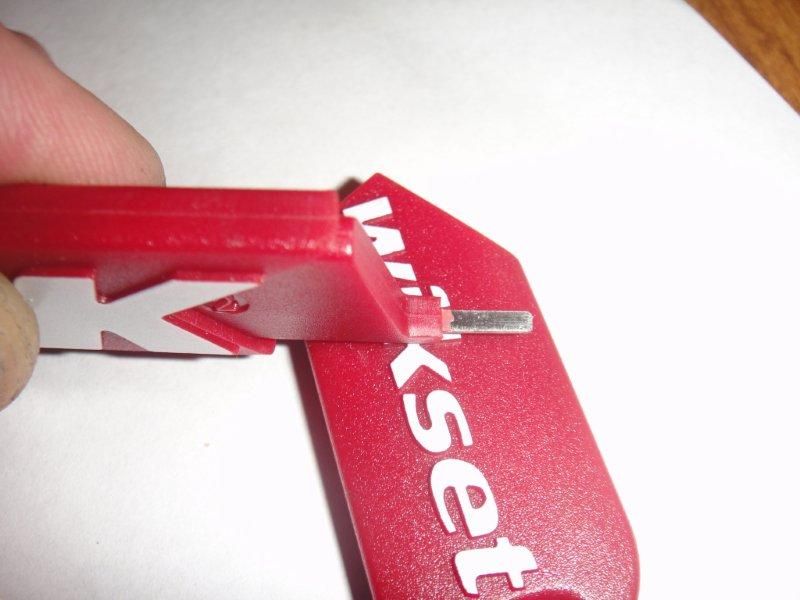
To push into the rectangular hole in the front of the hole on the left side of the keyway with the original key still in place. Internally, it moves that plug part back.
Image

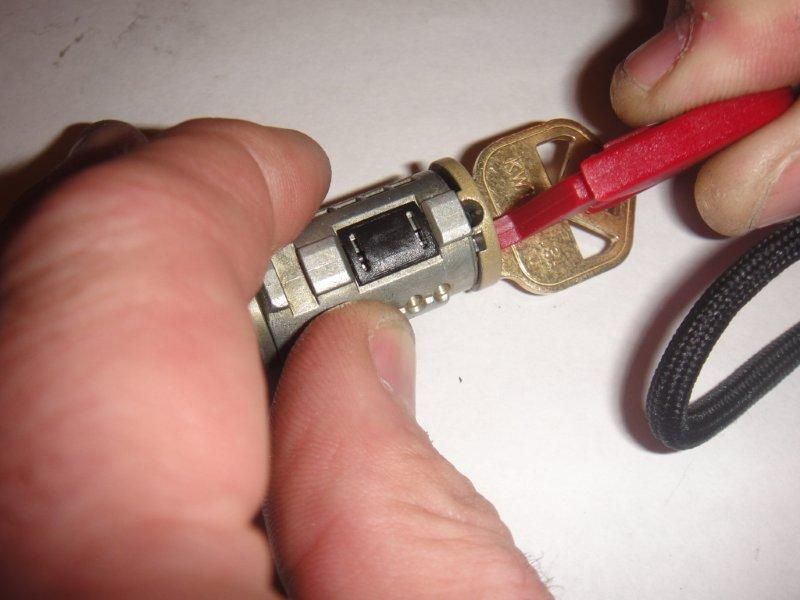
Remove the tool, then remove the original key (original key meaning what the lock is keyed to) by pulling it straight out. DO NOT turn the key back upright to do this... leave it at 90 degrees right. Fully insert the new key (still at 90 degrees right). Turn the key back up and continue to 90 degrees counter clockwise. Now turn the key back upright, and the key is rekeyed without all this full disassembly.

As you can see, there is no need to buy that $90 Kwikset SmartKey Reset Cradle, as long as you can take this apart and put it back together.

Sorry for the long post. Hope you feel it was worth it, even if it is for a Kwikset. :D As you can see, even if the lock is not secure, it is pretty cool from an engineering standpoint.

Gordon
Just when you finally think you have learned it all, that is when you learn that you don't know anything yet.
User avatar
GWiens2001
Site Admin
 
Posts: 7550
Joined: 3 Sep 2012 16:24
Location: Arizona, United States

Re: Kwikset Smartkey Disassembly

Postby ARF-GEF » 21 May 2014 2:17

Great writeup!
I agree it's a very interesting lock mechanically speaking. Also it's great to see it taken apart, it's not a lock you easily understand from a precursory glance :)
A pity they made it a bit too flimsy to be strong enough. But the idea is quite clever :)
I hope they continue working on it, and I think if they make an effort they could make a nice lock out of it by version2.
To infinity... and beyond!
ARF-GEF
 
Posts: 1154
Joined: 26 Oct 2012 11:14
Location: faraway and mythical land of eastern europe:)

Re: Kwikset Smartkey Disassembly

Postby GWiens2001 » 21 May 2014 6:25

Version 2.0 has been out a while now. Think you have one. The original had a lot of plastic components inside the core. They upgraded to pot metal, which is better than plastic.

Gordon
Just when you finally think you have learned it all, that is when you learn that you don't know anything yet.
User avatar
GWiens2001
Site Admin
 
Posts: 7550
Joined: 3 Sep 2012 16:24
Location: Arizona, United States

Re: Kwikset Smartkey Disassembly

Postby ARF-GEF » 21 May 2014 12:28

In that case I mean version 3 :D
Indeed I have version 2 then, with the pot metal insides. I kinda like the lock, hope they make it better.
To infinity... and beyond!
ARF-GEF
 
Posts: 1154
Joined: 26 Oct 2012 11:14
Location: faraway and mythical land of eastern europe:)

Re: Kwikset Smartkey Disassembly

Postby ARF-GEF » 21 May 2014 12:38

Wow, that was quick :D
It seems version 3 is already out :)
https://ssl.keypicking.com/viewtopic.php?f=12&t=9270
To infinity... and beyond!
ARF-GEF
 
Posts: 1154
Joined: 26 Oct 2012 11:14
Location: faraway and mythical land of eastern europe:)

Re: Kwikset Smartkey Disassembly

Postby billdeserthills » 27 May 2014 21:57

The Kwikset Smart Key reset cradle tool actually costs about $20 at The Home Depot
its around here:
http://www.homedepot.com/p/Kwikset-Smar ... ool-83260-
billdeserthills
 
Posts: 3827
Joined: 19 Mar 2014 21:11
Location: Arizona

Re: Kwikset Smartkey Disassembly

Postby billdeserthills » 2 Jun 2014 0:28

Today I had a job to open a smartkey deadbolt commercial version with the master key cylinder above the change key cylinder. Anyhow I had to walk away which pisses me off. I'm getting a bypass tool for those tomorrow.
billdeserthills
 
Posts: 3827
Joined: 19 Mar 2014 21:11
Location: Arizona

Re: Kwikset Smartkey Disassembly

Postby averagejoe » 2 Jun 2014 16:41

billdeserthills wrote:Today I had a job to open a smartkey deadbolt commercial version with the master key cylinder above the change key cylinder. Anyhow I had to walk away which pisses me off. I'm getting a bypass tool for those tomorrow.

Um, do you mean the lockout function one with the rotating faceplate? If a tenant for instance does not pay rent the landlord can turn the faceplate around to the top to have access and lock out the tenant at the same time. No rekeys needed. Not really meant to me a master key kind of thing.
User avatar
averagejoe
 
Posts: 488
Joined: 17 Jul 2011 6:12
Location: Canada

Re: Kwikset Smartkey Disassembly

Postby billdeserthills » 3 Jun 2014 0:48

averagejoe wrote:
billdeserthills wrote:Today I had a job to open a smartkey deadbolt commercial version with the master key cylinder above the change key cylinder. Anyhow I had to walk away which pisses me off. I'm getting a bypass tool for those tomorrow.

Um, do you mean the lockout function one with the rotating faceplate? If a tenant for instance does not pay rent the landlord can turn the faceplate around to the top to have access and lock out the tenant at the same time. No rekeys needed. Not really meant to me a master key kind of thing.


Yes, & if what you say is true then The Locksmith Ledger is Lying to me & every other locksmith subscriber. So how many have You actually worked on?

On top of that the company that made a bypass tool in the US has apparently withdrawn the sale of the tool, likely since kwikset's latest revision of their smart key lock.
billdeserthills
 
Posts: 3827
Joined: 19 Mar 2014 21:11
Location: Arizona


Return to Locks

Who is online

Users browsing this forum: No registered users and 5 guests