Lock Picking 101 Forum
A community dedicated to the fun and ethical hobby of lock picking.
       

Lock Picking 101 Home
Login
Profile
Members
Forum Rules
Frequent Forum Questions
SEARCH
View New Posts
View Active Topics


Live Chat on Discord
LP101 Forum Chat
Keypicking Forum Chat
Reddit r/lockpicking Chat


Learn How to Pick Locks
FAQs & General Questions
Got Beginner Questions?
Pick-Fu [Intermediate Level]


Ask a Locksmith
This Old Lock
This Old Safe
What Lock Should I Buy?


Hardware
Locks
Lock Patents
Lock Picks
Lock Bumping
Lock Impressioning
Lock Pick Guns, Snappers
European Locks & Picks
The Machine Shop
The Open Source Lock
Handcuffs


Member Spotlight
Member Introductions
Member Lock Collections
Member Social Media


Off Topic
General Chatter
Other Puzzles


Locksmith Business Info
Training & Licensing
Running a Business
Keyways & Key Blanks
Key Machines
Master Keyed Systems
Closers and Crash Bars
Life Safety Compliance
Electronic Locks & Access
Locksmith Supplies
Locksmith Lounge


Buy Sell Trade
Buy - Sell - Trade
It came from Ebay!


Advanced Topics
Membership Information
Special Access Required:
High Security Locks
Vending Locks
Advanced Lock Pick Tools
Bypass Techniques
Safes & Safe Locks
Automotive Entry & Tools
Advanced Buy/Sell/Trade


Locksport Groups
Locksport Local
Chapter President's Office
Locksport Board Room
 

My newest picks

When it comes down to it there is nothing better than manual tools for your Lock pick Set, whether they be retail, homebrew, macgyver style. DIY'ers look here.

Re: My newest picks

Postby atticRR » 14 Sep 2012 23:29

ok, i forgot the youtube search. for those who need to know: http://www.youtube.com/watch?v=lgEIVUVLrnQ

this made it completely clear to me what a cleco is, pretty cool.
I punched punctuation right in the face!
atticRR
 
Posts: 312
Joined: 8 Jun 2012 22:56
Location: mother lode/Jackson, CA

Re: My newest picks

Postby MBI » 15 Sep 2012 9:03

That's some good looking stuff Josh. I love the flowing lines on your picks.
MBI
Moderator Emeritus
 
Posts: 1346
Joined: 9 Oct 2007 2:29
Location: Utah, USA

Re: My newest picks

Postby Josh66 » 15 Sep 2012 9:35

I have a few 'step-by-step' pictures on my phone. It's missing the last few steps, but it should be a pretty good start. I'll write something up pretty soon.

I'll take a picture of the rivets too. They are MS20426E3-7 rivets though - the 3 is the diameter (3/32) and the 7 is the length (7/16), the E is the material, which I believe is 7075-T6. -7's are a good length if you're using 1/8" slabs on each side. Different thicknesses would require different length rivets, obviously. If you think you'll need a few different sizes, you could get them long (like a -10 or something) and cut them down as needed. The length is always measured in 16ths. Sometimes you can get half-sizes, -5.5, for example - which would be 5.5/16, or 11/32. You won't need to be that critical for this though, lol.
Josh66
 
Posts: 205
Joined: 15 Jan 2012 20:31
Location: Columbus, Ohio

Re: My newest picks

Postby Josh66 » 15 Sep 2012 11:18

OK, here goes...

First, as promised - the rivets:
Image

These pictures are from the making of these picks:
Image

First, make the picks how you normally would. You don't have to get a super fine finish on them at this point.
Image

Drill some holes in them:
Image
I drilled 4 equally spaced #40 holes.

For the next couple steps, you will need some clecos. You could use clamps, but clecos are better since they actually go inside the hole - they will make sure the holes stay lined up.
Cleco pliers: http://browntool.com/Default.aspx?tabid ... uctID=1902
#40 (3/32) standard length clecos: http://browntool.com/Default.aspx?tabid ... uctID=1881
#30 (1/8) standard length clecos (they show a #40 cleco in the picture, don't worry about that): http://browntool.com/Default.aspx?tabid ... uctID=1882
#30 (1/8) 1/2" grip cleco: http://browntool.com/Default.aspx?tabid ... uctID=1894
I have a bunch of 1/2" grip #40 clecos too, but it doesn't look like the sell them there. The 1/2 grip ones come in handy when you're working with thicker metal. The standard ones will be fine for about 5/16" and under thicknesses.

Clecos are color coded for their diameter:
3/32-Silver, 1/8-Copper, 5/32-Black, 3/16-Gold, (then the colors start over) 7/32-Silver, 1/4-Copper, 5/16-Black, larger than that and they're pretty much always black.

Drill the holes into your aluminum, then trace the outline of the pick:
Image
Repeat for the other side.

Cut that out on the band saw.

After you have the rough cut done, cleco it together:
Image

OK, I got on a roll or something after that and forgot to take pictures of the next few steps. Next time I make a pick, I'll get some pictures of these steps, because they are probably the most important ones.

You'll need some sort of grinder now. What I do is grind the aluminum down to the pick, but only at the end where the pick shaft sticks out. Grind it down till you get to the pick material, then take it apart, cleco it back together without the pick in there. Now sand the end down and round it off - you don't have to get it super smooth, you're just making it so that both sides are even where the pick protrudes.

Now, I countersink the holes on both halves of the handle. Countersink the 'outside', and deburr any holes that aren't countersunk. Actually, it's easier if you countersink it before you cut them out on the band saw.

My deburr:
Image

My countersink (microstop):
Image

Image

You can use a bedurr to countersink too, it's just not as precise. With the microstop, you can adjust the depth of the countersink in .001" increments.

Now, I shoot everything together. A hammer and some sort of steel block/anvil will work fine for this. The rivets don't have to be pretty - just make sure that the bucktail (the end you will be hitting with the hammer) fills the countersink. When you countersink the aluminum, make them so that the head will be a little high, not perfectly flush. That is just to make sure that the head markings (to identify the material it's made from) are completely removed when the whole thing is sanded down.

Now you're basically just going to do a ton of sanding - it'll get hot, so you'll want something to quench it in nearby. I sand the edges down first, till you get to the pick material all the way around. Once you have the edges even with the pick, start rounding all the corners off and shaping everything.

Just keep rounding everything off, after a while you'll get to a point that you can switch to sandpaper by hand. After a while, you will have this:
Image

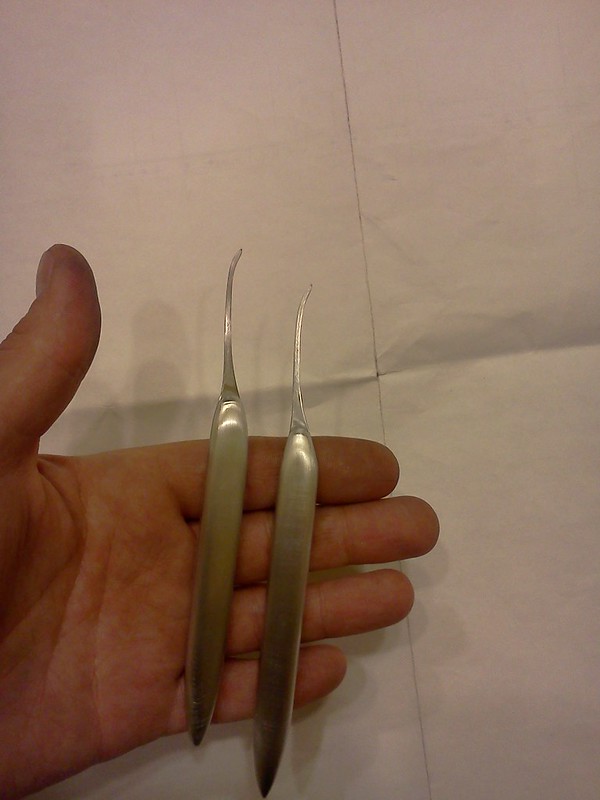
Here, they are pretty much ready for polishing. For the polishing, I start out with a Dremel and a buffing pad with some polishing compound on it. I do that till all the scratches and stuff like that are gone. Once I'm happy with that, I polish by hand. I prefer Flitz polish.

I'll try to remember to get the missing pictures next time I make a pick.
Josh66
 
Posts: 205
Joined: 15 Jan 2012 20:31
Location: Columbus, Ohio

Re: My newest picks

Postby Josh66 » 15 Sep 2012 16:42

Just thought I would add some tips for drilling them...

I drill holes all day long, so sometimes I forget that everybody doesn't just know this stuff.

When you're drilling steel, you want to use a low RPM and a lot of pressure. "High feed, low speed" is what we usually say, lol. Even then, it only takes one hole to ruin a drill bit sometimes. Be prepared to go through a few of them... There is a modification you can do to the cutting surfaces of the bit to make it better suited for hard steels, but that will be hard for me to explain without pictures - and I don't have the pictures I would need right now. A simple before and after picture should explain it pretty good - I'll do that on Monday...

Also, don't forget that steel work hardens with heat. When you drill it, it gets hot. If you stop and let it cool, it will be harder to drill when you go at it again.

When you're drilling the aluminum handles, it is very important that the holes are straight (perpendicular to the surface of the metal). If they are not, when you assemble everything, the rivets will not want to go into the holes.

Use a drill press or bushings.

There is a "trick" that I frequently use to drill straight holes without bushings all the time. It only works on bare, fairly shiny metal though. What you do is, look at the drill bit, and it's reflection on the metal. When the two make a perfectly straight line, the hole will be straight. Even a lot of the people I work with don't know that trick...

When you go to drill the picks, it will help to center punch the holes before you drill them. That will stop the drill bit from 'walking'.


If you have any questions, just ask. :D
Josh66
 
Posts: 205
Joined: 15 Jan 2012 20:31
Location: Columbus, Ohio

Re: My newest picks

Postby Josh66 » 15 Sep 2012 16:51

(I wish we could edit our posts here, lol)

One more thing. If you don't have clecos, or don't want to buy them - some type of small screw/nut would work too. Just make sure it is a good fit in the hole.

I don't blame you if you don't want to buy clecos, lol - I have thousands of them and have never bought one. Everywhere I've ever worked supplied them for us.
Josh66
 
Posts: 205
Joined: 15 Jan 2012 20:31
Location: Columbus, Ohio

Re: My newest picks

Postby atticRR » 15 Sep 2012 17:04

That's really something Josh. This is first on my list of picks to make one I have my new garage set up. I'll be using nuts and bolts rather than clecos but I'm sure it'll turn out fine. Everyone who sees these has to think they're awesome, thanks for posting the how- to!
I punched punctuation right in the face!
atticRR
 
Posts: 312
Joined: 8 Jun 2012 22:56
Location: mother lode/Jackson, CA

Re: My newest picks

Postby atticRR » 15 Sep 2012 17:06

Oh, and I vote for the sticky-icky.
I punched punctuation right in the face!
atticRR
 
Posts: 312
Joined: 8 Jun 2012 22:56
Location: mother lode/Jackson, CA

Re: My newest picks

Postby Josh66 » 15 Sep 2012 17:14

Nuts and bolts will be fine - just make sure they're the right size. You want them to be as close to the hole size as possible, so it can't shift around.
Josh66
 
Posts: 205
Joined: 15 Jan 2012 20:31
Location: Columbus, Ohio

Re: My newest picks

Postby Josh66 » 15 Sep 2012 17:54

atticRR wrote:Oh, and I vote for the sticky-icky.

Thanks. If this is sticky worthy, I would rather wait till I get the missing pictures and make a thread specifically meant to be a how-to (this one started out as 'hey, look at these picks I made', then evolved into a how-to). That way everything could be right in the first post, questions and answers after that.

I just think it would be cleaner that way. ;)


Missing Pictures:
Sanding the handles down to the pick shaft prior to riveting
Rounding off the ends right after that
Countersinking
Riveting it all together
Starting to shape them


Anything else missing?
Trying to get an idea of what I need to shoot next time...
Josh66
 
Posts: 205
Joined: 15 Jan 2012 20:31
Location: Columbus, Ohio

Re: My newest picks

Postby raimundo » 16 Sep 2012 8:07

YEah! they look like they would work well to...

but they would get scratched if you did use them...... :roll:
Wake up and smell the Kafka!!!
raimundo
 
Posts: 7130
Joined: 21 Apr 2004 9:02
Location: Minnneapolis

Re: My newest picks

Postby femurat » 17 Sep 2012 3:17

Great picks. Thanks for the how-to. Can't wait for the missing pictures.
And thanks for the great metal drilling tips: I'll never let the steel cold down again.

Cheers :)
User avatar
femurat
Site Admin
 
Posts: 3745
Joined: 22 Sep 2008 9:06
Location: Italy

Re: My newest picks

Postby Josh66 » 17 Sep 2012 17:43

If you're going to be drilling a few holes, some type of lubricant is best. Your hardware store should have some type of lube for drilling - usually they are fairly thick and melt when it starts to get hot. Even oil would be better than nothing, just messier.
Josh66
 
Posts: 205
Joined: 15 Jan 2012 20:31
Location: Columbus, Ohio

Re: My newest picks

Postby johnw » 19 Sep 2012 16:11

Very nice work, I'm impressed at how your different revisions just keep looking better and better. Keep pushing yourself :)
johnw
 
Posts: 23
Joined: 19 Oct 2010 2:13
Location: Down Under

Re: My newest picks

Postby Josh66 » 18 Oct 2012 10:37

I think I finally got all of the missing pictures. I'll try to have something written up by the weekend.
Josh66
 
Posts: 205
Joined: 15 Jan 2012 20:31
Location: Columbus, Ohio

PreviousNext

Return to Lock Picks

Who is online

Users browsing this forum: No registered users and 2 guests